In today's digital age, staying connected with friends, family, and colleagues has never been easier. One of the most popular platforms for communication is Skype. This powerful tool allows users to make voice and video calls, send messages, and even share screens, making it ideal for both personal and professional communication. If you're wondering why you should consider using Skype, let's dive into some of its key benefits!
- Free calls and messaging: Skype allows users to call and message anyone around the world for free, provided both parties have the app installed. This makes it a cost-effective choice for long-distance communication.
- High-quality video calls: With a stable internet connection, Skype provides excellent video quality, making you feel like you're in the same room with others, no matter the distance.
- Group video calls: You can connect with multiple people simultaneously through group video calls, perfect for family meetings, virtual gatherings, or team brainstorming sessions.
- Screen sharing: Whether you want to show a presentation during a meeting or share fun pictures with friends, the screen sharing feature enhances collaboration and interaction.
- Cross-platform compatibility: Skype is available on various platforms, including smartphones, tablets, and computers, allowing users to connect from anywhere.
- Security features: Skype employs end-to-end encryption, encouraging users to communicate with peace of mind, knowing that their conversations are secure.
Now that you know some of the fantastic advantages of using Skype, you may be eager to jump in and set up your account. In the next section, let’s outline what you’ll need to create a Skype account.
Requirements for Creating a Skype Account

Before you start the process of creating your Skype account, it's essential to ensure that you have everything needed to make the setup as smooth as possible. Here are the key requirements:
- An internet connection: Since Skype operates online, a reliable internet connection is crucial. Whether you're using Wi-Fi or a mobile data plan, ensure it’s stable.
- A device: You can create and use a Skype account on various devices, including:
- Smartphones (iOS and Android)
- Tablets
- Laptops
- Desktops
- An email address or phone number: You'll need a valid email address or phone number to register for your account. Skype will use this information to send you account verification details.
- Skype application: Download the Skype application on your device. You can find it in your device’s app store or on the official Skype website for desktops. Make sure to install the latest version for optimal performance.
- Basic personal information: Be prepared to provide some basic information like your name and date of birth when creating your account. This information helps personalize your experience on the platform.
With these requirements in hand, you'll be ready to create your Skype account in just a few steps. In the upcoming sections, we’ll guide you through the actual process, step by step, alongside a video tutorial for a seamless experience.
Also Read This: How to Use Always Ultra Pads Complete Guide for Women on Dailymotion
3. Step 1: Downloading the Skype App
Alright! Let's get started with the first step in creating your Skype account: downloading the app. It's a straightforward process, and you'll be chatting with friends and family in no time!
Here’s how to download the Skype app:
- For Windows:
- Go to the Skype download page.
- Click on the green “Get Skype for Windows” button.
- Your browser will start downloading the Skype installation file. Depending on your browser settings, you may need to check your downloads folder for the file once it's complete.
- For Mac:
- Visit the Skype download page.
- Click on the “Get Skype for Mac” button.
- The app will download automatically. Once it’s finished, go to your Downloads folder to locate the installation file.
- For Mobile (iOS and Android):
- Open the App Store (for iOS) or Google Play Store (for Android).
- In the search bar, type “Skype”.
- Locate the official Skype app and tap “Download” or “Install”.
Once you have downloaded the app, you're one step closer to making your first call! Make sure to check your device requirements to ensure compatibility, especially if you’re using older hardware.
Now, after downloading, let’s move on to the next step – installing the Skype app. Ready?
Also Read This: What to Block on Script to Block Dailymotion Ads? A Guide to Ad-Free Browsing
4. Step 2: Installing the Skype App
Fantastic! You've downloaded the Skype app. Now, it's time to install it on your device. Don’t worry; this is generally quick and easy!
Here’s how to install Skype based on the platform you’re using:
- For Windows:
- Locate the downloaded .exe file in your downloads folder (it typically has a name like SkypeSetup.exe).
- Double-click the file to begin the installation.
- Follow the on-screen instructions. You’ll usually be asked to approve the installation and select a destination folder. Just click “Next” until the installation completes.
- Once installed, Skype will open automatically. If not, you can find it by searching in the Start menu!
- For Mac:
- Find the downloaded .dmg file (it should appear in your Downloads folder).
- Double-click the .dmg file to open it.
- Drag the Skype icon into your Applications folder. This installs the app.
- Go to your Applications folder and double-click on Skype to launch it.
- For Mobile:
- Once the app has downloaded from the App Store or Google Play Store, it will usually install automatically.
- If not, just tap on the app icon from the home screen to launch it.
And voila! You’ve just installed Skype on your device. The next step will be to create your Skype account, but you’re already off to a great start! If you run into any issues during installation, don't hesitate to check the support section on the Skype website or look for troubleshooting videos online.
In the next sections, we’ll guide you through setting up your account and getting familiar with all those amazing features Skype has to offer. Exciting stuff ahead!
Also Read This: A Step-by-Step Guide on How to Use Dailymotion Video Downloader Online
5. Step 3: Starting the Account Creation Process

Alright, you’re making great progress! Now that you have the Skype app installed, it's time to actually start creating your account. This part is super straightforward and won’t take more than a few minutes. Let’s dive in!
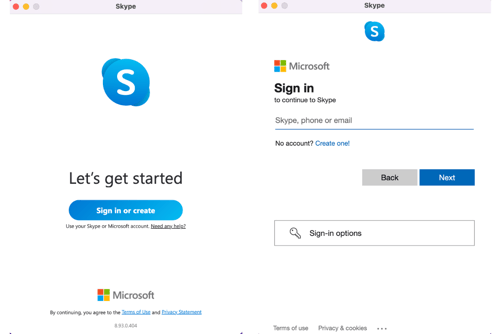
First things first, launch the Skype application on your device. Look for the Skype icon, which usually resembles a blue circle with a white “S” in the center. Once you find it, go ahead and give it a double-click (or tap, if you’re on mobile) to open the app.
Once Skype is open, you’ll see a welcome screen. You’ll notice a button that says “Sign in or create account”. Click on that! It looks like they're eager to get you started.
After that, you will be prompted with a choice to either log in with an existing account or create a new account. Since we’re on this journey to create a new account, go ahead and select the “Create account” option. This is your gateway to connecting with friends, family, or colleagues from anywhere in the world!
Next, depending on the device you’re using, Skype may give you a few friendly prompts guiding you through the setup process. If you’re on a mobile device, it may ask you for permission to access your contacts or device features. Make sure you allow the necessary permissions for a seamless experience.
If at any point you get lost, don’t worry! Most of the screens will have some helpful instructions or icons guiding you on what to do next.
Now that you’ve initiated the account creation process, you’re just a few clicks away from setting up your new Skype account. Ready to move on to the next step? I thought so!
Also Read This: Making an Origami Basket with a Handle Step-by-Step Dailymotion Guide
6. Step 4: Filling Out Your Personal Information
Here we are at the final leg of the account creation journey! This step involves filling out your personal information, and I promise it’s pretty simple. You might even find it a bit fun!
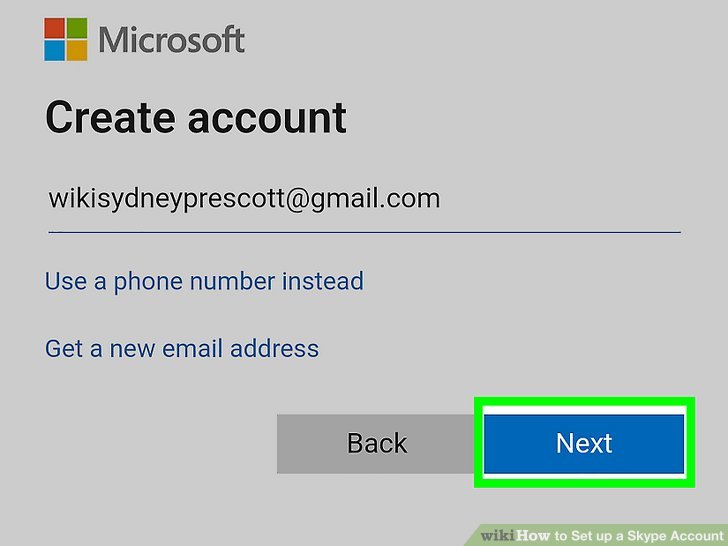
Once you've clicked on the “Create account” option, Skype will ask you to provide some basic information. Here’s what you’ll typically need to fill out:
- Email Address: This will serve as your primary identifier on Skype. Make sure it's one you check regularly, as important notifications will go here.
- Password: Create a strong password that you'll remember. It’s best to combine uppercase, lowercase, numbers, and even symbols for enhanced security!
- First Name: Your first name helps people recognize you when they see your profile. Simple, right?
- Last Name: Filling out your last name gives a complete picture to your contacts.
After you’ve filled out these details, you might have to confirm you’re not a robot. This usually involves solving a quick CAPTCHA puzzle or checking a box saying “I’m not a robot.” Just follow the prompts on the screen.
Finally, once you've completed all the necessary fields, go ahead and click the “Continue” button. You might see a screen that lets you personalize your account even more by adding a profile picture or syncing your contacts. Feel free to do this now or skip it for later; the choice is yours!
Congratulations! Following these steps means you’re super close to enjoying Skype. Now, let’s wrap up this part and move on to connecting with people. You're almost there!
Also Read This: What Is the Required Info for External Analytics in Dailymotion
7. Step 5: Verifying Your Email or Phone Number
Now that you've entered all your details, it's time to verify your email address or phone number. This step is crucial as it helps keep your account secure and ensures you can recover it if needed.
Here’s how to do it:
- *Check Your Email or SMS: After you submit your information, Skype will send you a verification email or SMS to the contact information you provided. If you chose email, look for a message from Skype in your inbox. If you opted for a phone number, check your texts for a verification code.
- Open the Message: Click on the link in your email or note down the code from your text. This will confirm that you have access to the email or phone number linked to your Skype account.
- Enter the Verification Code: Go back to the Skype setup page. You’ll see a prompt asking for the code. Simply type in the verification code (if applicable) or follow the link.
- Complete Verification: Once you enter the code or click the link, Skype will confirm that your account is indeed verified. This is an important step, as it will give you access to all the features of Skype, including messaging, calling, and more!
If you didn't receive the verification email or text, don’t worry! There should be an option to resend the verification link or code. Make sure to check your spam or junk email folder, too. Sometimes, those messages can end up there!
After successfully verifying your email or phone number, you’ll receive a confirmation and you can move on to the next exciting step: setting up your profile!
Also Read This: How Does Dailymotion Obtain the Rights to TV Shows? The Licensing Process
8. Step 6: Setting Up Your Profile and Preferences
Great job on verifying your email or phone number! Now it's time for the fun part – setting up your profile and preferences. This step allows you to put your personal touch on your Skype account!
Here’s how to do it:
- Choose a Profile Picture: Your profile picture is your representation on Skype, so choose one that reflects your personality. You can upload a photo from your computer or take a new one using your webcam. Just click on the camera icon, select your photo, and you’re good to go!
- Set a Display Name: Your display name is what people will see when they contact you. It can be your real name or a nickname – just make sure it’s something you’re comfortable with people seeing.
- Adjust Your Availability Status: Skype allows you to show whether you're online, busy, or offline. You can set your status to "Available," "Away," "Do Not Disturb," or "Invisible." Think about how you want to interact with others when you’re online.
- Add a Short Bio: If you want, you can add a few lines about yourself in your bio. This could include your interests, hobbies, or anything else you'd like to share with your contacts.
- Privacy Settings*: Finally, take a moment to review your privacy settings. Decide who can contact you or see your profile. You can customize these settings to ensure your Skype experience is just how you like it!
Once you’ve set all these preferences, take a moment to review everything. Happy with your choices? Fantastic! Click "Save" or "Done" to finalize your profile. Your Skype account is almost ready to go!
With your profile set up, you're well on your way to connecting with friends, family, and colleagues. It’s time to embrace communication in this digital age!
Also Read This: How to Download Videos from Dailymotion with Subtitles
9. Step 7: Watching the Step-by-Step Video Tutorial
So, you've followed the previous steps to set up your Skype account, and now it’s time to make sure you're completely comfortable with the platform. One of the best ways to do this is by watching a step-by-step video tutorial. Videos can be incredibly helpful because they provide a visual guide that can make the process a lot clearer.
To find a quality video tutorial, simply head over to popular platforms like YouTube. Just type in "How to create a Skype account" in the search bar, and you'll encounter a range of options. Here are some tips for selecting the right tutorial:
- Check the date: Look for the most recent videos as Skype regularly updates its interface.
- Review the content: Skim through the video's description and comments to ensure it covers all aspects of creating an account.
- Look for clarity: Choose videos with clear audio and visuals, and preferably ones featuring a friendly presenter.
Once you’ve found a great video, hit play and follow along! Here’s a quick checklist to keep in mind while watching:
- Pause the video whenever you need to catch up.
- Take notes on key points, like navigating the settings or using specific features.
- Consider re-watching sections that seem complex—sometimes a second look can clear things up!
By watching a tutorial, you’re not only ensuring that your account is set up correctly but also learning how to utilize Skype’s features to your advantage. Feel free to refer back to the video whenever you encounter a hurdle or want to learn about new features as they roll out. It’s a handy resource to have in your toolkit!
Also Read This: How to Remote Upload Files Easily to Dailymotion
10. Tips for Using Skype Effectively
Now that you have your Skype account all set up, let’s dive into some tips to help you use it effectively. Skype isn’t just about making calls; it's a powerful tool for communication. Here’s how to make the most of it:
- Use the chat feature: The chat function allows you to send text messages, images, and even files to your contacts. It’s perfect for quick conversations or sharing documents.
- Explore video settings: Make sure your video and audio settings are handy. You can adjust them before calls to ensure clear communication, which is essential for professional interactions.
- Group calls: Take advantage of group calls for meetings or catching up with friends and family. Skype allows multiple participants, making it easier to connect with several people at once.
- Check your connection: For the best experience, test your internet connection before important calls. A stable connection can significantly improve video and audio quality.
- Use the screen sharing feature: This is particularly useful for presentations or troubleshooting. By sharing your screen, you can guide others through documents or web pages seamlessly.
- Stay updated: Regularly check for updates to ensure you’re using the latest version of Skype. New features and enhancements can greatly improve your experience!
Incorporating these tips can elevate your experience on Skype, whether you’re using it for work, school, or keeping in touch with loved ones. Remember, like any tool, the more you practice, the more proficient you’ll become!
Conclusion and Next Steps
Congratulations! You have now successfully created your Skype account. This opens up a world of communication opportunities, allowing you to connect with friends, family, and colleagues across the globe. With just a few clicks, you can initiate voice calls, video chats, and even send instant messages!
To make the most of your new Skype account, here are some recommended next steps:
- Set up your profile: Personalize your account by adding a profile picture and a brief bio. This helps others recognize you easily.
- Explore Skype features: Familiarize yourself with the various features such as screen sharing, call recording, and video backgrounds to enhance your communication experience.
- Connect with contacts: Reach out to your friends and family to add them to your contact list. You can search for contacts using their Skype username, email, or phone number.
- Test your audio and video settings: Before making important calls, ensure your microphone and camera settings are properly configured for optimal performance.
- Explore Skype support: If you encounter any issues, the Skype support center is an excellent resource for troubleshooting and tips.
By following these simple steps, you'll be well on your way to mastering Skype and enjoying seamless communication with your loved ones. Remember to check out the video tutorial for a visual guide through the process. Happy Skyping!
 admin
admin


