Have you ever seen a birthday cake that looks like a plane? If you have, you know how spectacular it can be! Plane cakes are not only fun to look at but also allow for a lot of creativity in baking and decorating. Whether it's for a child's birthday, an aviation enthusiast, or just because you want to try something new, creating a plane cake can be a delightful experience.
In this blog post, we'll walk you through the process of making your very own plane cake, step-by-step. From gathering your ingredients to assembling and decorating your masterpiece, you'll be amazed at how satisfying it can be to create something so unique and tasty. So, buckle up, and let’s get started on this delicious flight!
Ingredients Needed for a Plane Cake
Creating a plane cake requires a good set of ingredients. This ensures that not only does your cake look great, but it also tastes delicious! Below is a list of the key ingredients you will need:
- For the Cake:
- 2 cups of all-purpose flour
- 1 ½ cups of sugar
- 1 cup of unsalted butter, softened
- 4 large eggs
- 1 cup of milk
- 2 ½ teaspoons of baking powder
- 1 teaspoon of vanilla extract
- 1/2 teaspoon of salt
- For the Buttercream Frosting:
- 1 cup of unsalted butter, softened
- 4 cups of powdered sugar
- 1/4 cup of milk
- 2 teaspoons of vanilla extract
- Food coloring (for decorating)
- Additional Decorative Items:
- Fondant (for wings and other features)
- Chocolate candies (for wheels)
- Gummy candies (for passengers or other decorative elements)
- Edible glitter (for sparkle)
Feel free to mix and match or adjust the flavors according to your preference. Maybe you want a chocolate cake instead? Simply substitute some cocoa powder for flour! The beauty of baking is its flexibility. Having a good assortment of ingredients will help you customize your plane cake to your liking.
Once you've gathered all your ingredients, you're ready to fly! The next step will be guiding you through the baking process, so stay tuned! Happy baking!
Also Read This: Build a Paper Gun That Shoots: DIY Guide on Dailymotion
3. Essential Tools for Cake Baking and Decoration
Creating a stunning plane cake isn't just about the ingredients; having the right tools is equally important! When it comes to baking and decorating, the appropriate tools can make your job easier and result in a more professional-looking cake. Here’s what you’ll need:
- Cake Pans: Invest in high-quality non-stick cake pans. For a plane cake, you typically need two 8 or 9-inch round pans. If you're making a larger cake, you might consider additional pans.
- Measuring Cups and Spoons: Accurate measurements are crucial in baking. Get both dry and liquid measuring cups to ensure you have everything just right!
- Mixing Bowls: A set of nesting mixing bowls is fantastic for whipping up your batter. Opt for glass or stainless steel, as they’re durable and easy to clean.
- Electric Mixer: While you can mix by hand, an electric mixer saves you time and effort, especially when creaming butter and sugar together.
- Spatula: A good rubber or silicone spatula is essential for scraping down the sides of your mixing bowl and folding in ingredients without losing airiness.
- Offset Spatula: This tool is perfect for spreading frosting smoothly over your cake and helps achieve a professional finish.
- Decorating Tools: Invest in a piping bag and various nozzles for decorating your cake. You can create beautiful designs with just a little practice!
- Turntable: A rotating cake stand can make decorating much easier, allowing you to turn the cake effortlessly as you work.
- Cooling Rack: Once baked, the cake needs to cool completely. A wire cooling rack allows air to circulate around your cake for even cooling.
- Knife or Cake Leveler: Leveling your baked cake is key to a neat final product. A serrated knife or a specifically designed cake leveler makes this much easier.
With these tools at your disposal, you'll be well-equipped to create your cake masterpiece. So gather them up before you dive into the baking process!
Also Read This: Tips to Filter Search Results on Dailymotion for Better Results
4. Step-by-Step Instructions for Baking the Cake
Now that you're all set up with the essential tools, it's time to get baking! Follow these step-by-step instructions to whip up a delicious cake that will serve as the foundation for your stunning plane cake design:
- Preheat Your Oven: Start by preheating your oven to 350°F (175°C). This ensures that your cake bakes evenly.
- Prepare Your Cake Pans: Grease the sides and bottoms of your cake pans with butter or non-stick spray, then line the bottoms with parchment paper for easy removal once baked.
- Make Your Batter:
- In a mixing bowl, cream together 1 cup of softened unsalted butter and 2 cups of granulated sugar until light and fluffy.
- Add in 4 large eggs, one at a time, beating well after each addition.
- Mix in 1 teaspoon of vanilla extract.
- In a separate bowl, combine 2 cups of all-purpose flour, 1 ½ teaspoons of baking powder, and ½ teaspoon of salt.
- Gradually add the dry ingredients to the butter mixture, alternating with 1 cup of milk. Begin and end with the dry ingredients, mixing until just combined.
- Pour the Batter: Divide the batter evenly between your prepared cake pans. Smooth the tops with an offset spatula for an even surface.
- Bake: Place the pans in your preheated oven and bake for about 25-30 minutes, or until a toothpick inserted into the center comes out clean.
- Cool the Cakes: Remove the cakes from the oven and let them cool in the pans for about 10 minutes. Then, transfer them to a wire cooling rack to cool completely.
- Level the Cakes: If needed, use a cake leveler or a serrated knife to trim the tops of your cakes, ensuring they are flat and even.
Once your cakes are cooled and leveled, you’re ready to move on to decoration! Stay tuned for tips on how to assemble and decorate your plane cake in the next sections!
Also Read This: Master the Art of Applying Braces on Teeth with Dailymotion Videos
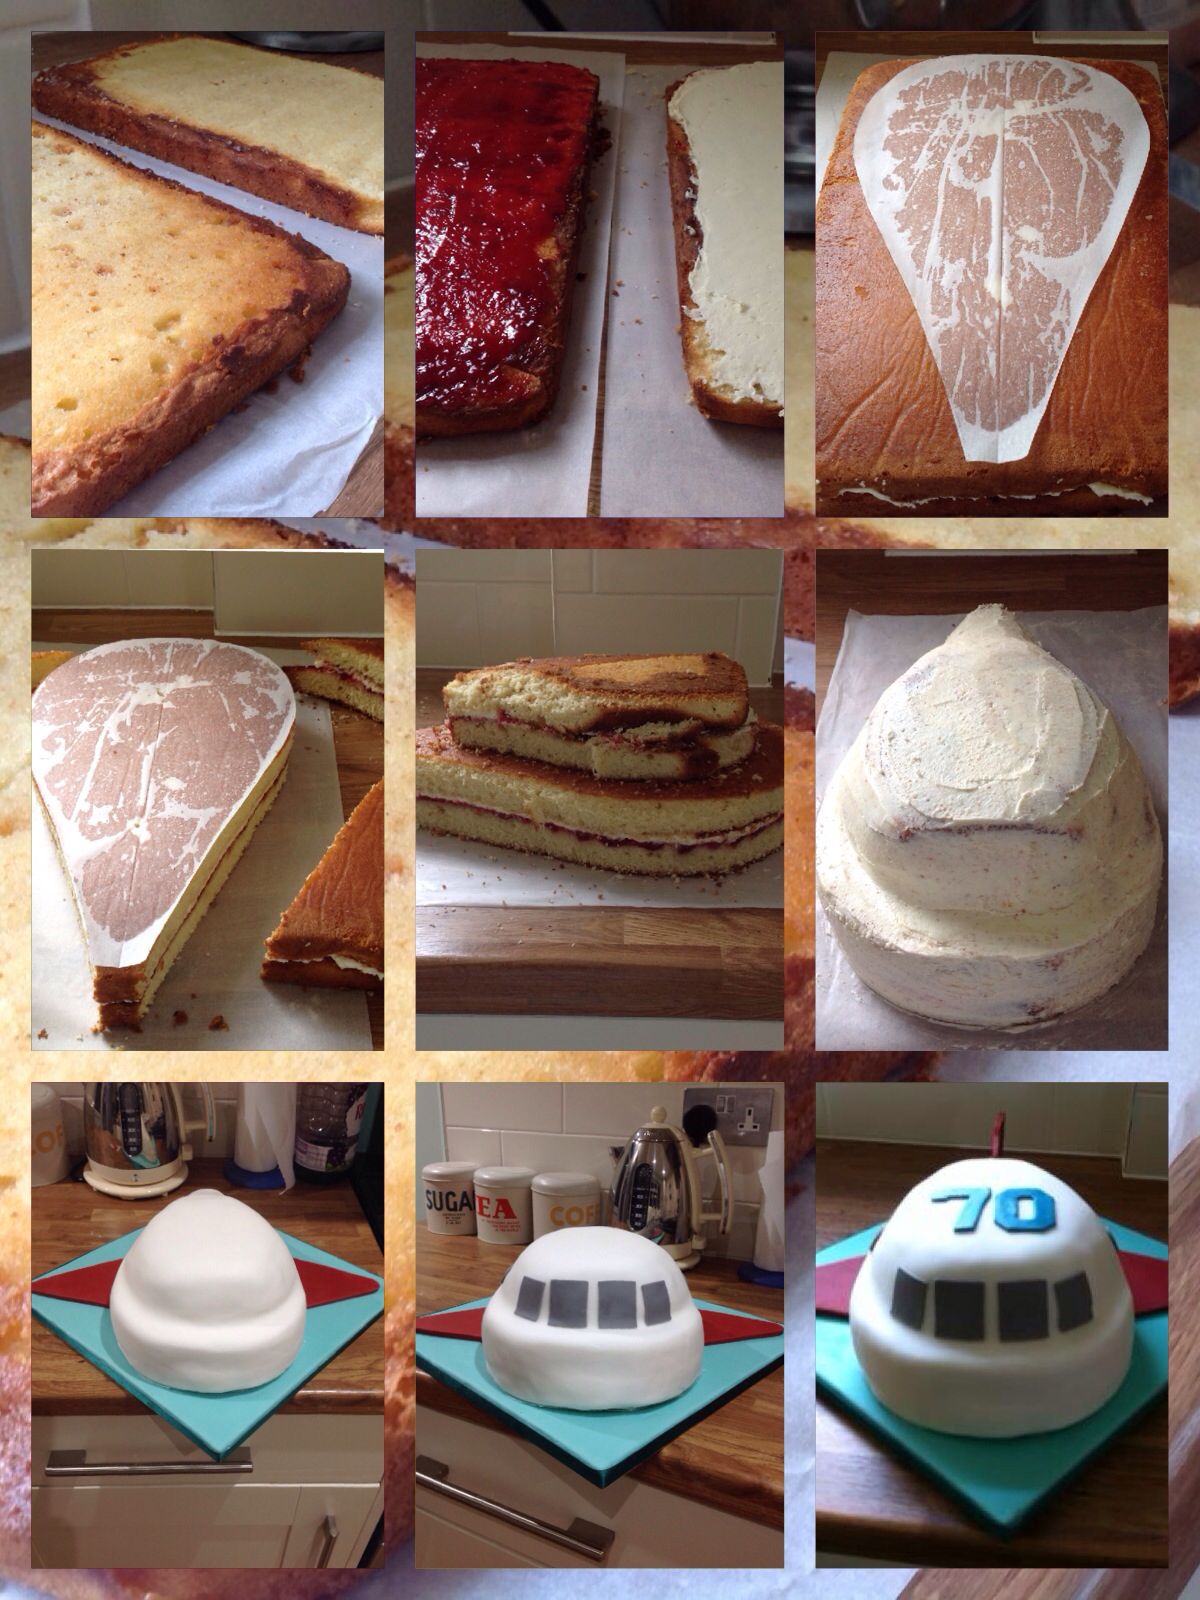
5. Assembling the Plane Cake
Now that you've baked and cooled your cake layers, it's time to bring your plane cake to life by assembling all the components. This part is where you can let your creativity soar!
Here’s a step-by-step guide to help you assemble your plane cake:
- Level Your Cake Layers: Start by leveling your cake layers if they’ve domed at the top. Use a serrated knife to cut off any uneven edges. This will ensure that your cake sits flat and stable.
- Select Your Base: Choose a sturdy cake board or platter that’s large enough to accommodate your finished cake. A thick cardboard or wooden board works great.
- Stack the Layers: Place your first layer of cake on the board. Spread a layer of frosting on top using an offset spatula. Make sure it’s even. Then, add the second cake layer on top. Repeat this for any additional layers.
- Crumb Coat: Apply a thin layer of frosting all over the assembled cake to catch any crumbs. This is called the crumb coat, and it will help create a smooth final layer of frosting. Chill the cake in the refrigerator for about 30 minutes to set this layer.
- Final Frosting: After the crumb coat has set, apply a thicker layer of frosting over the entire cake using your spatula. You can choose any color you like, but a sky-blue or white frosting will give a perfect airplane look.
Keep your spatula or cake knife handy to smooth out any rough edges. The goal here is to achieve a clean and polished appearance.
Now that your cake is professionally assembled, it’s time for the fun part—decorating!
Also Read This: How to Build a Pop Pop Boat: Watch Step-by-Step on Dailymotion
6. Decorating Your Plane Cake for a Perfect Look
Decorating the cake is where you can really have fun and let your imagination take flight! Here are some tips and ideas to ensure your plane cake looks amazing:
Choose Your Decorations: Depending on the theme and level of detail you want, your decorations can range from simple to elaborate. Consider the following:
- Fondant: This pliable icing can be molded into shapes. You can create airplane wings, propellers, and even clouds. Roll out the fondant and cut it into the shapes you desire. Color it using food coloring to add a vibrant touch.
- Candy Decorations: Use candies like gummy bears as passengers or chocolate balls as wheels. Edible glitter can add a touch of sparkle to your creation!
- Airplane Toppers: Consider using toy airplanes as cake toppers. They not only look great but can also serve as a fun toy post-celebration.
Adding Details: To make your cake really pop, think about adding some additional elements:
- Clouds: Pipe some white frosting or use cotton candy around the base and top of the cake to resemble clouds.
- Dirt Runway: Crushed cookies or dark cocoa powder can mimic dirt or asphalt runways, giving a realistic touch to your cake.
Final Touch: Don’t forget about the presentation! A sweet touch like a personalized cake banner or a matching cake stand can elevate your decorated cake even more.
Finally, step back and admire your creation! Your airplane cake is ready to be the star of the party, just waiting for its moment to take off. Enjoy the compliments from your guests as they indulge in your delicious masterpiece!
Also Read This: How to Achieve Smokey Eyes Step by Step Expert Makeup Guide on Dailymotion
7. Tips and Tricks for a Successful Plane Cake
Creating a stunning plane cake isn’t just about following a recipe; it’s about nailing the details! Here are some valuable tips and tricks to help you craft a cake that looks just as good as it tastes:
- Choose the Right Cake Base: Start with a sturdy cake that can support your decorations. A dense cake, like a pound cake, works wonderfully as it can hold up under the weight of fondant and other decorations.
- Use Cake Boards: For any cake, but especially a sculpted one like a plane cake, using a cake board that’s at least the size of your finished cake is essential. It offers stability and makes it easier to move your cake around.
- Level Your Cakes: Make sure all your cake layers are level. A crooked cake can lead to a lopsided plane, which is definitely something we want to avoid!
- Mind the Filling: If you’re adding layers, choose fillings that won’t squish out when cut. Something with a nice stability, like buttercream or ganache, is ideal.
- Cake Cooling Is Key: Be patient! Allow your cakes to cool completely before frosting. Warm cake can melt your frosting and ruin the sleek surface you want for decorating.
- Use a Crumb Coat: A thin layer of frosting around your cake before the final frosting job will help lock in the crumbs and give you a clean look. Chill it for a bit after applying the crumb coat to make the final layer easier to work with.
Remember, practice makes perfect. If you’re new to cake decorating, try a few practice runs before your big event! Each attempt will help you perfect your technique and boost your confidence.
Also Read This: A Complete Guide to Dry Cleaning Coats at Home with Dailymotion Video Assistance
8. Where to Find Inspirational Plane Cake Designs
Looking for ideas and inspiration for your plane cake? There’s a world of creativity out there! Here are the best places to explore:
- Social Media: Platforms like Instagram and Pinterest are goldmines for cake inspiration. Just search for “plane cake” to find countless designs, tutorials, and creative ideas shared by fellow bakers!
- Decorating Blogs: There are tons of baking and cake decorating blogs filled with step-by-step guides and images. Websites like Sweetapolita and Rosanna Pansino often have themed cake designs.
- YouTube: If you’re a visual learner, YouTube is your best friend! Many talented bakers share video tutorials that walk you through the design process in real-time.
- Cake Decorator Forums: Online communities like Cake Central and The Cake Decorating Network are great places to share your ideas, ask questions, and get feedback from experienced decorators.
- Cookbooks: Don’t underestimate printed books! Many baking cookbooks contain chapters dedicated to themed cakes, including intricate designs like plane cakes.
Inspiration is everywhere; all you have to do is look! Whether you want to replicate a design or put your unique twist on one, these resources will surely spark your creativity. Happy baking!
Conclusion and Final Thoughts
Creating a plane cake can be a delightful experience that brings out your creativity and baking skills. Whether you're making it for a birthday party, a themed event, or just for fun, following the right steps ensures your cake will soar high both in appearance and taste.
To summarize, here are the key steps you should keep in mind:
- Preparation: Gather all necessary ingredients and tools.
- Baking: Follow your favorite cake recipe carefully.
- Decoration: Use fondant, icing, and edible decorations to achieve a realistic airplane look.
- Assembly: Ensure all parts fit together well for a sturdy presentation.
- Finishing Touches: Add details like windows, wings, and other features for authenticity.
Remember to have fun during the process! Don't be afraid to experiment with flavors and colors. If things don't go perfectly the first time, practice makes progress, and each attempt gets you closer to creating the perfect plane cake.
In the end, your plane cake isn't just about its visual appeal but also about the joy it brings to those who enjoy it. Happy baking!
 admin
admin


