Are you ready to share your creativity with the world? Uploading your iMovie videos to YouTube can be a fantastic way to showcase your projects and connect with an audience. The process may seem daunting at first, but don’t worry! In this guide, we'll walk you through the steps to ensure your videos are formatted correctly and ready to shine on YouTube.
Preparing Your iMovie Video for Upload
Before you hit that upload button, it’s essential to prepare your iMovie video. This ensures your content looks great and works well on YouTube. Let’s break down the steps.
1. Finalize Your Editing
First things first, make sure your video is fully edited and polished. Here are a few tips for this step:
- Review your timeline: Double-check for any cuts or edits that need tweaking.
- Enhance with effects: Use filters, transitions, and text overlays wisely to enhance your video without overwhelming your viewers.
- Sound quality: Ensure your audio levels are balanced and clear. Consider adding background music or voiceovers where appropriate.
2. Exporting Your Video
Once you’re satisfied with your edit, it's time to export your video. This is crucial because the export settings can affect the quality of your upload. Follow these steps:
- Click on the File menu in iMovie.
- Select Share, then choose File.
- In the export settings:
- Resolution: Choose 1080p for high quality, or 720p if you want a smaller file size.
- Quality: Opt for 'High' or 'Best' to ensure your video retains its clarity.
- Compress: Select ‘Better Quality’ to enhance visual appeal.
- Click Next, choose a destination for your video, name it, and hit Save.
3. Adding a Thumbnail
A captivating thumbnail is essential for grabbing viewers' attention. While you can create a thumbnail in iMovie, consider using tools like Canva or Photoshop for more creativity. Make sure the thumbnail:
- Is eye-catching and relevant to your content.
- Has readable text, if any.
- Looks good at smaller sizes, as it may be displayed that way on YouTube.
4. Organizing Your Files
Before uploading, it’s helpful to organize your project files. Create a dedicated folder for your video project that includes:
- The exported video file
- Your thumbnail images
- Any related media files or notes
With your iMovie video polished and exported, you're not far from sharing it with the world. Next up, we’ll cover how to upload your video to YouTube and optimize it for maximum reach!
Also Read This: How to Report a Hacked YouTube Channel Effectively
3. Exporting Your Video from iMovie
Now that you've created a stunning video in iMovie, it’s time to get it ready for the world by exporting it. This step can seem a bit tricky at first, but don’t worry—we’ll walk you through it!
First things first, make sure your video is polished and finished, with any edits, transitions, and titles where you want them. Once you’re happy with it, follow these simple steps to export:
- Open Your Project: Launch iMovie and open the project you want to export.
- Click on the Share Button: In the top right corner of the iMovie interface, you’ll see a share button (a box with an upwards arrow). Click on this!
- Select File: From the drop-down menu, choose the "File" option. This allows you to export your movie as a video file.
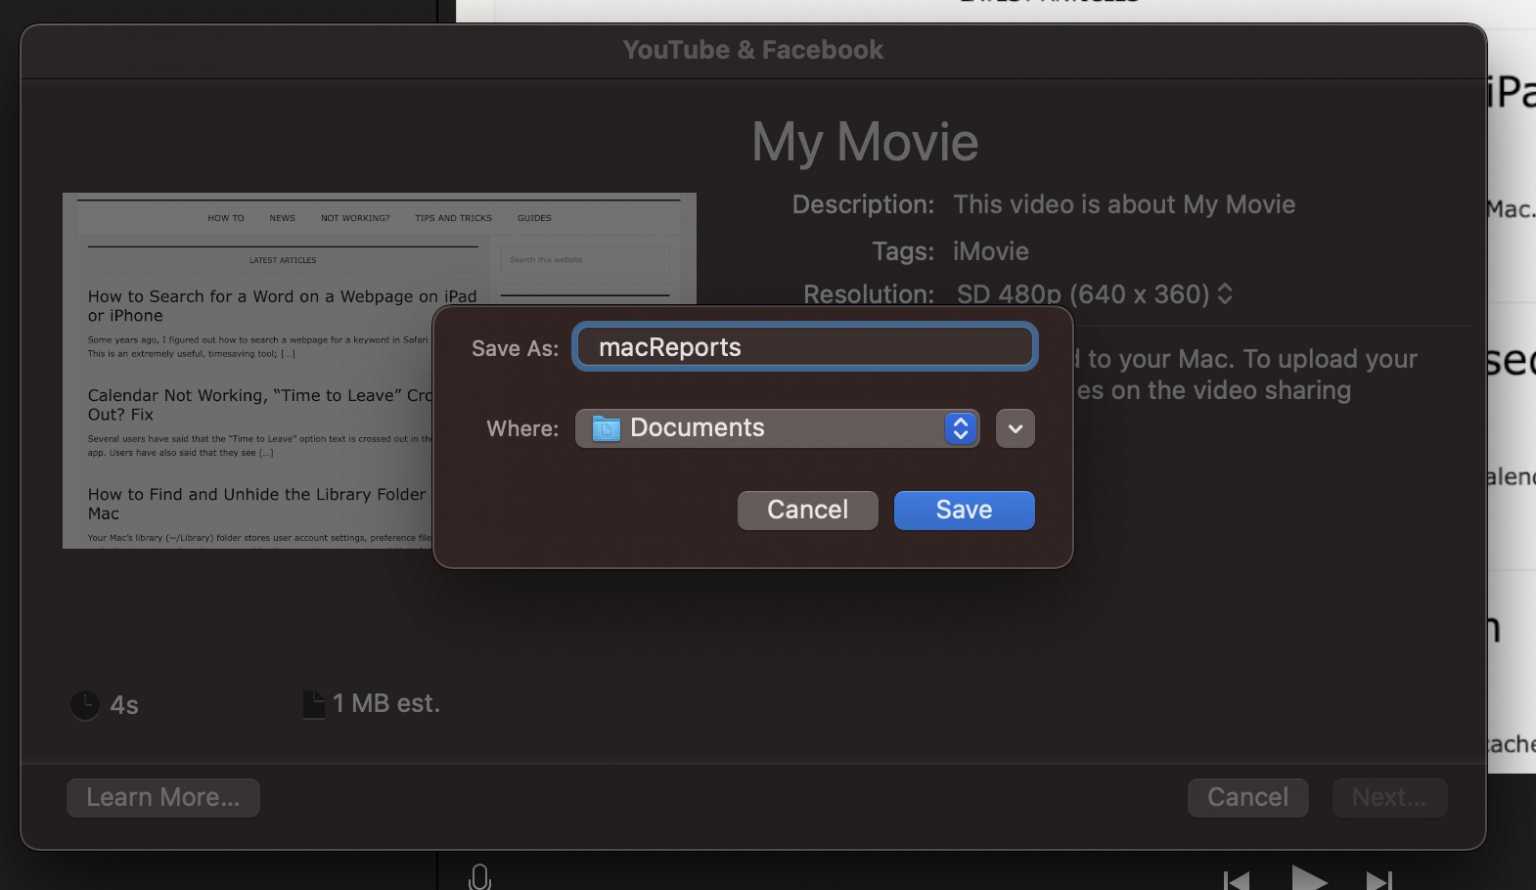
- Adjust Your Settings: A new window will pop up, giving you options. Here’s where you can set the title, description, and tags. Make sure to select the appropriate resolution and quality for your video. For YouTube, 1080p is usually a good choice.
- Choose Export Location: Decide where you want to save your video on your computer. Make it easy to find later, like your desktop or a dedicated Videos folder.
- Click on Next and Export: Once everything looks good, click “Next.” Then, click “Export” to start the process. This might take some time depending on the length of your video and your computer’s performance.
And voila! Your iMovie video is now exported and saved as a file on your computer. Before you move on to uploading it to YouTube, it’s wise to play the video once to ensure everything looks just as you intended. Giving it a quick review can save you the hassle of needing to re-export later!
Also Read This: How Tall Is Jake Webber, the Popular YouTuber? Fun Facts About Him
4. Creating a YouTube Account
Ready to share your fabulous video with the world? First, you'll need a YouTube account if you don’t already have one. Creating an account is a breeze and will only take a few minutes.
Here’s how to get started:
- Visit YouTube: Open your browser and go to www.youtube.com.
- Click on Sign In: In the top right corner, you’ll see the “Sign In” button. Click it to begin the process.
- Create Account: If you don’t have an account, click on “Create account.” You will be prompted to choose whether it’s for yourself or to manage a business. Select what fits your needs.
- Fill in Your Information: Provide the necessary information such as your name, email, and a strong password. Make sure to create a password you can remember but that’s also secure!
- Verify Your Account: You'll likely need to verify your email address or phone number. Follow the instructions sent to your email or phone to complete this step.
Once you've verified your account, congratulations! You now have a YouTube account that you can use to upload videos, subscribe to other channels, and build your presence on the platform.
If you plan to monetize your videos or use additional features like live streaming, you may need to set up a few more details in your account settings. But don’t worry—these steps are straightforward and can be completed whenever you’re ready.
With your video exported from iMovie and your YouTube account set up, you're on the right track to sharing your creativity with the world!
Also Read This: How Much Do ASMR YouTubers Earn
5. Uploading Your Video to YouTube
Alright, you’ve crafted your masterpiece in iMovie, and now it’s time to share it with the world! Uploading your video to YouTube is pretty straightforward, but let’s break it down step-by-step to make it as smooth as butter.
First things first, make sure you’re signed in to your YouTube account. If you don’t have one, don’t fret! Creating a YouTube account is free and only takes a minute. Just head over to YouTube and follow the prompts.
Now, here’s how to upload:
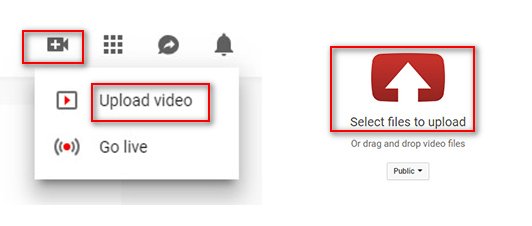
- Open YouTube: Click the camera icon with a plus sign located at the top right corner of the YouTube homepage. This is your gateway to upload.
- Select “Upload Video”: A drop-down menu will appear; click on "Upload Video" to proceed to the upload window.
- Drag and Drop Your Video: Open the folder where you saved your iMovie project and drag your video file into the designated upload area. Alternatively, you can click "Select Files" to navigate manually.
- Details, Details, Details: While your video is loading, you’ll be prompted to enter important details about your video. This is where you can add a catchy title, description, and tags that make your video easy to find. Don’t skip this step!
- Thumbnail Time: You can choose one of the suggested thumbnails or upload a custom one. First impressions matter—a captivating thumbnail can significantly increase your click-through rate!
- Select Your Audience: Make sure to specify if your video is meant for kids or if it’s not created for a child audience. This is crucial for compliance with regulations.
- Advanced Settings: Want to dive deeper? Click on "More Options" to adjust settings like monetization, licensing, and subtitles.
- Hit Publish: Once you’ve filled out all the necessary information, it’s time for the grand finale—hit that “Publish” button!
And voilà, your video is live! Don't forget to check how it looks and sounds on your channel. You can also share the link on social media to spread the word even further!
Also Read This: How to Sign Out of YouTube on Your TV: A Simple Guide
6. Optimizing Your Video for YouTube
Congratulations on uploading your video! But that’s just the beginning. To really make waves with your content, you need to optimize it for YouTube. Think of optimization as the magic sauce that helps your video stand out in a sea of content.
Here are some essential tips to help you optimize your video effectively:
- Use SEO-Friendly Titles: Your title should be descriptive and include key phrases that people might type into the search bar. For instance, instead of “My Fun Trip,” try something like “Exploring Florence: A Day in the City of Art.”
- Craft a Compelling Description: Your video description is like a mini-essay. Use this space to provide a thorough overview of your video, include links to your social media, and even relevant timestamps. Be strategic about incorporating keywords.
- Tag Wisely: Tags help YouTube understand the content of your video. Use a mix of broad and niche tags. For example: if your video is about hiking, you could use tags like “hiking tips,” “outdoor adventures,” and “hiking in national parks.”
- Encourage Engagement: Invite viewers to like, comment, and subscribe. Engaging with your audience can lead to higher visibility since YouTube’s algorithm favors content with strong viewer interaction.
- Create Playlists: Organize your videos into playlists. This not only helps viewers find related content easily but also keeps them on your channel longer, which YouTube loves!
- Utilize End Screens and Cards: These features allow you to promote other videos, encourage subscriptions, and even link to external sites. It’s a perfect way to drive traffic to your other content.
By optimizing your video properly, you’re not just making it easy for viewers to find your content, but you're also setting it up for long-term success on the platform. Remember, the more strategic you are with your video details, the better your chances of reaching a wider audience!
Also Read This: How to Access Unlisted YouTube Videos and the Benefits of Using Them
7. Promoting Your Video After Upload
Congratulations! You've successfully uploaded your iMovie video to YouTube. But wait—your work isn't over just yet! Now comes the exciting part: promoting your video so that it reaches as many viewers as possible. Here are some effective strategies to give your video the visibility it deserves:
- Share on Social Media: Utilize your social media platforms like Facebook, Twitter, Instagram, and TikTok. Create eye-catching posts that highlight your video. Don't forget to use relevant hashtags to increase your reach!
- Engage with Your Community: If you have a blog or other online presence, consider writing a post about your new video and linking to it. Engage with your audience by asking for their thoughts in the comments section.
- Collaborate with Other Creators: Reach out to fellow YouTubers for collaboration opportunities. This cross-promotion can expose your content to a new audience and build connections within the creator community.
- Email Your Subscribers: If you have an email list, send out an announcement about your video. Include a brief description of what viewers can expect, along with a direct link to the video.
- Optimize Video Tags and Descriptions: Ensure that your tags and descriptions are fully optimized for search. Use keywords that your target audience is likely to search for. This not only helps in promoting your video but also aids in SEO!
Another effective method is to create engaging promotional materials like short clips or trailers highlighting the main points of your video. This can create a buzz and entice viewers to check out the full content.
Lastly, consider running paid promotions or ads on platforms like Facebook or Instagram. While this involves some investment, it can lead to substantial returns in terms of views and subscribers!
8. Conclusion
Uploading your iMovie video to YouTube is just the beginning of your journey as a content creator. With the simple steps outlined in this guide, you’ve transformed raw footage into engaging content that can entertain, inform, or inspire.
Remember, the quality of your video is important, but so is your approach to promoting it. By leveraging social media, engaging with your audience, and implementing SEO strategies, you can maximize your video's reach and impact.
As you continue to create and upload, focus on learning what resonates with your viewers. Analyze your video performance using YouTube Analytics to understand what works and what doesn’t. This iterative process is crucial for growth and will guide you in creating better content in the future.
So go ahead—make your mark on YouTube! Embrace the challenges, celebrate the successes, and most importantly, enjoy the creative process. Your unique voice and perspective have the potential to connect with people across the globe, so don’t hold back!
Happy uploading, and here’s to your success as a YouTube creator!
 admin
admin


