Welcome to the world of Shopify! If you're a store owner, you probably know how important packing slips are in the fulfillment process. But did you know you can customize them using Shopify Liquid? Liquid is Shopify's templating language that allows you to modify the look and functionality of your store, including packing slips. In this post, we’ll dive into how to add images to your packing slips, so your shipments can add a personal touch to each order. Ready? Let’s get into it!
Understanding the Components of a Packing Slip
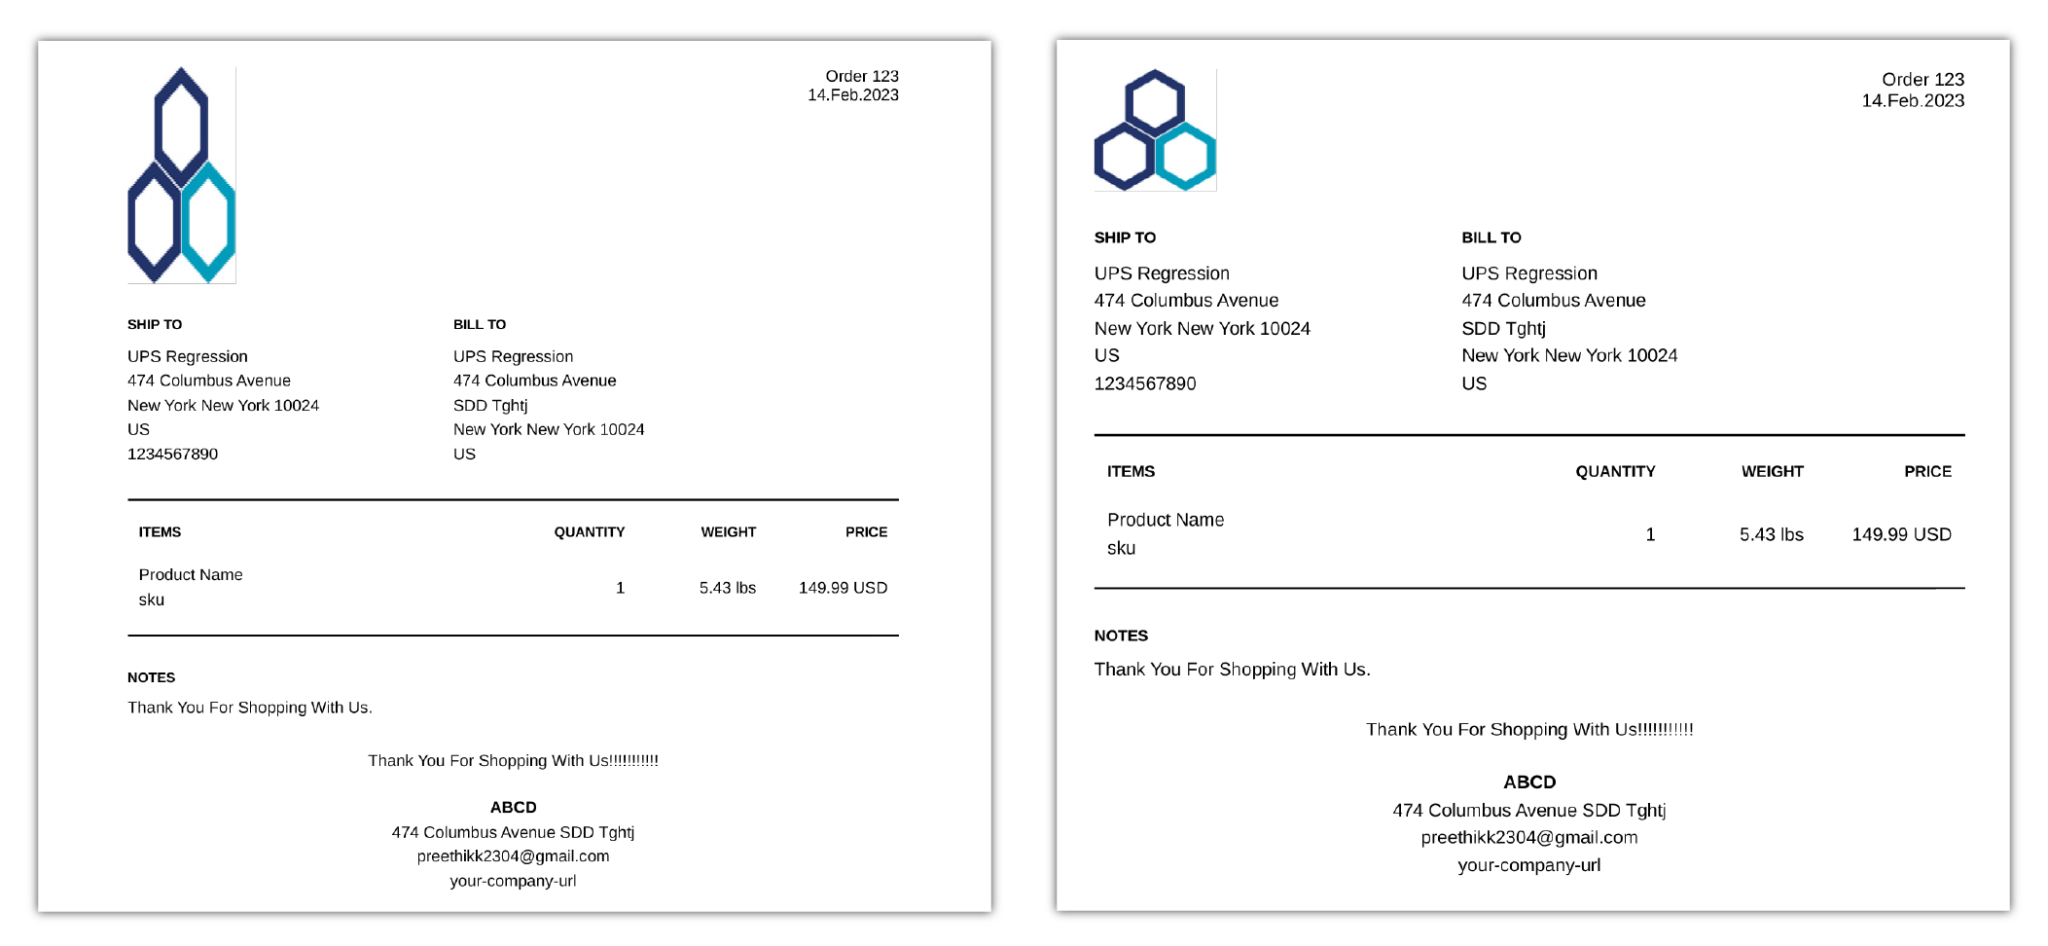
A packing slip is a critical document that accompanies each order your customers receive. It provides essential details about the items included in the shipment and serves as a handy reference for both buyers and sellers. Understanding the various components of a packing slip will help you know what information to display and how to customize it effectively.
Let’s break down the key elements that make up a typical packing slip:
- Store Information: This includes your store’s name, logo, address, and contact details. Including a logo is a great way to brand your packaging.
- Customer Information: The name, address, and contact details of the customer who placed the order. It’s crucial for ensuring the packing slip is accurate and personalized.
- Order Details: Here, you’ll list each item in the order. This includes the product name, SKU, quantity, and sometimes the price. Clear descriptions are vital to eliminate confusion!
- Shipping Information: Details about the shipping method and tracking number, if applicable. This helps customers know when to expect their package.
- Return Policy: A brief note about your return/exchange policy can reduce the need for future customer inquiries and enhance their shopping experience.
When customizing a packing slip in Shopify Liquid, you can manipulate each of these components. For example, you can decide to include a special message or promotion at the bottom of the slip. This small personal touch could encourage your customers to return for future purchases!
*Now, let’s talk about adding images to your packing slips.* Whether it's a logo, a product image, or even a handwritten note scanned and digitized, adding visuals can make a substantial difference. You'll be using the Liquid syntax to include these images, so understanding how it all works is essential.
To get started, you'll access your Shopify admin panel and navigate to Settings > Shipping and Delivery. From there, you’ll find the Print Custom Packing Slip option. This is where you'll customize the template to include image tags.
If you’re unsure about the coding, don’t worry! A simple snippet of Liquid code can fetch images from your store's files or a URL. For example:
{{ 'filename.png' | asset_url | img_tag }}
By inserting this code into the right part of your packing slip template, you can ensure that your chosen image will display properly. Remember, image sizes should be optimized to ensure quick loading times.
In summary, understanding the components of a packing slip lays the groundwork for making it truly yours. When you combine this knowledge with the power of Shopify Liquid, you can create packing slips that not only inform but also impress your customers!
Also Read This: How Do You Mirror an Image on iPhone for Creative Edits
3. Steps to Access Shopify Liquid Code
Alright, let’s dive into the nitty-gritty of accessing the Shopify Liquid code! Whether you’re a seasoned Shopify merchant or a newbie, understanding how to access your Liquid files is crucial for customizing your packing slips.
Here’s a simple step-by-step guide to get you started:
- Log Into Your Shopify Admin: Start by logging into your Shopify admin panel. You’ll need your credentials for this.
- Navigate to the Online Store: On the left sidebar, look for Online Store and click on it. This will expand a menu.
- Go to Themes: From the expanded menu, select Themes. This section will show you the current theme you are using.
- Click on Actions: Under your theme, you will see a button labeled Actions. Click on it to reveal a drop-down menu.
- Select Edit Code: In the drop-down menu, choose Edit code. This will open up the code editor where you can access all your Liquid files.
And voilà! Now you’re in the world of Shopify Liquid. You will notice a list of file directories on the left side, where you can find various sections like Templates, Snippets, and Assets. For packing slips, you typically want to focus on the Templates section.
Remember, if you’re planning to make any changes, it’s always a good idea to back up your code or create a duplicate theme. This way, if something goes sideways, you can just revert to the previous version without any stress!
Also Read This: Learn How to Download Streamable Videos in MP4 HD Quality
4. How to Upload Your Image for the Packing Slip
Once you have access to your Liquid code, the next step is to upload the image you want to include in your packing slip. Here’s how to do it, step by step:
- Go to the Assets Folder: While you’re still in the code editor, look for the Assets folder in the left sidebar. Click on it to open up.
- Click on Add a New Asset: At the top right of the Assets section, you will see an option to Add a new asset. Click on it!
- Upload Your Image: You can select an image file from your computer. Make sure the image is in a web-friendly format (like .jpg, .png, or .gif). Once you’ve selected your file, hit Upload.
- Copy the URL of Your Uploaded Image: After uploading, your image will now reside in the Assets folder. Click on the image name to open it, and then copy the URL that appears in the browser’s address bar. This URL is what you will use in your Liquid code.
And just like that, you’ve uploaded your image to Shopify! Next, you can integrate this image into your packing slip by using the URL within your Liquid code. Be sure to keep the
That's it for uploading your image! In the next sections, we'll explore how to actually implement this image into your packing slip template using Liquid code. Exciting stuff ahead!
Also Read This: Simple Steps to Mirror an Image on Epson Printers
5. Editing the Packing Slip Template to Include the Image
Alright, let’s get our hands a little dirty with some code! Now that you’ve uploaded your image to Shopify, you need to edit the packing slip template to actually display it. It might sound a bit intimidating, but don’t worry—I’ll walk you through it step-by-step!
First, navigate to your Shopify admin panel and head over to Settings > Shipping and delivery. From there, you should see an option for Packing slips. Click on that, and then look for the Edit button next to the packing slip template. This is where the magic happens!
Once you’re in the code editor, you’ll want to find the appropriate spot for your image. Typically, you might want your image to appear at the top or bottom of the packing slip. Here’s how you can add it:
- Look for a section in the Liquid code where other variables or images are defined; this is often a header or footer section.
- Add the following Liquid code where you’d like your image to appear:
{{ 'your-image-file-name.png' | asset_url | img_tag: 'Your Alt Text' }}Replace your-image-file-name.png with the actual file name of the image you uploaded earlier. Make sure you also fill in an appropriate alt text; this not only helps with accessibility but can also improve your SEO!
After that, you can adjust the alignment or size with some CSS styles if you want to get fancy. For example, you can add a style attribute to your img_tag to set a specific width:
{{ 'your-image-file-name.png' | asset_url | img_tag: 'Your Alt Text', style: 'width: 100px; height: auto;' }}Once you’ve made your edits, be sure to click Save. Just like that, you’ve told Shopify to include an image in your packing slip template. Super easy, right?
Also Read This: Create Your Own Behance Portfolio with a Personalized URL
6. Testing the Updated Packing Slip
Time to put your work to the test! Now that we’ve made those edits to include the image, you’ll want to make sure everything looks and functions as expected. Testing is crucial because you want to ensure professionalism in the shipping process and avoid surprises for your customers.
Follow these simple steps to test your new packing slip:
- Create a test order: Navigate back to your Shopify admin and create a test order. You can do this by adding a product to your cart and proceeding through the checkout process. Use a test email address for notifications.
- Fulfill the order: Once your test order is placed, you’ll need to go to the Orders section and fulfill that order. Click on Mark as fulfilled after selecting a shipping method.
- Print the packing slip: While viewing the fulfilled order, choose the Print packing slip option. This is where you’ll get to see your changes in action!
Take a moment to review the packing slip. Check for:
- Is the image correctly displayed?
- Does it look crisp and clear at the size you set?
- Are there any formatting issues or misalignments?
If something doesn’t look quite right, you can go back into the template and adjust the Liquid code or styles. Don’t hesitate to test a few times until you’re completely satisfied with the outcome!
Once you’ve confirmed it all works, you can consider yourself done! Your packing slips are now more professional and personalized, adding a nice touch to your shipping process. So, go ahead, impress your customers with the updated packing slip!
Also Read This: How Imago Images Empowers Content Creators to Stand Out Online
7. Tips for Using Images on Packing Slips Effectively
Adding an image to your packing slips in Shopify can enhance your brand presentation and create a more memorable experience for your customers. However, to get the most out of this feature, consider these effective tips:
- Choose the Right Image: First impressions matter! Opt for a high-quality logo or a relevant product image that resonates with your brand identity. Remember, this image is often the first thing customers see when they receive their package.
- Keep It Simple: Your packing slip is a logistical document, not a marketing brochure. Choose a clean design and ensure your image complements rather than overwhelms the vital order information. Too much clutter can confuse customers.
- Optimize Image Size: Large images can slow down printing and may not fit well on the slip. Aim for a resolution that maintains quality without being too large. A good rule of thumb is to keep it under 300 KB.
- Consider Placement: Where you place your image matters! Typically, placing it at the top of the packing slip works best, catching attention without distracting from important order details.
- Test Different Variations: Experiment with different images and designs to see what resonates more with your customers. You can conduct A/B tests to find out which format leads to higher engagement.
- Maintain Consistency: Ensure that your packing slip’s design aligns with your overall branding. Consistent use of colors, fonts, and images reinforces your brand identity and builds customer trust.
- Include a Call to Action: If space allows, you can add a small call to action beside your image, encouraging customers to follow you on social media or visit your website for future promotions.
By keeping these tips in mind, your packing slips can be more than just a receipt—they can be a powerful branding tool that enhances customer satisfaction and loyalty.
Also Read This: How to Add Subtitles to Dailymotion Videos
8. Troubleshooting Common Issues
Though adding images to packing slips in Shopify Liquid is straightforward, you might run into some hiccups along the way. Here’s a quick troubleshooting guide for some of the most common issues:
I. Image Not Appearing
If your image doesn’t show up on the packing slip, try the following steps:
- Check the Image URL: Ensure that the URL you’re using for the image is correct. Verify that the link is absolute (begins with http:// or https://) and accessible.
- File Format Compatibility: Make sure the image is in a supported format, such as JPG, PNG, or GIF.
- Permissions Issues: If your image is hosted externally, ensure that it’s set to public access. A private image won’t load for your customers.
II. Image Not Printing Correctly
Sometimes images may display on-screen but look distorted or improperly sized when printed. Here’s how to tackle this:
- Adjust Print Settings: Check your printer settings. Make sure you’re printing at 100% and not scaling the size.
- Verify Image Dimensions: If the image is too large, consider resizing it in your Shopify Liquid file prior to printing. Use a width of around 300 pixels for best results.
III. Slow Loading Times
If your packing slips take too long to generate or print, it could be due to the image size:
- Optimize Image Size: Compress the image file without losing quality and ensure it's lightweight. Tools like TinyPNG or ImageOptim can help.
- Limit the Use of Images: While a good brand image is essential, avoid adding too many images in the packing slip to prevent slow loading.
By following this troubleshooting guide, you can quickly resolve common issues and ensure that your packing slips are visually appealing and function smoothly. Happy customizing!
Conclusion and Further Resources
In conclusion, adding an image to a packing slip in Shopify Liquid is a straightforward process that enhances the branding of your shipments and creates a more personalized experience for your customers. By following the steps outlined in this guide, you can successfully integrate images into your packing slips, making your orders not only functional but also visually appealing.
For those looking to deepen their understanding and skills with Shopify Liquid, consider exploring the following resources:
- Shopify Liquid Documentation - Official documentation that covers all aspects of Liquid templating, including best practices and advanced techniques.
- Shopify Liquid Guide - A comprehensive guide that offers tutorials and tips on using Liquid for theme customization.
- Shopify Liquid Tutorials on YouTube - A variety of video tutorials that can help you see Liquid in action and provide insights into different use cases.
- Shopify Community Forums - Connect with other Shopify users and developers to ask questions, share information, and seek assistance with Liquid-related queries.
By utilizing these resources, you can further enhance your skills and maximize the potential of your Shopify store. Happy customizing!
 admin
admin


