Side braids are a fantastic way to add a touch of elegance and style to your look without requiring hours in front of the mirror. They are versatile, making them suitable for casual outings or fancy events. Whether you have long, medium, or even short hair, a side braid can elevate your hairstyle game. In this guide, we’ll walk you through the basics of creating a stunning side braid and the essential tools you’ll need to achieve this chic style. Let's dive in!
Essential Tools and Products Needed

Creating a beautiful side braid is much easier when you have the right tools and products at your disposal. Here’s a handy list of everything you’ll need:
- Brush or Comb: A good quality brush or comb helps to detangle your hair and smooth it out, creating a cleaner base for your braid.
- Hair Elastic: You’ll need a small elastic to secure the end of your braid. Choose one that matches your hair color to make it blend in better.
- Hair Clips: These are great for sectioning your hair and keeping stray strands at bay while you work on your braid.
- Styling Mousse or Gel: To add some texture and hold, consider applying a lightweight mousse or styling gel before you start braiding. This can help prevent flyaways and give your braid a little more grip.
- Hairspray: A light hairspray can be your best friend for keeping your braid in place all day without feeling stiff.
- Optional Accessories: If you want to dress up your side braid, think about adding some cute hairpins, ribbons, or floral accents for an extra flair.
Now that you have all the necessary tools, creating your side braid will be a breeze! Having good quality tools can make all the difference in the world, ensuring that your hairstyle not only looks great but also lasts longer. So gather your supplies, and let’s get ready to master this stylish braid!
Also Read This: Engaging with Content Creators on Dailymotion
3. Step-by-Step Instructions for a Perfect Side Braid
Ready to rock a gorgeous side braid? Let’s get into the nitty-gritty of how to create this stunning hairstyle in just a few easy steps. Grab your brush, some hair ties, and maybe a little hairspray, and let’s start braiding!
- Prepare Your Hair: Before you start braiding, it’s crucial to ensure your hair is clean and free of tangles. Brush through to remove knots. If your hair is too silky, a slight spritz of texturizing spray can help the braid hold better.
- Gather Your Hair: Tilt your head to one side and gather all your hair over your shoulder. You can choose to do this on either the left or right side, depending on your preference. Use your fingers to gather it into one smooth section.
- Divide into Sections: Divide your gathered hair into three equal sections. Hold one section in each hand and let the third section hang in the middle. This is where the braiding magic happens!
- Start Braiding: Cross the right section over the middle section so that it becomes the new middle section. Now your hair looks like this: right section (now in the middle), middle section (left). Next, take the left section and cross it over the new middle section. Continue this pattern: right over middle, left over middle, and so on.
- Add Hair as You Go: For a classic side braid, you’ll want to add hair to each section as you go. Once you’ve made a few passes of the braid, start incorporating hair from the side of your head. Each time you pick up a new section, make sure to add it to the right or left side, whichever you’re currently braiding.
- Secure the End: After you’ve incorporated all your hair and reached the end, secure the braid with a hair tie. Make sure it’s snug but not too tight. You want to ensure the braid holds its shape without causing discomfort!
- Finish It Off: For a more relaxed look, gently pull on the sides of the braid to loosen it up a bit. This can give your braid a fuller appearance. Finally, splash a little hairspray if needed to secure everything in place. Voila! You’ve got a stunning side braid!
Also Read This: Learn to Make Handmade Baskets: Easy Videos on Dailymotion
4. Common Mistakes to Avoid When Braiding
While braiding might seem straightforward, there are a few common pitfalls that can derail your braid game. Let’s break down some mistakes to watch out for so you can achieve that perfect look every time.
- Skipping the Prep: Never underestimate the power of a good prep session. Starting with clean, untangled hair makes a world of difference. Tangles can lead to uneven sections and a messy braid.
- Not Sectioning Evenly: If you divide your hair into sections that are too small or large, it can result in an uneven braid. Aim for three equal-sized sections for a seamless look.
- Over-Tightening: It’s easy to get carried away and pull too tight while braiding. This can cause discomfort and create a stiff look. Keep your grip firm, but not overly tight—there’s beauty in a little looseness!
- Forgetting About Hair Type: Different hair types require different approaches. If you have fine hair, you may need more product to help hold the braid, while thick hair might need some smoothing beforehand.
- Ignoring the Face Frame: If you’re braiding hair that’s very long, don’t forget the shorter hairs around your face. Leaving them out can make the style look incomplete. Consider adding them into the braid for a cohesive look.
- Post-Braid Management: Just because the braid looks great doesn’t mean it’ll stay great. A little mist of hairspray or a finishing serum can help keep flyaways in check and prolong the life of your braid.
By keeping these pointers in mind, you’ll be on your way to mastering the art of the side braid in no time! Happy braiding!
Also Read This: A Creative Hub for Learning – Finding Rare and Inspiring Content on Dailymotion
5. Variations of the Side Braid to Try
If you're looking to switch up your style or embrace different vibes with your side braid, there are plenty of variations to explore! Each twist and turn can add a unique personality to the classic look. Here are some fun side braid variations you might want to try:
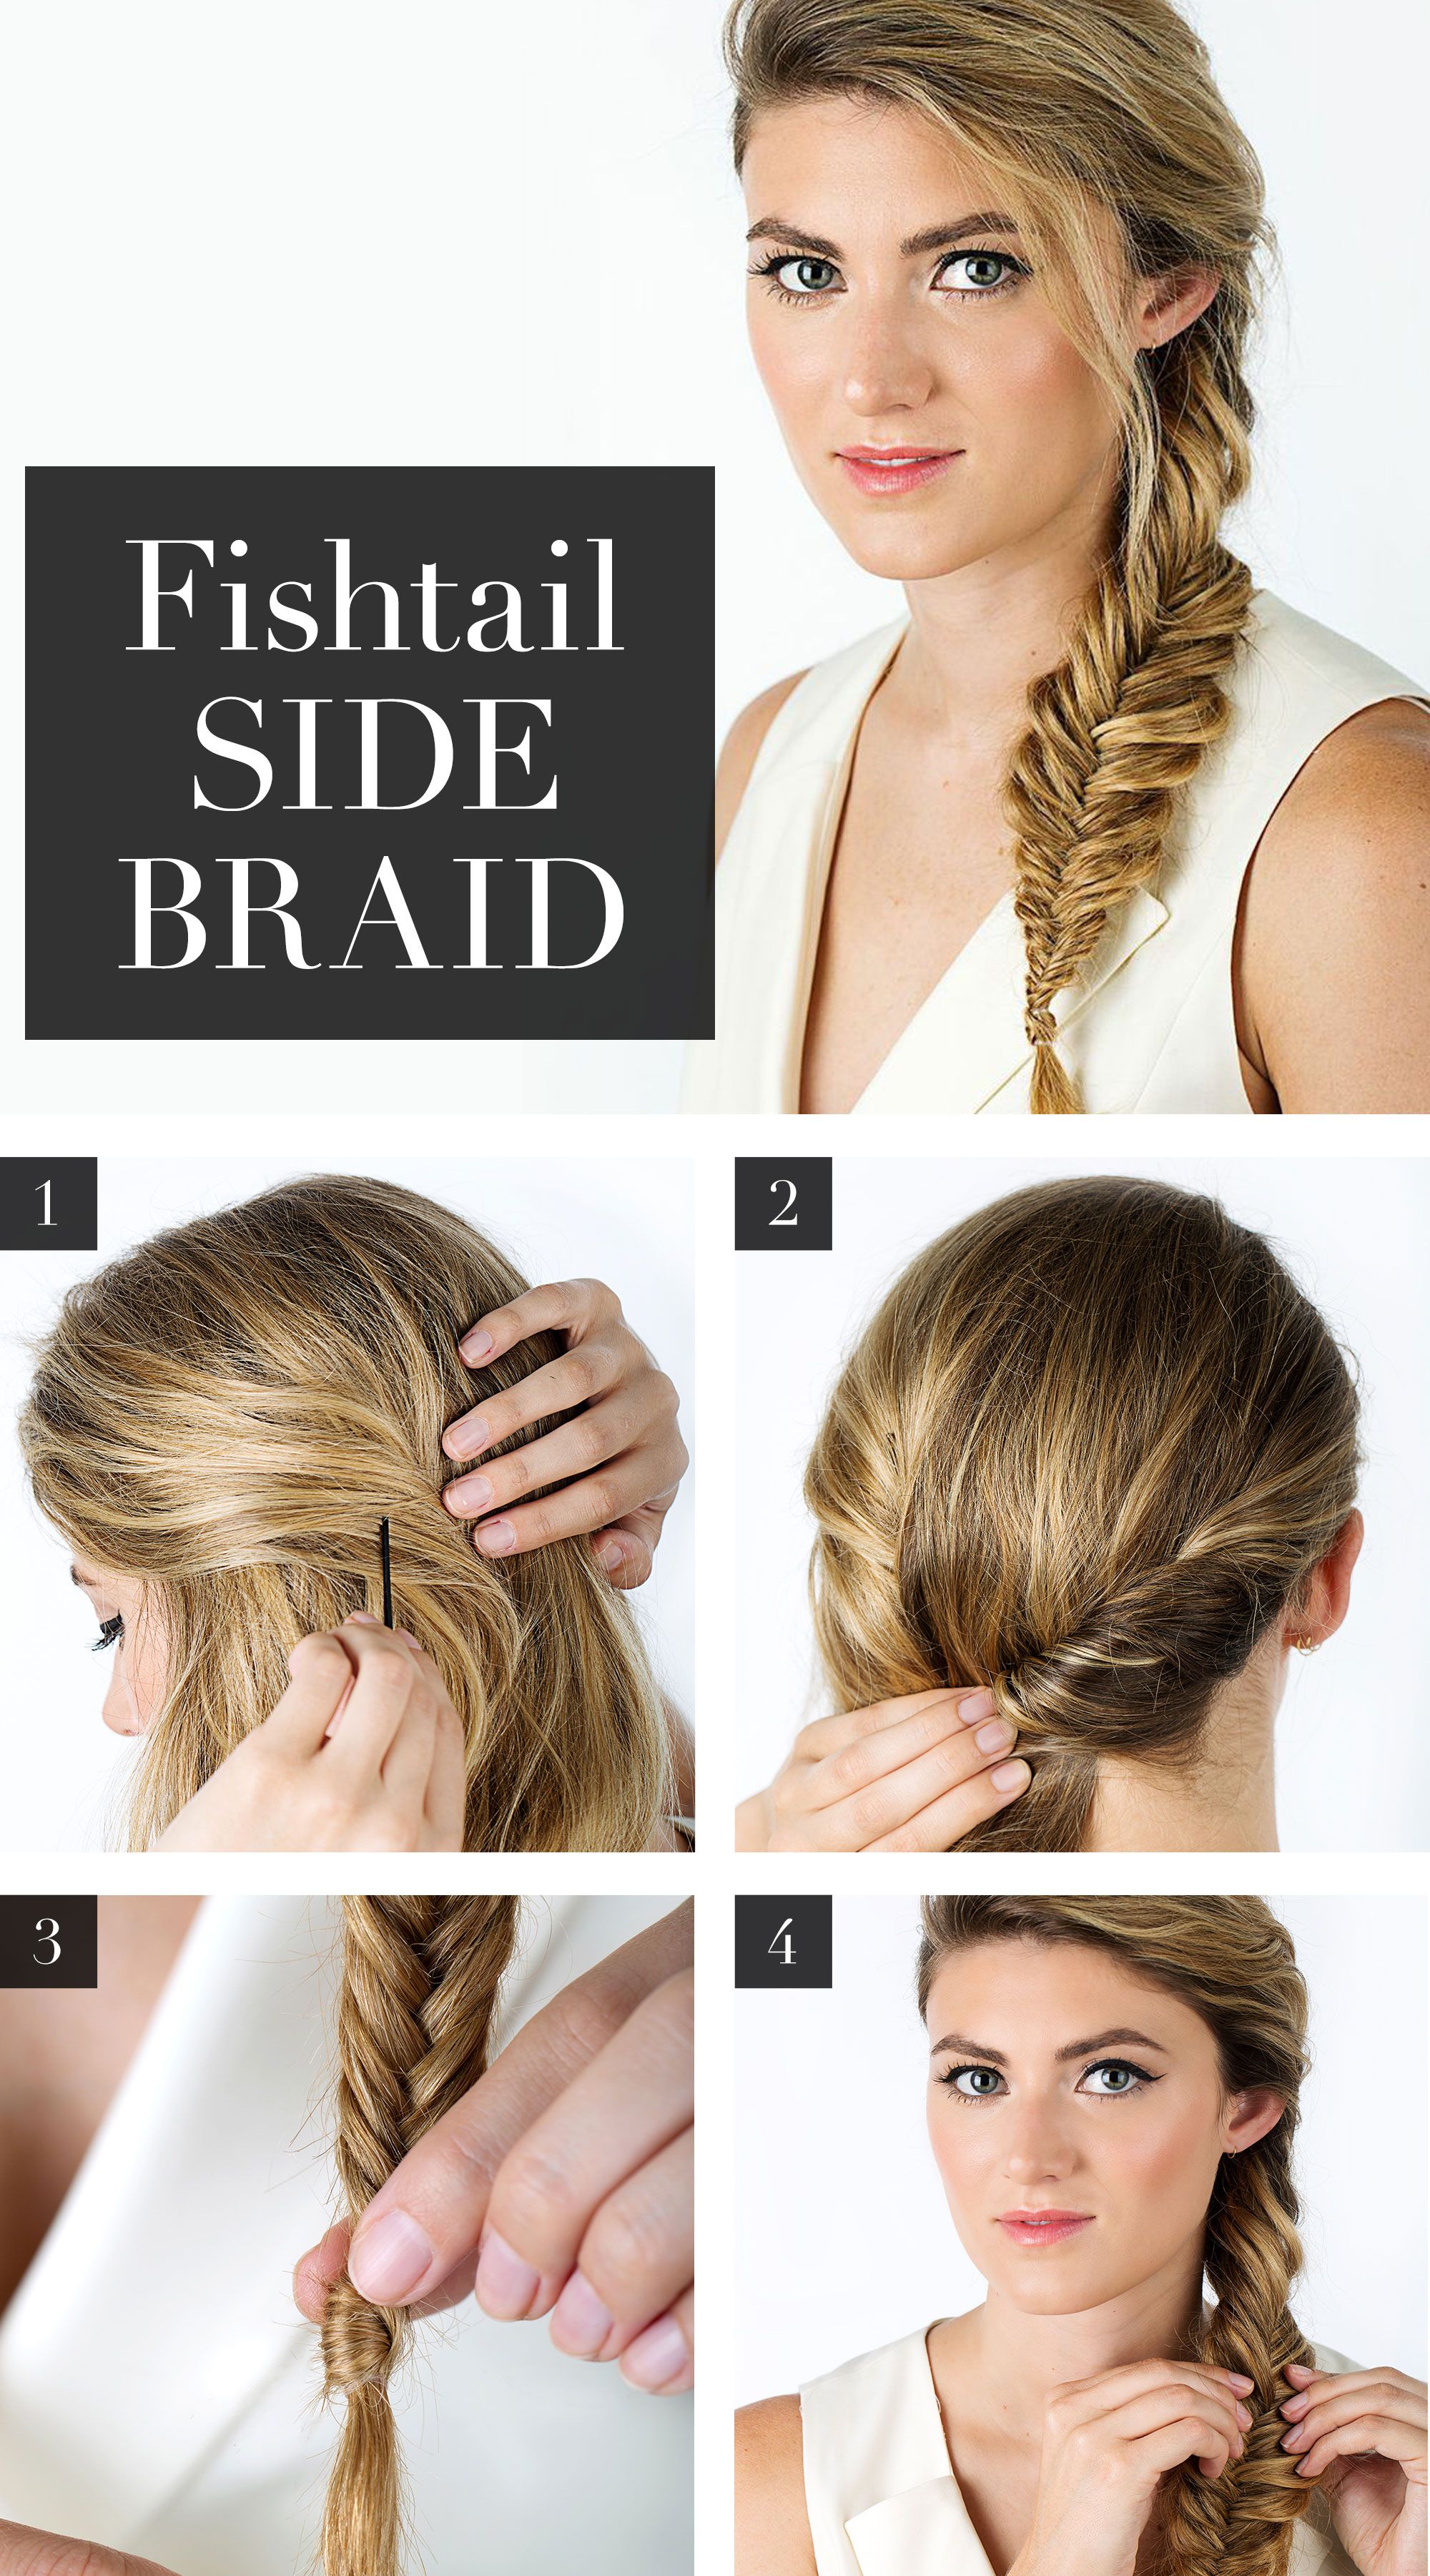
- Fishtail Side Braid: This stunning braid gives a more intricate look than a traditional one. To create it, divide your hair into two sections. Then, take a small piece from the outer edge of one section and cross it over to the other section. Repeat by alternating sides until you reach the end.
- Messy Side Braid: For a relaxed, boho-chic appearance, try a messy side braid. Start by loosely pulling your hair to one side and begin braiding, leaving some pieces out for a more casual feel. Don't worry about perfection – the more tousled, the better!
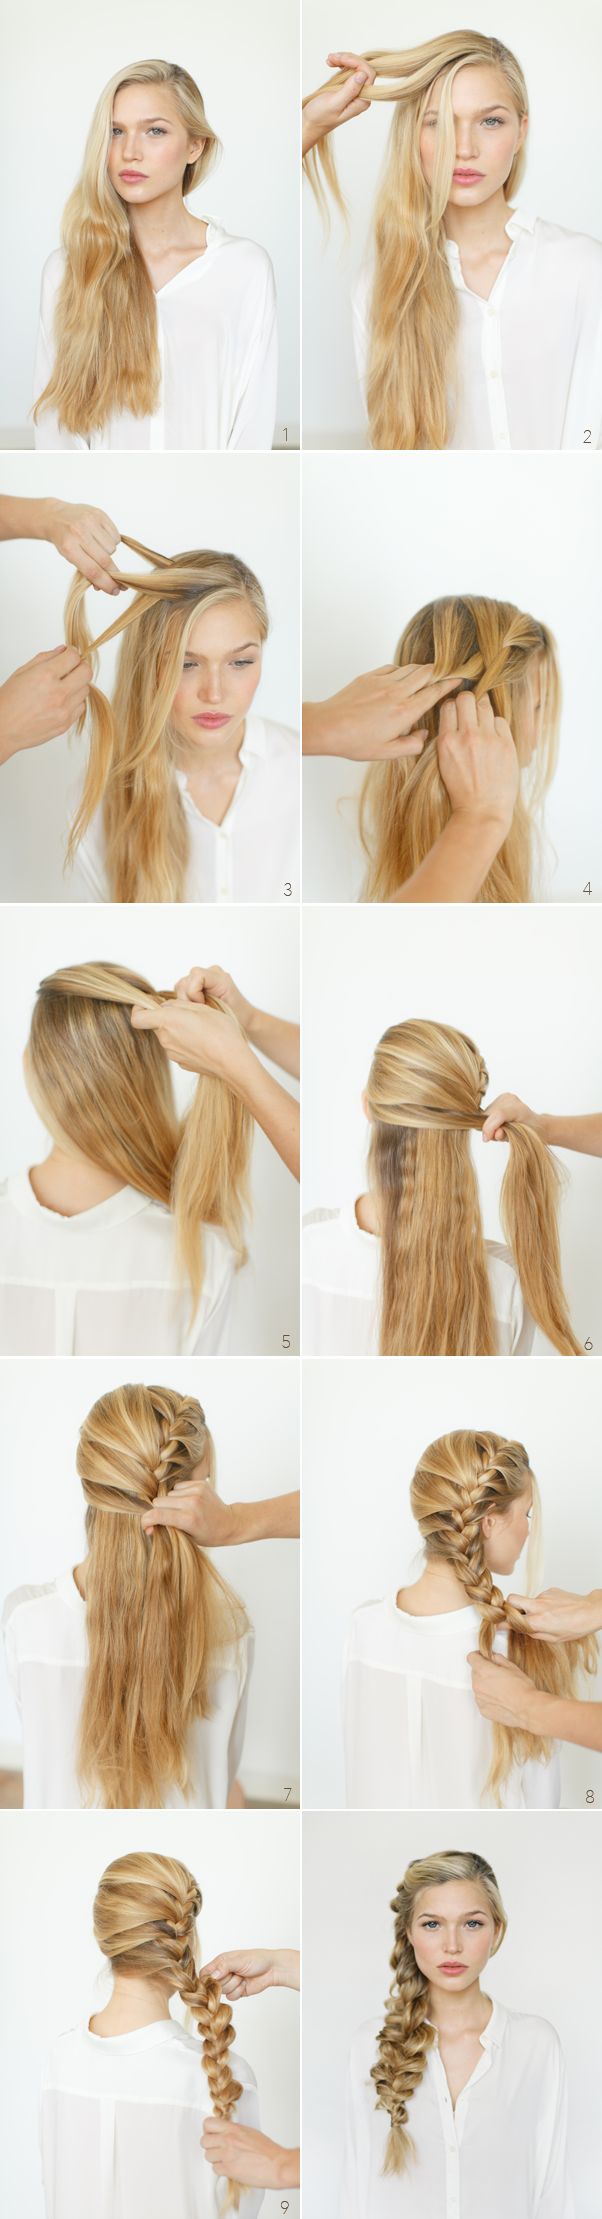
- French Side Braid: Incorporating the classic French braid into your side braid offers volume and a polished touch. Begin at the top of your head and gradually incorporate hair from the sides as you braid downwards. This creates a nice, cascading effect.
- Waterfall Side Braid: This variation provides beautiful depth and elegance. Start with a regular braid, but instead of using all the sections, let one strand drop out and replace it with a new piece from above. This gives the appearance of cascading hair, like a waterfall!
- Rope Braid: Change things up with a rope braid! Split your hair into two sections and twist them together, then wrap them around each other in one direction. The result is a beautiful, twisted effect that’s different from traditional braids.
Each variation can reflect your personality and help you express yourself in different settings, whether it's a casual day out or a fancy evening event. Don't be afraid to play with these styles – mix and match elements from each to create something entirely your own!
Also Read This: How to Apply Makeup Base for a Flawless Foundation on Dailymotion
6. Tips for Maintaining Your Side Braid Throughout the Day
No one wants their beautiful side braid to fall apart halfway through the day! To keep your braid looking fresh and fabulous, here are some handy tips:
- Start with Clean, Dry Hair: Make sure your hair is clean and completely dry before you start braiding. Dirty or damp hair doesn't hold a braid as well, so it’s best to style when you’re working with dry strands.
- Use Hair Products: Applying a bit of mousse or styling gel before braiding can help add grip. If you have slippery hair, a light hairspray can give your braid extra buoyancy without making it feel crunchy.
- Secure the Ends: Use a small hair tie that matches your hair color to secure the end of the braid. If you want a more carefree look, you can also use a clear elastic.
- Pull Gently: After you complete the braid, gently tug at the sections to add volume and texture. Just be careful not to pull too hard to avoid unraveling your hard work!
- Keep a Few Hairsprays Handy: Carry a travel-size hairspray with you for quick touch-ups throughout the day. A light spritz can help keep stray hairs in check and keep your braid looking sharp.
By following these simple tips, your side braid can stay intact and stylish from morning to night. Embrace this versatile hairstyle with confidence, knowing you have the tricks to maintain that stunning look!
Conclusion and Final Thoughts on Side Braids
Creating a side braid is not only a simple way to style your hair but also a versatile option for various occasions. Whether you're preparing for a casual day out or a formal event, side braids can elevate your look with minimal effort. Here are a few final tips to keep in mind:
- Practice makes perfect: Try different techniques and styles until you find one that suits you best.
- Use the right products: A good quality styling cream or hairspray can keep your braid in place throughout the day.
- Accessorize: Adding decorative pins or ribbons can enhance your braid’s appearance, making it more personalized.
Remember, everyone has different hair types and textures, so feel free to adjust the braid’s tightness or looseness according to your preference. Don't hesitate to experiment with variations like the fishtail side braid or a Dutch braid for added flair.
Lastly, while mastering the art of braiding can take some time, the results are well worth the effort. As you become more comfortable with side braids, you'll find them a go-to hairstyle for any occasion. Enjoy your hairstyling journey!
 admin
admin


