Changing eye color in Photoshop CS5 is a fun and creative way to enhance your images. Whether you're looking to create a dramatic effect, mimic a themed color scheme, or simply experiment with different looks, Photoshop offers powerful tools to help you achieve stunning results. In this post, we’ll explore the basics of altering eye color, ensuring that even beginners can follow along easily. With just a few simple steps, you can transform ordinary photos into eye-catching masterpieces. So, let’s dive in!
Setting Up Your Workspace in Photoshop CS5
Before we get into the nitty-gritty of changing eye colors, it’s essential to set up your workspace effectively in Photoshop CS5. A well-organized workspace can make all the difference in how smoothly your editing process goes. Here’s how you can set up your environment for an optimal experience:
- Open Photoshop CS5: Launch the application to get started.
- Load Your Image: Navigate to File > Open and select the photo you want to edit. Make sure it's a high-resolution image for the best results.
- Arrange Your Panels: Go to Window in the menu bar. Here, you can enable panels like Layers, Color, and Brushes if they aren’t already open. These tools will be essential as you work on your eye color change.
- Choose a Suitable Workspace: If you prefer a specific layout, go to Window > Workspace, and select one that you feel comfortable with, such as Photography or Essentials.
With your workspace in order, it’s crucial to ensure that you are zoomed in enough to work on the eyes without losing detail. You can use the Zoom Tool or simply press Ctrl and + (or Cmd and + on a Mac) to zoom in. Aim for around 200-400% for detailed work, making it easier to select precisely without getting jagged edges.
Tip: If you find that your workspace gets cluttered with too many panels, consider closing the ones you don’t need for the current task. You can always reopen them later!
Lastly, familiarize yourself with the Toolbox on the left side of the window. You'll be using tools like the Elliptical Marquee Tool for selecting the eye area, as well as the Brush Tool for any touch-ups. It helps to have these tools in mind as you prepare to change your eye color.
Now that your workspace is set up, you’re ready to embark on your journey to change eye colors in Photoshop CS5. In the next sections, we’ll go step-by-step through the actual process of making those stunning changes. Stay tuned!
Also Read This: How to Make a Frame in Photoshop on Dailymotion
3. Selecting the Eyes for Color Change
Now that we’re all hyped up about changing eye colors in Photoshop CS5, it’s time to get down to the nitty-gritty—selecting the eyes! This step is crucial because it sets the foundation for all the changes we’ll make. A clean and precise selection will ensure that the color change looks natural.
To start, follow these steps:
- Open Your Image: Launch Photoshop and load the image you want to edit. Make sure it's clear and high-resolution for the best results.
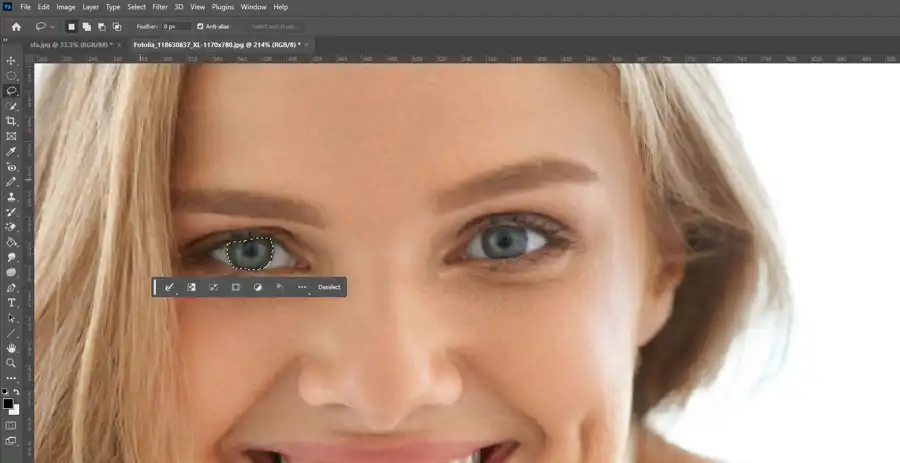
- Select the Lasso Tool: Head over to the toolbox on the left side of the screen. Click on the Lasso Tool (you can also press L on your keyboard to select it quickly). This tool allows you to create freehand selections—perfect for intricate shapes like eyes.
- Draw Around the Eyes: Carefully trace around the irises of both eyes. Take your time and make sure to include the entire iris while avoiding the whites of the eyes and the eyelids. A steady hand here will save you from future adjustments!
- Refining the Selection: If your initial selection isn’t perfect, don’t fret! You can hold down the Shift key to add to your selection or the Alt (or Option on a Mac) key to subtract from it. Zooming in (using Ctrl + +) can help you get those fine details right.
And voilà! You should now have a nice, clear selection around the eyes. If your selection looks jagged around the edges, you can use the Select and Mask feature in Photoshop to smooth it out. Simply go to Select in the top menu, then Select and Mask, adjust the settings, and hit OK when you’re satisfied.
Also Read This: How to Wear a Tie Step by Step on Dailymotion
4. Creating a New Adjustment Layer
With your eyes selected, it's time to breathe life into them with color! The next step is to create a new adjustment layer. This method is non-destructive, meaning you can modify your changes later without ruining your original image. Let’s jump right in!
Here’s how to create that adjustment layer:
- Go to the Layers Panel: If you can’t see the Layers Panel, just go to Window in the top menu and select Layers. It’s where all the magic happens!
- Create a New Adjustment Layer: At the bottom of the Layers Panel, find the Create new fill or adjustment layer icon, which looks like a half-filled circle. Click on it, and from the drop-down menu, choose Hue/Saturation.
- Name Your Layer: When prompted, you can name your adjustment layer (like “Eye Color” or “New Iris Color”) to keep things organized. Creating a workflow you can track is super helpful, especially if you’re working on multiple layers!
- Adjust the Hue: Now, you’ll see a properties panel on the right side. To change the color, simply adjust the Hue slider. As you move the slider, you’ll see your eye color change in real-time. Keep a lookout for tones that will enhance the overall aesthetics of your image!
Don’t forget to fiddle with the Saturation and Lightness sliders too! These adjustments can add depth and richness to your new eye color. If you want a subtler look, tone down the saturation or lighten up the color a bit.
Once you’re satisfied with the new eye color, you can close the properties panel to keep your workspace neat.
And there you have it! You’ve just created an adjustment layer specifically for your eye color. The best part? You’re free to revisit this layer at any time to tweak the settings until it's just right!
Also Read This: How to Watch Dailymotion on Roku and Stream Videos Directly on Your TV
5. Choosing the Right Color for the Eyes
When it comes to changing eye color in Photoshop CS5, choosing the right shade is crucial for creating stunning effects that feel natural. You might be tempted to go for dramatic colors like bright blue or vibrant green, but it’s essential to consider a few factors.
Skin Tone: The first thing to think about is the subject's skin tone. Warm skin tones tend to look better with earthy or warm eye colors like:
- Hazel
- Amber
- Light brown
On the other hand, cool skin tones can really pop with colors such as:
- Steel blue
- Emerald green
- Purple hues
It's all about harmony! The eye color should enhance the overall look rather than clash with the skin tone.
Hair Color: Another factor to keep in mind is the subject’s hair color. If they have dark hair, brighter eye colors can provide a striking contrast. Conversely, lighter hair colors can often be complemented by soft, muted eye shades. For example:
- Dark brown hair pairs nicely with bright blue or green.
- Blonde hair looks beautiful with soft browns or light greys.
Personal Style: Remember that the choice of eye color should also reflect the subject's personality and style. If you're editing a portrait for someone who loves bold colors, don't be afraid to go a little wild. Conversely, if it’s a subtle, professional photo, softer colors might be more appropriate.
Finally, it helps to look at reference photos for inspiration. You could explore fashion magazines, online portfolios, or even color theory resources to find hues that work well together. Trust your instincts—choose a shade that you think looks stunning!
Also Read This: How to Create a Simple Hairstyle for School with Quick Dailymotion Tips
6. Adjusting Color Settings for Natural Look
Once you've selected the perfect eye color, the next step is to ensure that it looks natural. Photoshop CS5 provides various tools to help you achieve this. Here are some easy adjustments you can make to maintain realism.
1. Opacity Adjustment: The first thing to do is adjust the layer opacity. After applying your desired color, reducing the opacity can help blend the new eye color with the original one. Start around 70-80% and fine-tune according to how it looks. You want the color to enhance, not overwhelm!
2. Blending Mode: Changing the blending mode of the layer can also significantly affect the final appearance. Options like “Soft Light” or “Overlay” can create a more seamless integration with the rest of the image. Experiment with different modes to find the perfect fit.
3. Use Color Balance: Take advantage of Photoshop's Color Balance tool. Navigate to Image -> Adjustments -> Color Balance. Here you can tweak the color sliders to adjust the highlights, midtones, and shadows, achieving a more natural and convincing look.
4. Add Highlights and Shadows: To really pull the effect together, consider adding small highlights or shadows. Use the Brush Tool with a soft brush and a very low opacity to create depth. Highlights can be added in the lighter areas of the eye, while shadows can go in the creases or corners.
5. Final Touches: Lastly, don’t forget to zoom out and check the overall image. Sometimes the eye color you chose might seem different when viewed at a distance. If it looks off, make minor adjustments until it feels just right.
By adjusting these color settings carefully, you can enhance your eye color change and ensure the result is as natural and stunning as possible. Happy editing!
Also Read This: Play Dailymotion Videos on iPad with Simple Tutorials
7. Fine-Tuning the Eye Color Change
Now that you've changed the eye color in Photoshop CS5, it's time for the exciting part: fine-tuning! This is where you can really make the change look natural and stunning, ensuring it fits well within the context of the portrait. Let's break this down into manageable steps:
Adjusting the Hue and Saturation
- First, select the layer where you've made your eye color change.
- Go to Image in the top menu, then choose Adjustments and select Hue/Saturation. This powerful tool allows you to tweak the colors with precision.
- Drag the Hue slider left or right to find the perfect shade. Be mindful of how it complements the rest of the photograph.
- Next, adjust the Saturation. Sometimes a bit too much vibrancy can look unnatural, so don’t hesitate to dial it back! Keeping it just a notch above the original often yields the best results.
Working with Brightness and Contrast
After tweaking the hue and saturation, consider adjusting the brightness. Brightness adjustments can highlight the eyes and make them truly pop! Here’s how to do it:
- Go back to the Adjustments menu and select Brightness/Contrast.
- Increase the brightness slightly to draw focus toward the eyes.
- Adjust the contrast to deepen the color and enhance the overall vibrancy. Again, the goal is to achieve a natural look that draws attention without being overwhelming.
Sharpening the Eyes
Next, let’s make those eyes really stand out through sharpening. Here's how:
- Select the appropriate eye layer and navigate to Filter in the top menu.
- Choose Sharpen and then Unsharp Mask. Adjust the sliders to enhance the details without introducing too much noise.
Lastly, don’t forget to zoom out occasionally. It’s easy to get caught up in the details when you're close-up, but seeing the complete image will help you assess what looks best. Remember, the aim is to create a captivating look that feels authentic!
Also Read This: Is Dailymotion Free and Safe to Use? An In-Depth Overview
8. Blending and Final Touches
Now that your eye color looks stunning, it’s time for the final touches to ensure it seamlessly blends with the rest of the image. This is a crucial step that will define the overall impact of your edit. Let's take a scenic route through the final blending process!
Blending the Edges
To avoid that typical “cut-out” look, pay special attention to the edges of the color change. You want everything to look smooth and natural.
- Select your eye color layer, and then click on Add Layer Mask at the bottom of the Layers palette.
- Grab a soft brush with low opacity (around 15-20%) and set the foreground color to black. Now, gently brush over the edges where the new color meets the original image. This technique will gradually blend the new color with the surrounding areas.
Adding a Vignette Effect
A subtle vignette can help draw attention to the eyes and create a more cohesive look. Here’s how to add this effect:
- Create a new layer above all others.
- Go to Edit and select Fill. Choose a solid black fill.
- Change the layer mode to Soft Light and adjust the opacity to around 20-30% to create a gentle gradient around your subject.
Final Checks
Finally, take a moment to review your overall image. Ask yourself:
- Does the eye color enhance the character of the subject?
- Is there consistency in lighting and shadows across the eyes and the rest of the face?
- Does the final image look polished and professional?
Once you’re satisfied, don’t forget to save your work! Use File - Save As to save your project in the desired format. Consider saving both a PSD for future edits and a flattened version (like JPEG) for sharing. With these fine-tuning and blending techniques, you’re on your way to creating eye-catching portraits that truly captivate viewers!
Also Read This: How to Do Bicycle Crunches on Dailymotion for Core Strength
9. Saving Your Work and Exporting the Image
Once you’ve put in the hard work to change your eye color in Photoshop CS5, it’s crucial to save and export your masterpiece correctly. After all, the last thing you want is to lose your stunning effects due to a mishap or software crash! Here’s how you can do it seamlessly:
First, you’ll want to save your project file. This allows you to come back and make tweaks later without losing any effects or layers. Here’s how to save your work:
- Go to File in the top menu.
- Select Save As.
- Name your file appropriately (e.g., "Eye Color Change Project") and ensure you save it in the .PSD format. This keeps all layers intact.
Now that your project is safely saved, you can export it for sharing or printing. Here’s a step-by-step guide to exporting your image:
- Go to File once again.
- Select Save for Web & Devices. This option optimizes the image for web use, which is great if you plan to share it online.
- In the dialog box that appears, choose the format you need. JPEG is commonly used for photographs, but you can also use PNG if you need transparency.
- Adjust the quality settings as needed to balance between image quality and file size. Higher quality means a larger file.
- Click Save, and choose where to store this version of your image.
And just like that, your eye color change effect is not only saved but also ready to dazzle your friends, family, or clients!
Also Read This: How to Create Beautiful Stars with Paper: Step-by-Step Guide on Dailymotion
10. Troubleshooting Common Issues
While Photoshop CS5 is a powerful tool, you might run into a few hiccups when changing eye color. Not to worry! Here are some common issues and their solutions to help you troubleshoot like a pro:
1. Color Not Showing Up:
If you’ve successfully selected the eyes but the new color isn’t visible, check the following:
- Make sure the Hue/Saturation adjustment layer is above the eye layer in the layers panel.
- Adjust the Opacity of the layer. Sometimes, it might be set too low.
2. Harsh Edges Around the Eyes:
Sometimes, after applying color, edges can appear sharp and unnatural. To smoothen them out:
- Use the Feather option. Select your layer mask, go to Select > Modify > Feather, and choose a small radius.
- Try adjusting the mask with a soft brush to blend edges.
3. Color Disappears After Saving:
If the vibrancy of your eye color seems to diminish after saving, it could be due to file format choice. Always check that you’re using the right format:
- For the best color retention, use PNG or high-quality JPEG.
- Avoid formats like GIF when working with rich color images.
With these tips, you should be well-equipped to tackle any issues that might arise during your eye color transformation journey. Remember, practice makes perfect, so keep experimenting and refining your skills!
Conclusion and Tips for Eye Color Editing
Modifying eye color in Photoshop CS5 can elevate your images, providing a stunning effect that captures attention. Here are a few key tips to keep in mind:
- Use High-Resolution Images: Starting with a high-quality image ensures that your edits look natural and professional.
- Experiment with Layers: Always work on a duplicate layer. This allows for easy adjustments without damaging the original image.
- Adjust Saturation and Brightness: Tweaking these settings can enhance the realism of the new eye color. Subtle adjustments often yield the best results.
- Blend Wisely: Use a soft brush when applying colors to create a seamless blend that mimics natural eye shading.
- Add Highlights: Consider using the Dodge tool to add brightness or highlights to the eyes, enhancing depth and realism.
Remember, subtlety is key. It’s easy to go overboard with the effects, so take your time and refine your edits until it feels just right.
In conclusion, changing eye color in Photoshop CS5 is a powerful tool that, when done with care and creativity, can dramatically enhance your images and leave a lasting impression.
 admin
admin


