If you've ever found yourself wanting to watch your favorite YouTube videos offline, you're not alone! Many people love the convenience of having videos readily available on their devices, especially during commutes or travels. In this post, we'll explore how you can easily convert YouTube videos to MP4 format on your Mac. This simple process will allow you to enjoy your favorite content anytime, anywhere, without relying on an internet connection!
Understanding MP4 Format Benefits
When it comes to video formats, MP4 stands out as one of the most popular choices. Let's dive into some of the key benefits that make MP4 a fantastic option for downloading and storing video content.
- Universal Compatibility: One of the biggest advantages of MP4 is its wide compatibility with various devices and platforms. Whether you're using a Mac, Windows, smartphone, or tablet, MP4 videos can be easily played without the need for additional software!
- High Quality with Smaller File Size: MP4 utilizes advanced compression techniques, which means you can enjoy high-quality video without taking up too much space on your device. This is perfect for those who have limited storage capacity but don’t want to sacrifice video quality.
- Flexible Streaming: MP4 is not just good for downloads; it’s also great for streaming! So, if you ever want to share your downloaded videos or view them online, MP4 ensures a seamless experience.
- Supports Multiple Tracks: MP4 allows you to include multiple audio tracks, subtitles, and even chapters within a single file. This can be particularly useful if you're downloading videos in different languages or want to add your own subtitles.
- Future-Proof Format: Given its widespread adoption, it's unlikely that MP4 will become obsolete anytime soon. This means you can trust that your videos will still be accessible and playable for years to come!
Now that you understand the benefits of using MP4, you're probably eager to start downloading your favorite videos. With a bit of knowledge about the right tools and software, converting YouTube videos to MP4 on your Mac can be an effortless experience!
Also Read This: Where Can I Download Videos from YouTube? Legal and Safe Ways to Download YouTube Content
3. Necessary Tools for Converting YouTube Videos on Mac
If you're looking to convert YouTube videos to MP4 format on your Mac, the good news is that you don’t need to stress about complicated setups or fancy equipment. There are several user-friendly tools available that can make this process a breeze! Let’s dive into some of the most popular options that you can use right away.
1. 4K Video Downloader
This is a powerful yet easy-to-use app that allows you to download videos, playlists, channels, and subtitles from YouTube in high quality. The configuration is straightforward, and it offers support for multiple formats, including MP4, which is what you need. It also allows you to download videos up to 4K resolution if desired!
2. ClipGrab
ClipGrab is another wonderful tool for converting videos. It’s free, open-source, and supports a variety of formats, including MP4. You just copy the YouTube link, paste it in ClipGrab, choose MP4 as your format, and let it work its magic. It’s super straightforward and perfect for those who don’t want to fuss with complex settings.
3. HandBrake
HandBrake is an open-source transcoder that’s more advanced but incredibly powerful. While it’s not specifically designed for YouTube, you can indeed download the YouTube video first using any downloader, and then use HandBrake to convert it to MP4 if you need specific adjustments to the video quality or compression. It’s more suited for users who are looking for detailed control over their videos.
4. Any Video Converter
This program is versatile and supports a myriad of formats. You can download videos and convert them to MP4 with just a few clicks. Any Video Converter also offers options for editing and improving the videos before conversion — something to consider if you like a little extra flexibility in your video creation process.
In conclusion, each of these tools has its unique strengths and capabilities. Depending on your specific needs — be it ease of use, advanced editing features, or high-definition downloads — there’s definitely a solution that’s just right for you. Just pick one that fits your style, and you’ll be ready to start converting in no time!
Also Read This: How to Upload iPhone Video to YouTube: A Simple Tutorial
4. Step-by-Step Guide to Convert YouTube Videos to MP4 on Mac
Ready to get started on your video conversion journey? Let’s break down the process into easy steps using one of the popular tools mentioned — 4K Video Downloader. This step-by-step guide will help you convert YouTube videos to MP4 on your Mac without any hassle!
Step 1: Download and Install 4K Video Downloader
First, head over to the 4K Video Downloader website and download the software for Mac. Installation is straightforward — simply drag the application into your Applications folder. Once installed, open it to get started.
Step 2: Copy the YouTube Video URL
Next, go to YouTube and find the video you want to convert. Click on the address bar of your browser, highlight the URL, and copy it (Command + C).
Step 3: Paste the URL into 4K Video Downloader
Now, switch to 4K Video Downloader. The interface is quite user-friendly — just click the 'Paste Link' button in the top left corner. The program will analyze the video link, which may take a few moments.
Step 4: Choose Quality Format
After the analysis, a new window will pop up. Here, you’ll see various options for video quality and formats. Select the MP4 format and choose your preferred quality (like 1080p, 720p, etc.) based on your needs.
Step 5: Download and Convert
Once you’ve made your selections, click the 'Download' button. The program will start downloading and converting the video. Just sit back and relax while it does all the hard work for you.
Step 6: Access Your Converted Video
After the download is complete, your video will be available in the output folder that you can specify in the settings. By default, it usually goes to the 'Downloads' folder. Double-check your video to make sure everything converted correctly!
And there you go! You've just converted a YouTube video to MP4 format on your Mac in just a few easy steps. Pretty simple, right? Enjoy your videos anytime, anywhere!
Also Read This: What Does Subscribing to a YouTube Channel Really Mean? A Simple Guide
5. Using Online Converters for Quick Downloads
If you're looking for a speedy way to convert YouTube videos to MP4 format on your Mac, online converters can be your best friend! These web-based tools allow you to quickly transform videos without the need to install any software. Here’s how it works: you simply copy the URL of the YouTube video you want, paste it into the converter, choose your desired format, and hit convert!
Many online converters are user-friendly and come with a straightforward interface. Here’s a quick rundown of the benefits and things to keep in mind:
- Convenience: No need to download or install any software; perfect for one-off conversions.
- Accessibility: Accessible from any device with internet access, not just your Mac!
- Time-efficient: Usually quicker than downloading bulky software, especially if you’re in a hurry.
However, be cautious! Here are some considerations when using online converters:
- Quality Variations: Not all converters provide the same output quality. It's worth testing a few to see which you prefer.
- Ads and Pop-ups: Many free online converters are ad-supported, which can lead to annoying interruptions.
- File Size Limits: Some services limit the size or length of the videos you can convert unless you upgrade to a paid tier.
To get you started, here are a couple of popular online converters that you might find helpful:
- YTMP3: A simple interface for quick MP4 conversions. Just paste your URL and hit convert!
- OnlineVideoConverter: Offers multiple format options and is generally reliable for most users.
So, if you’re ever in need of a fast conversion solution, don’t overlook online converters! They’re a great tool to have in your back pocket.
Also Read This: How to Connect YouTube to Instagram: Sharing Videos Across Platforms
6. Recommended Software Options for Mac Users
If you do a lot of video downloads or conversions, using dedicated software on your Mac can save you time and hassle. While online converters are great for quick tasks, they may not always meet your needs for more complex projects. Here’s a list of some top software options for converting YouTube videos to MP4 format:
- VideoProc: This powerful video processing software not only converts but also allows for editing and resizing videos. It supports a vast range of formats, and the user interface is clean and straightforward.
- iTube Studio: A popular choice among Mac users, iTube Studio offers a range of features from downloading YouTube videos to converting them into various formats. It’s easy to use and supports batch downloads!
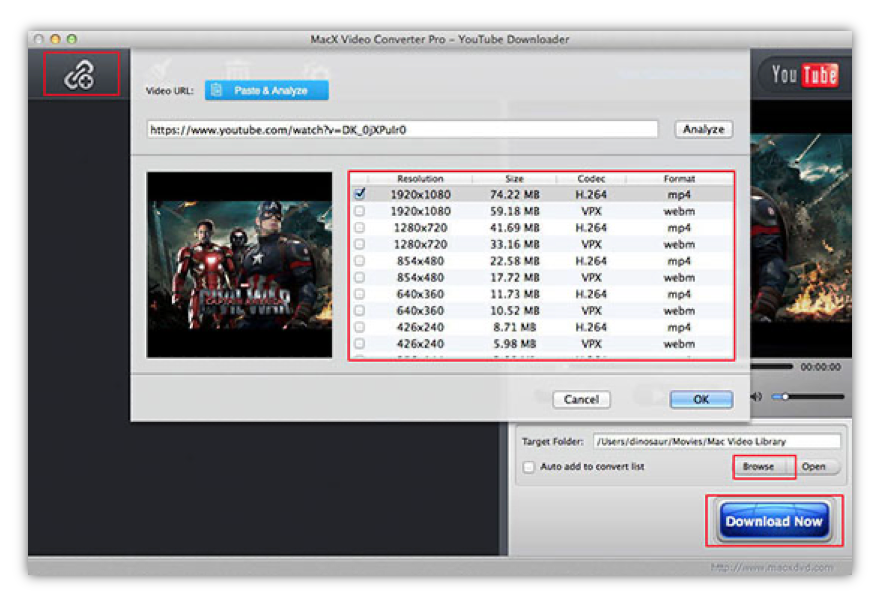
- MacX YouTube Downloader: Specifically designed for YouTube, this software is efficient with excellent output quality. It supports multiple video resolutions and formats, catering to different user needs.
- Any Video Converter: True to its name, this software isn’t just limited to YouTube. It’s versatile and supports a multitude of formats while also being free in its basic version.
When choosing the right software, consider your own video needs:
| Software | Features | Price |
|---|---|---|
| VideoProc | Editing, resizing, multi-format support | Paid (with trial options) |
| iTube Studio | Download & convert, batch processing | Paid (with trial options) |
| MacX YouTube Downloader | High quality, multi-res support | Free |
| Any Video Converter | Multi-format support, basic free version | Free & Paid options |
Investing in good conversion software can elevate your video download and conversion experience, making it easier and more efficient. So take your time, explore some options, and find the software that's right for you!
Also Read This: Why Are My YouTube Commercials in French? Understanding Regional Ad Settings
7. Troubleshooting Common Issues During Conversion
Sometimes, even the simplest tasks can run into a few bumps along the way. When converting YouTube videos to MP4 format on your Mac, you might encounter some issues. Don’t worry; I’ve got your back. Here are some common problems and how you can troubleshoot them:
- Video Not Downloading: Ensure that the video URL is correct. If the link doesn’t work, try copying the URL again from the YouTube page. Sometimes, an error in the link can prevent the download.
- Slow Conversion Speed: If your video is taking longer than expected to convert, it could be due to your Mac’s performance. Close unnecessary applications to free up resources and try again.
- Format Incompatibility: While MP4 is widely supported, make sure that the converter you're using actually outputs MP4 files. Always double-check the settings before starting the conversion.
- Audio Issues: If you find that there is no sound after conversion, ensure that the audio settings in your converter are correctly set up. Some tools offer options for audio quality; check those settings!
- Errors During Download: Occasionally, you might encounter network issues. A simple restart of your internet connection can work wonders. If the problem persists, consider trying another network.
By keeping these troubleshooting tips in mind, you can save a lot of time and frustration. If you regularly encounter issues, consider switching to a different converter tool that may be more reliable or easier to use.
8. Conclusion and Best Practices for Downloading Videos
Congratulations! You’ve now learned how to convert YouTube videos to MP4 format on your Mac easily. Here’s a quick recap of some best practices to follow when downloading videos:
- Always Use Reputable Software: Opt for trusted converters to avoid malware and ensure a smooth experience. Research user reviews and recommendations.
- Check Copyright Laws: Be aware of YouTube's copyright policies to avoid legal issues. Not all videos are available for public downloading.
- Choose the Right Quality: Take a moment to select the quality of the video that best fits your needs. Higher resolutions require more storage but provide a better viewing experience.
- Organize Your Files: After conversion, keep your downloaded videos neatly organized in folders. This not only saves time but also helps you find what you're looking for faster.
- Keep Your Software Updated: Whether it's the macOS or the conversion tool you're using, keeping everything updated ensures that you benefit from the latest features and security improvements.
By following these best practices, you’ll not only enjoy a smoother experience but also ensure that your video library remains safe and organized. Remember, downloading videos should be fun and simple—now you’re equipped with the knowledge to do just that. Happy downloading!
 admin
admin


