Welcome to our unique craft tutorial! In this post, we’ll dive into the serene world of pencil drawing, specifically focusing on how to create a beautiful rose. Whether you're a beginner or an experienced artist looking to refine your skills, this step-by-step guide is perfect for you. Drawing a rose may seem daunting, but with the right approach, you'll find it not only achievable but also incredibly rewarding. So grab your pencils and let's get started on this artistic journey!
Materials Needed for Pencil Rose Drawing
Before we embark on our drawing adventure, it’s essential to gather the right materials. Having everything on hand will make the process smoother and more enjoyable. Here’s a comprehensive list of what you’ll need:
- Pencils: A range of pencils (HB, 2B, 4B, and 6B) will allow you to create different shades and details.
- Eraser: A good quality eraser is crucial for correcting mistakes and adding highlights.
- Blending Stumps: Also known as tortillons, these tools are excellent for blending pencil marks smoothly.
- Paper: Choose a smooth drawing paper or sketch pad that can withstand multiple layers of pencil.
- Reference Image: Having a clear picture of a rose will help you capture the delicate details.
- Sharpener: Keep those pencils sharp for precise lines and crisp details.
- Ruler: This may come in handy for establishing proportions or measuring guidelines.
With these materials, you’re ready to kick off your drawing! The variety in pencil hardness will help you achieve depth and realism in your rose, while quality paper ensures that every stroke shows beautifully. Don’t forget to keep your reference image close by; being able to look at it as you draw will guide your hand and inspire your creativity. Now that you have everything ready, you're one step closer to bringing your pencil rose to life!
Also Read This: How to Share a Dailymotion Video on Facebook for Maximum Visibility
3. Step-by-Step Guide to Drawing a Rose with a Pencil
Alright, let’s dive into the fun part! Creating a stunning rose with just a pencil might seem daunting at first, but with the right steps, you’ll be amazed at what you can achieve. Grab your materials—some good quality paper (preferably sketch paper), a sharp pencil, an eraser, and maybe some blending stumps or cotton swabs for shading. Ready? Let’s go!
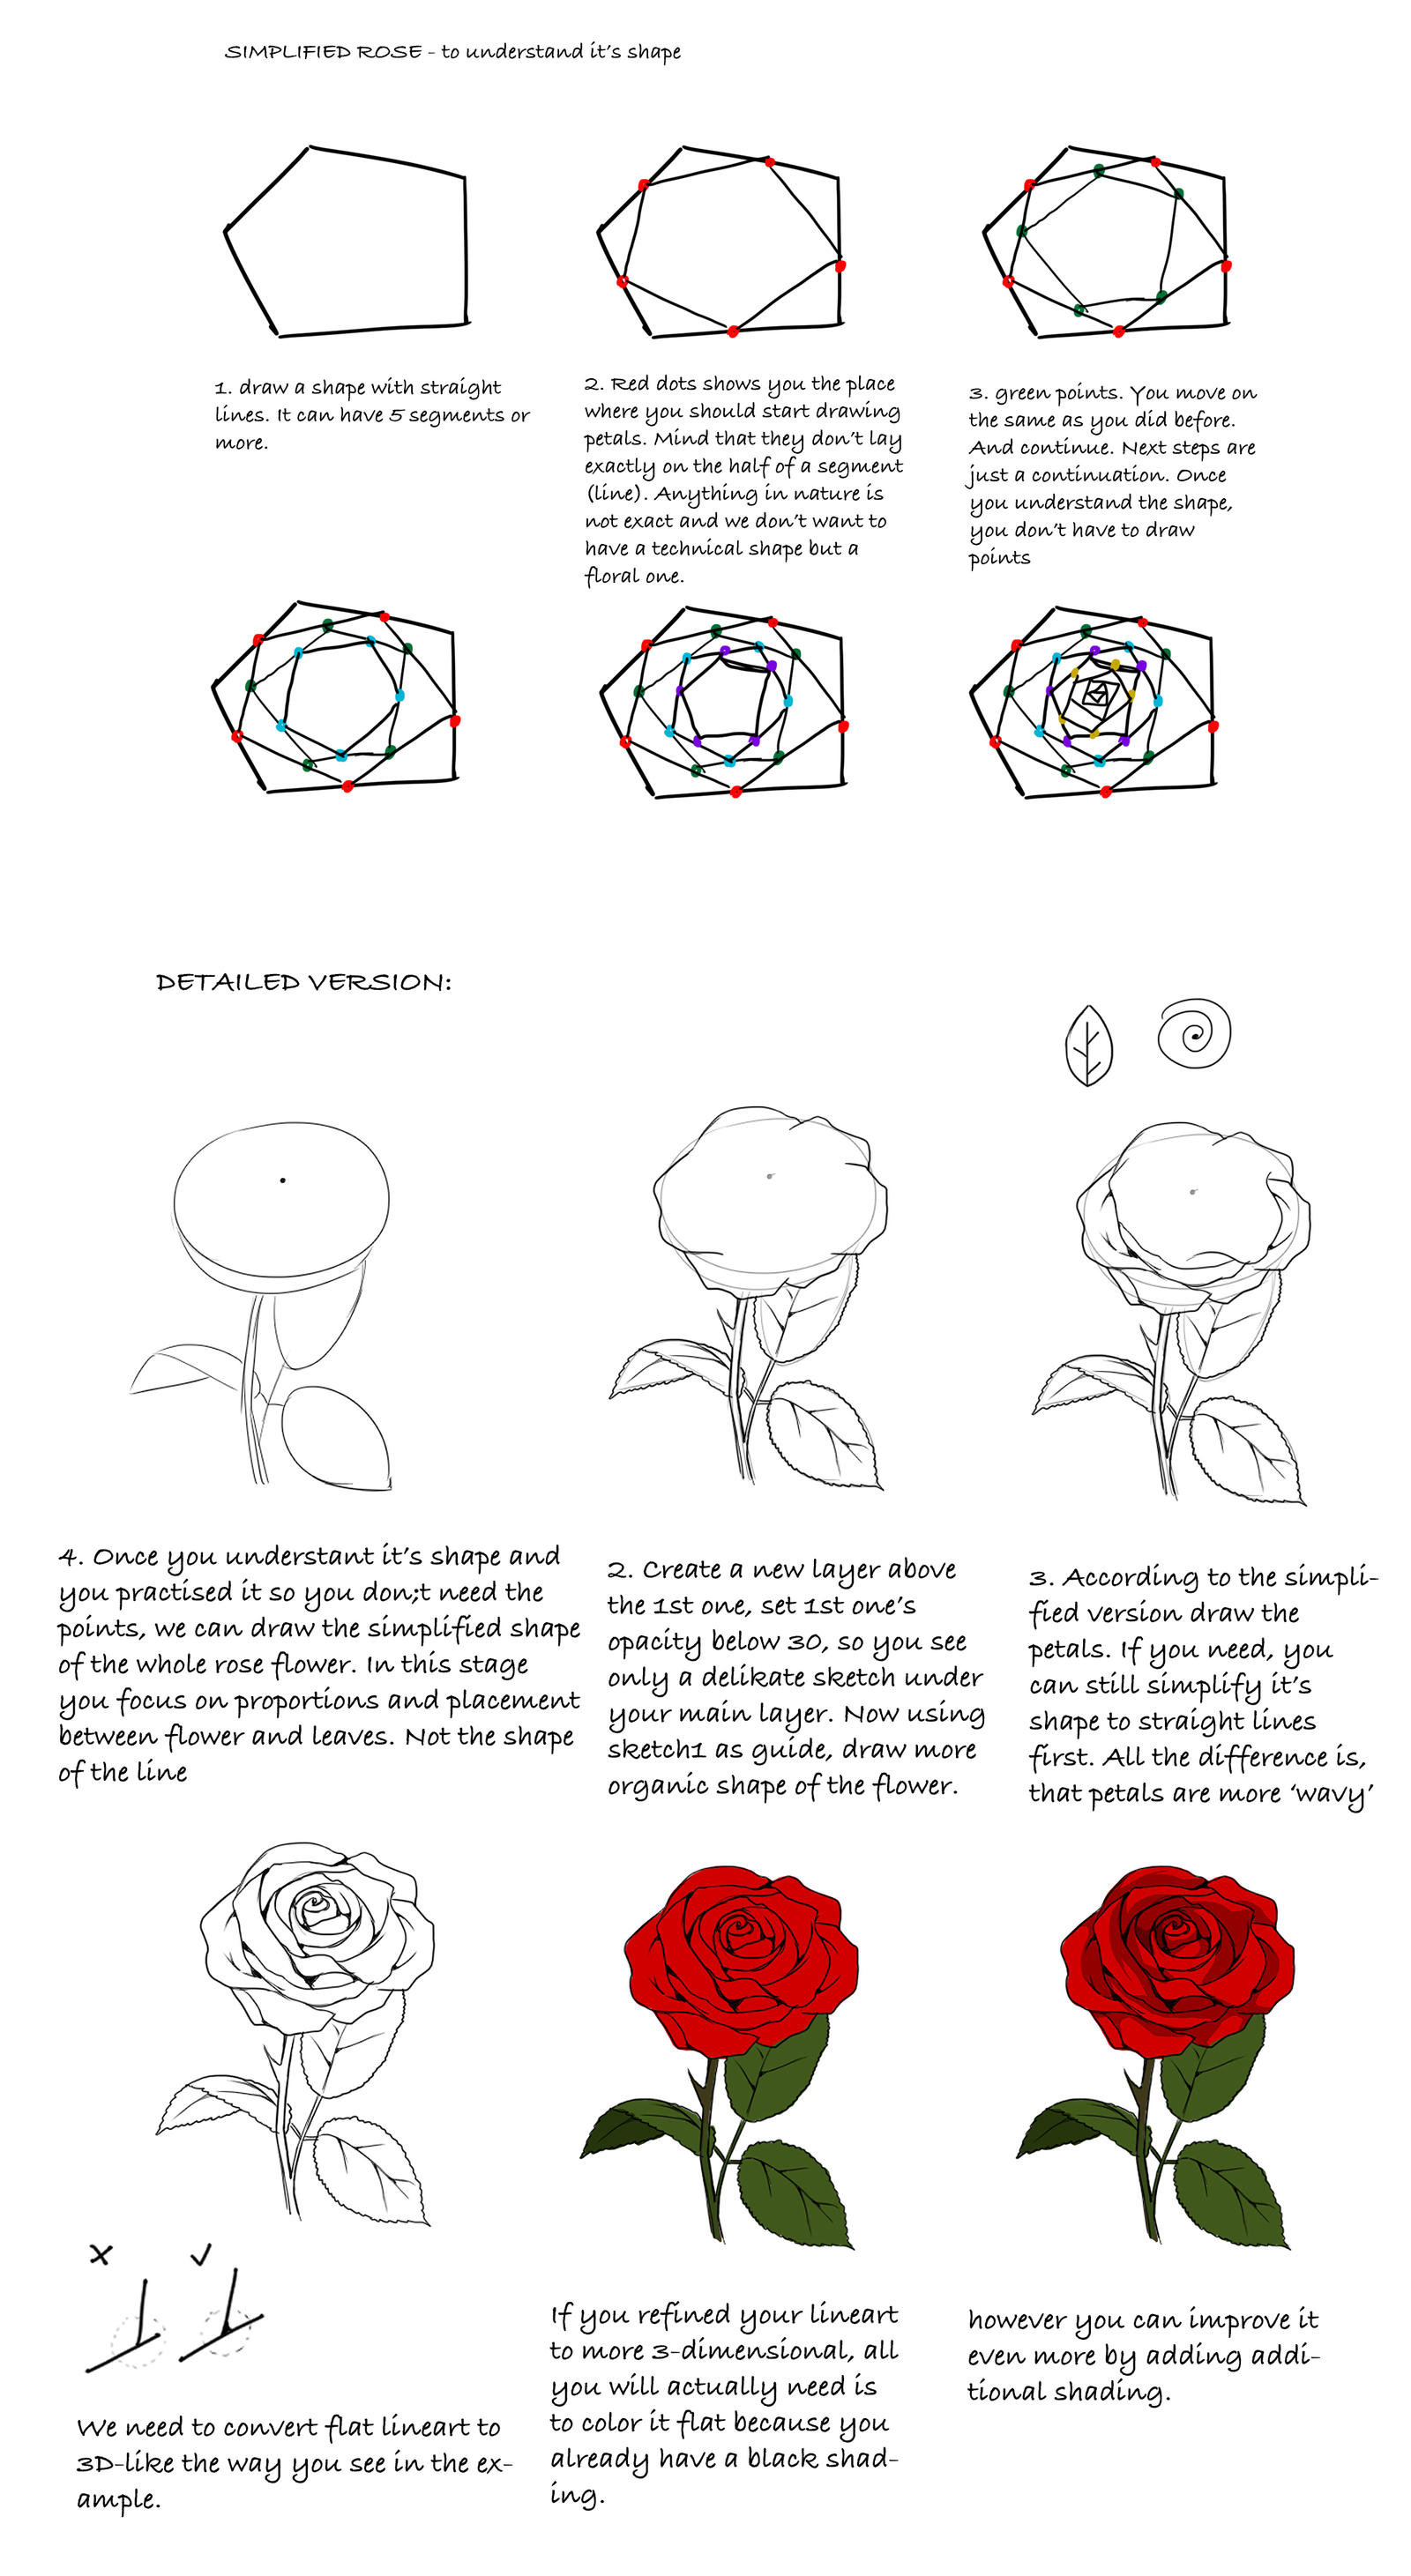
Step 1: Start with the Center
Begin by sketching small, circular shapes for the center of the rose. Think of it like drawing a spiral or the shape of a tiny funnel. This will serve as the focal point of your rose, so focus on making it look as natural as possible.
Step 2: Add the Petals
Next, draw the petals around the center. Rose petals have a soft, curled appearance, and they often overlap. Start with a few outer petals, making them larger as you move away from the center. Don’t worry about making them perfect! The beauty of a rose lies in its irregularity.
- Tip: Use light pencil strokes for this part. You can always darken lines later, but it’s easier to erase if your initial sketch is light.
Step 3: Define the Shape
Once you're satisfied with the arrangement of petals, begin refining their shapes. Add a little wave or curve to each petal to give them that realistic touch. The edges should look soft rather than stiff, as roses have a natural elegance.
Step 4: Draw the Stem and Leaves
Next, sketch the stem extending downward from the petals. It should be thick enough to support the flower. Add 1-2 leaves on either side of the stem. Rose leaves are usually pointed at the ends and feature serrated edges. Draw them gently to maintain a natural look.
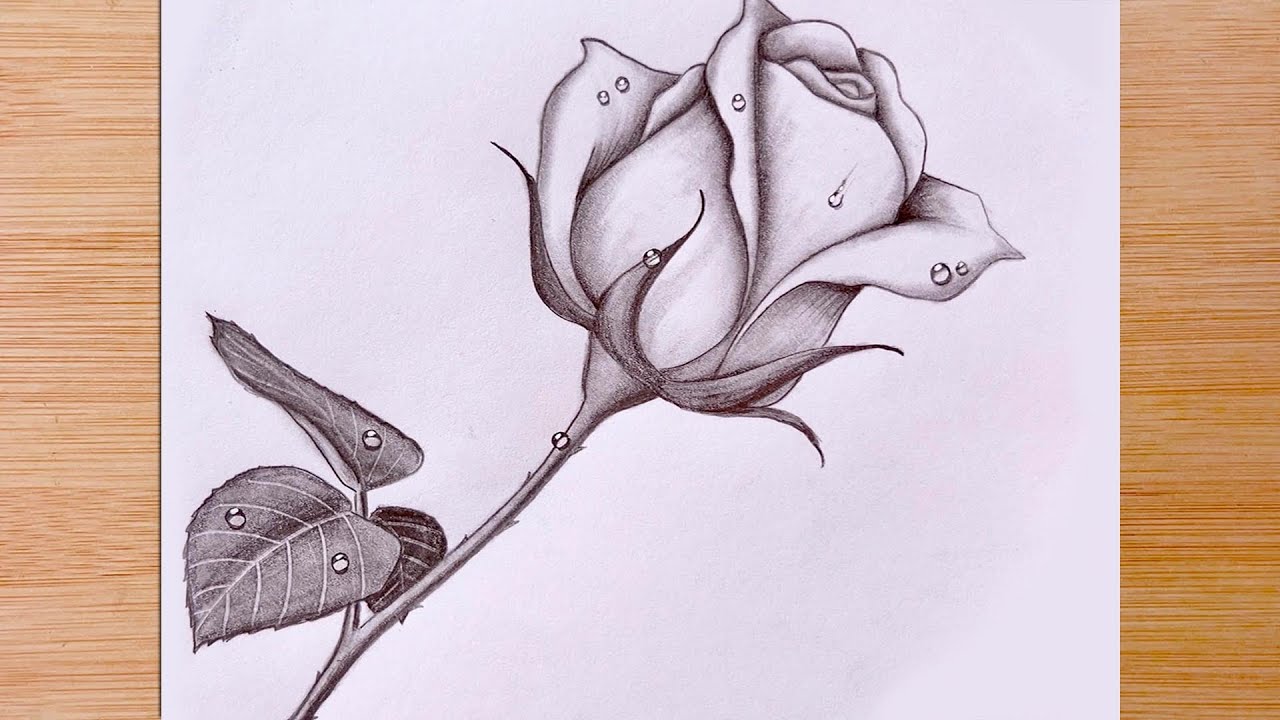
Step 5: Shading and Detailing
This is where your rose really comes to life! Start shading the petals to add depth. Identify a light source direction and shade the opposite sides of the petals darker. Use your blending stump or cotton swab to smooth the shaded areas, creating a gradual transition. Don’t forget to add some gentle shading on the leaves and stem, too.
Step 6: Final Touches
Finally, once you're happy with the shading, go back and darken the outlines where necessary. Erase any stray lines or smudges, and clean up your drawing to ensure it looks polished. Step back and admire your work—you’ve just created a beautiful rose!
Also Read This: How to Achieve a Full and Voluminous Look with Hair Extensions on Dailymotion
4. Tips for Enhancing Your Pencil Rose Drawing
Now that you’ve got the basics down, let’s talk about how to take your pencil rose drawing to the next level. Here are some handy tips to enhance your artwork:
- Experiment with Textures: Use different pencil grades to create a variety of textures. Harder pencils (H) will give you fine lines, while softer pencils (B) are perfect for rich, dark shading.
- Contrast is Key: To make your rose pop, employ a good contrast between light and dark areas. This adds dimension and makes your flower look more lifelike.
- Practice Makes Perfect: Don’t be discouraged if your first rose doesn’t turn out as you envisioned. The more you practice, the better you’ll get! Consider trying different angles and compositions.
- Use References: Don’t shy away from using real-life references or photos of roses. They can provide insights into how light plays on petals and how colors would look if you were using other mediums.
- Consider Backgrounds: Adding a simple background, like a soft gradient or a hint of foliage, can make your rose drawing stand out even more.
So there you have it—your guide to creating a beautiful pencil rose and enhancing your artwork! With a bit of patience and practice, you’ll be able to draw stunning roses that you can be proud of. Now, grab your pencil and get started!
Also Read This: How to Copy Video URLs from Dailymotion: A Complete Guide for Easy Sharing
5. Common Mistakes to Avoid When Drawing a Rose
Drawing a rose can be a delightful experience, but it's easy to fall into some common traps, especially if you're just starting out. Here are a few mistakes that many artists make and how to avoid them:
- Neglecting Proportions: One of the biggest mistakes is getting the proportions wrong. A rose consists of multiple layers of petals that spiral around the center. Take your time to study real roses or reference photos while drawing to ensure that you accurately represent the size and shape of the petals.
- Overcomplicating Details: While details are important, overdoing them can make your rose look messy. Focus on the essential shapes and contours of the petals first, then add details like veins and shading gradually to maintain a clean look.
- Using One Direction for Shading: A common error is shading only in one direction. Instead, observe how light hits the rose and create curves and gradients for a more realistic effect. This will give your drawing depth and dimension.
- Ignoring Background Elements: Sometimes, artists focus so much on the rose that they forget about the background. A simple, soft background can make your rose pop even more. Consider lightly shading the area around it to highlight your flower.
- Rushing the Process: Rome wasn’t built in a day, and neither is a great rose drawing! Taking your time lets you appreciate the intricacies of the flower, so don’t rush through the process. Enjoy every minute of it!
By keeping these points in mind, you'll be on your way to creating a more accurate and beautiful representation of a rose. Remember, even experienced artists make mistakes, so don’t get discouraged if things don’t turn out perfectly on your first try!
Also Read This: Is Dailymotion Safe for Users? A Comprehensive Guide to Secure Usage
6. Conclusion and Final Thoughts
Creating a beautiful rose with a pencil is not just about mastering technique; it's about expressing your creativity and finding joy in the process. Each stroke of your pencil tells a story, and every rose you draw is unique to you!
As you've learned through this tutorial, the key steps can be broken down into manageable parts:
- Start with the basic shapes.
- Add layers of petals with careful attention to their flow.
- Incorporate shading to give your rose dimension.
- Don’t forget to have fun and explore your personal style!
Whether you're creating a detailed piece for a gift, decorating a card, or simply practicing your skills, remember that every piece of art is a reflection of your effort and passion. Don't shy away from mistakes; they're an essential part of the learning process. Consider keeping a sketchbook where you can experiment and explore different styles and techniques without pressure.
Lastly, I encourage you to continue practicing and challenging yourself with different subjects, whether it's different flowers, landscapes, or abstract art! The more you draw, the more you'll discover your own artistic voice.
So grab your pencil, find some inspiration, and get out there to create your next beautiful rose! Happy drawing!
Watch the Tutorial on Dailymotion
Creating a beautiful rose with a pencil is a rewarding and enjoyable craft that can be mastered with just a bit of practice. To help you along the way, we’ve created an engaging tutorial available on Dailymotion. This step-by-step video guide will provide you with all the techniques needed to bring your rose to life.
In the video tutorial, you will learn:
- Essential Materials: A list of what you need before you start:
- Pencil (HB and 2B recommended)
- Eraser
- Sketch paper
- Blending stump (optional)
- Basic Sketching Techniques: How to sketch the initial outline of the rose.
- Shading Tips: Techniques for shading that create depth and realism.
- Detailing: How to add intricate details that make your rose stand out.
With clear instructions and helpful demonstrations, our tutorial ensures that even beginners can follow along and create stunning pencil drawings. You’ll also see various styles of roses, enabling you to choose which design resonates most with your artistic voice.
So, grab your materials, and don’t forget to watch our Dailymotion tutorial. You'll be on your way to drawing beautiful roses in no time!
In conclusion, immersing yourself in this tutorial not only equips you with skills but also ignites creativity in your art journey. Enjoy the process and watch your artistic abilities blossom!
 admin
admin


