Hey there! If you're a content creator or just someone who loves sharing videos online, you might find yourself wondering how to effectively manage your video uploads across different platforms. One common question is: how do you upload Facebook videos to YouTube? In this guide, we'll explore not only the steps to do that but also dive into the reasons why transferring your videos can be beneficial for you. So, let's get started!
Why You Might Want to Transfer Videos from Facebook to YouTube
There are several compelling reasons to consider transferring your videos from Facebook to YouTube. Let’s break these down:
- Wider Audience Reach: YouTube is one of the largest platforms for video sharing, boasting over 2 billion active users. By uploading videos to YouTube, you increase the visibility of your content and tap into a larger audience. Facebook is great for connecting with friends and family, but YouTube can introduce your videos to a global audience.
- Better Monetization Options: If you're looking to monetize your content, YouTube offers various ways to make money from your videos. You can earn through ads, sponsorships, merchandise, and memberships. Facebook has monetization options too, but YouTube's Partner Program is often considered more robust and accessible for creators.
- Enhanced Video Features: YouTube provides advanced features like video analytics, end screens, thumbnails, and playlists, which can greatly enhance your channel's performance. Facebook's video features are limited in comparison, especially when it comes to optimizing discoverability and engagement.
- Longevity of Content: Videos on YouTube have a longer lifespan compared to Facebook. While Facebook's algorithm promotes new content, videos on YouTube can continue to gain views and engagement for years after their upload. This makes YouTube a better option for content that you want to remain relevant long-term.
- SEO Benefits: YouTube is owned by Google, which means videos hosted on this platform tend to rank better in search engine results. By uploading your videos to YouTube, you can use video titles, descriptions, and tags to improve search visibility, ultimately driving more traffic to your content.
- Community Engagement: YouTube has a strong community aspect, allowing creators to engage with their audience through comments, live streams, and community posts. You can build a dedicated subscriber base that’s more invested in your content, leading to more interaction and loyalty.
While transferring your videos may seem like a daunting task, the rewards often outweigh the effort. Whether you're looking to expand your reach, monetize your content, or simply take advantage of YouTube's features, uploading videos from Facebook to YouTube can be a smart move for anyone serious about video content creation.
Also Read This: Fixing Black Screen Issues on YouTube TV
3. Prerequisites for Uploading Videos
Before you jump into uploading your videos from Facebook to YouTube, it’s important to ensure you have everything in place. Here’s what you need to check:
- Access to Your Facebook Videos: You can only upload videos that you own or have permission to use. Make sure you have access to the Facebook account that contains the videos you want to upload.
- Video Quality: Consider the quality of the video. YouTube supports various resolutions, including 4K, so it’s best to upload your highest quality version. If the video is pixelated or poor quality on Facebook, it’ll look the same on YouTube.
- File Format: Make sure your video is in a compatible format for YouTube. Common video formats include MP4, AVI, and MOV. If it’s in a different format, you may need to convert it before uploading.
- Internet Connection: A stable and fast internet connection is essential for uploading videos to YouTube. A slow connection can lead to long upload times and even interruptions.
- YouTube Account: Ensure you have a YouTube account. If not, you’ll need to create one, which is free and quick. A channel is necessary for you to upload videos.
- Copyright Awareness: Be aware of copyright issues. If your Facebook video uses copyrighted material (like music or film clips), you may encounter issues when uploading to YouTube. It's best to use original content or content that you have rights to.
Once you have these prerequisites sorted out, you're ready to move on to the next stage of the process: downloading your Facebook videos.
Also Read This: How to Stop YouTube from Playing Videos While Scrolling: Managing Auto-play Settings
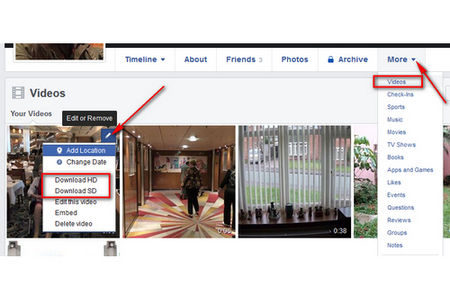
4. Step-by-Step Guide to Downloading Facebook Videos
Now that you're clear on the prerequisites, let's get into the nuts and bolts of downloading your videos from Facebook. Whether it's a cherished family moment or a promotional clip, here's how to go about it:
- Log into Facebook: Open Facebook and log into your account. Navigate to the video you want to download.
- Find the Video: Locate the video you wish to download, either on your timeline or on a friend's page/tool.
- Click on the Video: Click to open the video in full view. This is crucial because it changes the URL to the direct video link.
- Copy the Video URL: In the address bar of your browser, right-click and select “Copy” to grab the video’s URL. This link is essential for downloading the video.
- Use a Video Downloader: Open a reliable online video downloader. Websites like savefrom.net or fbdown.net are user-friendly options that allow you to simply paste the URL you copied. Just follow the on-screen instructions to initiate the download.
- Select Video Quality: Most websites offer different quality options. Choose the resolution that best suits your needs. Higher quality is recommended for better viewing experience on YouTube.
- Download the Video: Click on the download button and wait as your video is processed. Once it's ready, your browser will prompt you to save the video file.
And there you go! You now have a copy of your Facebook video saved directly to your device. Next up, you'll be ready to upload it to YouTube, where you can share it with an even wider audience!
Also Read This: How to Download Audio from YouTube: A Step-by-Step Guide
5. How to Prepare Your Videos for YouTube
So, you've got your Facebook video ready and you’re eager to get it on YouTube. But hold your horses! Before you dive into the upload process, it's crucial to prepare your video properly. Here’s how to do just that:
- Check Video Quality: Ensure your video looks great. YouTube supports various resolutions, but for the best viewer experience, aim for at least 1080p. If your video from Facebook isn’t crisp, consider editing it or re-exporting it in a higher resolution.
- Edit for YouTube: If your video is tailored for Facebook—like having a square format or an overly long intro—now’s the time to make adjustments. Use a video editing tool to:
- Trim unnecessary parts
- Add engaging graphics or captions
- Enhance audio quality
- Optimize File Format: YouTube supports a variety of file formats, but the most common and effective formats are MP4, AVI, and MOV. If your Facebook video is in a different format, consider converting it before uploading.
- Create an Engaging Thumbnail: While YouTube automatically generates thumbnails, a custom thumbnail can underscore your video’s content and attract more viewers. Use tools like Canva to design something eye-catching!
- Write a Compelling Description: Your video’s description is essential for SEO and viewer engagement. Include keywords relevant to your content, a brief summary, and any links to your social media or website. Make it informative yet inviting!
By following these tips to prepare your video, you're ensuring it’s not just ready for YouTube but also positioned to capture the attention of viewers and keep them watching. With everything in order, you’ll be all set for the big upload!
Also Read This: What Channel is the Super Bowl on YouTube TV? Find Out Here
6. Uploading Your Videos to YouTube
Alright, you’ve prepped your video, and now it’s time for the moment of truth—the upload! This is a straightforward process, but I'll break it down step-by-step to make sure nothing trips you up.
- Sign into Your YouTube Account: Before you can upload, make sure you’re logged into the right YouTube account. If you don’t have one, creating a YouTube account is simple and free!
- Click on the Upload Button: On the YouTube homepage, find the camera icon with a '+' sign, usually located in the upper right corner. Click this to open the upload menu.
- Select Your Video: You’ll be prompted to select a file. Navigate to the video you prepared earlier and click 'Open.' This will start the upload! You can view the progress bar as your video uploads.
- Add Video Details: Once your video is uploaded, you will have options to enter:
- Title: Keep it concise yet descriptive. Make sure to include keywords!
- Description: This is where the compelling description you prepared earlier comes in.
- Tags: Adding relevant tags helps your video to be discovered. Think about what terms people might search for.
- Playlist: If you have playlists set up, consider adding your video to one to increase visibility.
- Choose Privacy Settings: You can set your video to Public, Unlisted, or Private. If you're just starting, you might want to try Unlisted until you're confident everything looks good!
- Publish Your Video: When everything is filled out and looks great, hit that 'Publish' button! If you're not ready to go live just yet, you can save it as a draft.
And there you have it! You’ve successfully uploaded your video from Facebook to YouTube. Now, sit back, promote your video on your other social media platforms, and watch your audience grow.
Also Read This: How to Block YouTube Ads on iPad and Enjoy Ad-Free Content
7. Optimizing Your Videos for Better Reach on YouTube
So, you've successfully uploaded your Facebook videos to YouTube—great job! But wait, just hitting that upload button isn't enough to get your videos the views they deserve. You need to optimize them for better reach! Here are some tips to help your videos stand out in the vast world of YouTube:
- Catchy Titles: Your video title is the first thing viewers will see, so make it engaging and descriptive. Try to include relevant keywords that people might search for. For example, instead of "My Trip," you could say "Exploring the Hidden Gems of Italy – A Travel Guide."
- Effective Thumbnails: A picture is worth a thousand words, right? Create eye-catching thumbnails that visually represent your video content. YouTube allows custom thumbnails, so use high-quality images and bold text to attract clicks.
- Compelling Descriptions: The description box is your opportunity to provide more context. Use relevant keywords to improve discoverability, and include links to related content or social media. A well-crafted description can entice viewers to keep watching.
- Tags Matter: Tags help YouTube understand what your video is about. Use a mix of broad and specific tags relevant to your content. While they’re not as crucial as they used to be, they can still help with discoverability.
- Engagement is Key: Encourage viewers to like, comment, and subscribe. Ask questions in your video to prompt comments, and don’t forget to respond to them. Higher engagement can lead to better rankings in search results.
- End Screens and Cards: Use these features to promote other videos or playlists. This keeps viewers on your channel longer and boosts your overall watch time, which is a significant factor in YouTube’s algorithm.
- Consistent Uploading Schedule: Regular uploads can build your audience over time. Create a content calendar and stick to it! Consistency helps in retaining viewers and attracting new subscribers.
By implementing these strategies, you're not just increasing your video's chances of being seen by a broader audience; you're also building a community around your content. Remember, YouTube is as much about engagement as it is about videos!
8. Conclusion
Congratulations on taking the plunge into uploading your Facebook videos to YouTube! It’s a fantastic way to reach a wider audience and make the most of your content. As we've discussed, optimizing your videos plays a crucial role in ensuring they get the visibility and engagement they deserve.
Here’s a quick recap of what we've covered:
- Understand the differences between Facebook and YouTube's audience and formats.
- Utilize the right editing tools to make your videos shine.
- Master the upload process to minimize issues.
- Optimize titles, descriptions, and thumbnails for better visibility.
- Engage with your audience to boost interaction and loyalty.
As you embark on this journey, remember that it may take time to see results. Be patient, keep experimenting with your content, and watch your YouTube channel grow. Whether you’re a budding creator or an established personality, there’s always something new to learn.
Thanks for reading our Quick Guide to Uploading Facebook Videos to YouTube! If you found this helpful, consider sharing it with others who might benefit. Also, feel free to drop your thoughts or questions in the comments below. Happy uploading!
 admin
admin


