Side bun hairstyles are the perfect blend of elegance and ease, making them a popular choice for various occasions. Whether you're dressing up for a wedding, heading to the office, or simply want a chic everyday look, a side bun can elevate your entire outfit. This style is versatile, allowing you to incorporate braids, twists, or even a few loose strands for a relaxed vibe. In this guide, we'll explore the beauty of side buns and how they can suit your unique style.
Benefits of Choosing a Side Bun Style
Opting for a side bun hairstyle comes with several benefits that make it a fantastic choice for many. Here are some key reasons why you should consider rocking this style:
- Versatility: Side buns can be dressed up or down. They work wonderfully for formal events, casual outings, or even gym sessions when paired with the right outfit.
- Suitable for All Hair Types: Whether you have straight, wavy, or curly hair, side buns can be adjusted to fit your texture. They can also accommodate various hair lengths, making them accessible for everyone.
- Effortlessly Chic: A side bun instantly adds a touch of sophistication to your look. It transforms even the simplest outfits into something more polished and stylish.
- Face-Framing: This hairstyle can beautifully frame your face, highlighting your features while adding elegance. You can leave out a few strands for a softer touch or keep it sleek for a more structured look.
- Comfort: If you're looking for a hairstyle that keeps your hair off your neck and out of your face, a side bun is a great way to achieve that while looking fabulous. This makes it an excellent option for warmer days or active events.
- Quick and Easy: Side buns can be created in a matter of minutes, especially with a bit of practice. Whether you're rushing out the door or just want to switch things up, it’s a fast and effective style.
In conclusion, choosing a side bun hairstyle not only enables you to express your personal style but also offers numerous practical benefits. From its versatile nature to its chic appeal, this hairstyle is a must-try. So, if you’re ready to elevate your look, grab your hair ties and let’s dive into how you can achieve the perfect side bun!
Also Read This: How Michael Jackson Died: Dailymotion Documentary and News
3. Essential Tools and Products for Creating Side Buns
Creating the perfect elegant side bun isn’t just about technique; it’s also about having the right tools and products on hand. Whether you’re aiming for a chic, polished look or a relaxed, messy bun, here’s a rundown of essentials that will help you achieve your desired style with ease.
1. Hairbrush or Comb
Starting off, a good hairbrush or a fine-tooth comb is indispensable. You’ll want to smooth out any tangles before you begin styling, ensuring a neat finish. A boar bristle brush is great for adding shine, while a wide-tooth comb works well for creating beachy, textured looks.
2. Hair Ties
Invest in quality hair ties that won’t snag or damage your hair. Look for elastic ties that are gentle on the strands but secure enough to hold your bun in place. If you’re going for a more polished look, consider using a clear elastic that blends in with your hair color.
3. Bobby Pins
You can’t create a side bun without bobby pins! These little lifesavers will secure your bun and keep everything in place. Keep a few different sizes on hand, but standard-sized pins work for most buns. For finer hair, mini bobby pins can be more effective.
4. Hair Donut (Optional)
If you want a fuller, more structured bun, a hair donut can be a game changer. Simply pull your hair through the center, spread your hair around it, and secure it with bobby pins. It’s perfect for beginners or anyone looking for a little extra volume.
5. Hairspray
No side bun is truly complete without a spritz of hairspray! This product will help set your style for the day. Choose a flexible-hold hairspray for a natural look or a stronger formula for a more polished finish. Remember to use it sparingly; too much can create a crunchy texture.
6. Hair Gel or Mousse
For sleek and polished side buns, hair gel or mousse can come in handy. Apply a small amount before styling to tame flyaways and add hold. A bit of mousse on damp hair before drying can provide texture and grip for your style.
7. Decorative Hair Accessories (Optional)
If you want to amp up your side bun, consider adding decorative hair accessories. Flowers, jeweled pins, or ribbons can give your bun an elegant touch, making it perfect for special occasions like weddings or parties.
With these tools and products in your styling kit, you're well on your way to creating gorgeous side buns that showcase elegance and sophistication!
Also Read This: Access YouTube in Pakistan with Dailymotion Video Instructions
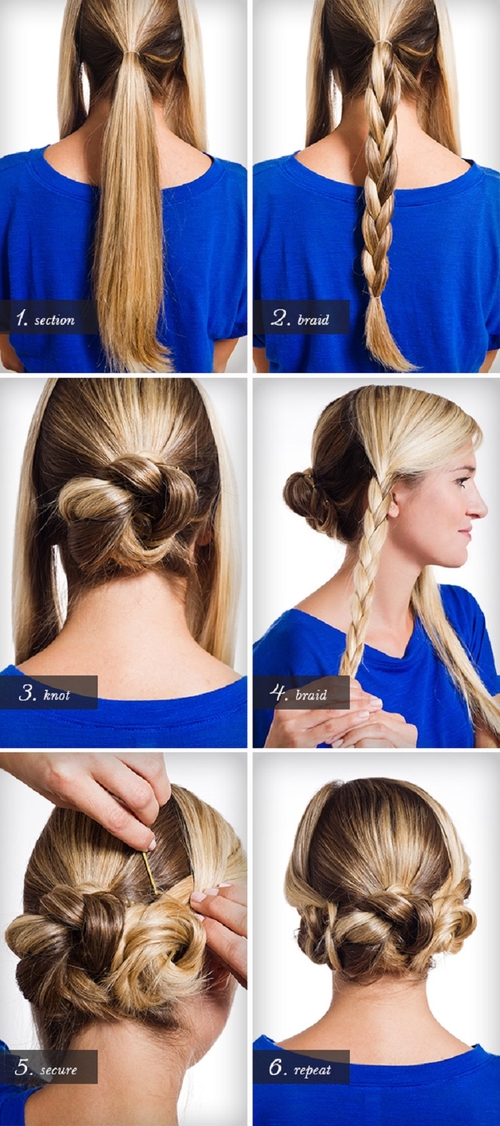
4. Step-by-Step Guide to Creating a Basic Side Bun
Now that you've gathered your essential tools and products, let's dive into the step-by-step process of creating a basic side bun. This classic style is incredibly versatile and can be worn for any occasion, from casual outings to formal events.
Step 1: Prep Your Hair
Start with clean, dry hair. If your hair is freshly washed, consider applying a light styling product—like mousse—to add texture. If you're working with second or third-day hair, a bit of dry shampoo can add volume and grip.
Step 2: Create a Side Part
Using your comb, create a side part where you'd like your bun to sit. A deeper part can add more drama, while a subtle one keeps the look soft and classic. Don’t stress if it's not perfect—this style can be forgiving.
Step 3: Gather Hair
Using your hands or the hairbrush, gather all your hair over to one side—whichever side you prefer. Hold it in place with one hand while you prepare to secure it with an elastic tie.
Step 4: Create a Ponytail
With your hair collected to one side, use your elastic hair tie to create a loose ponytail. Don’t pull it too tight; allowing some slack will make for a more relaxed bun.
Step 5: Form the Bun
Now, take the ponytail and twist it gently. Wrap this twist around the base where your elastic is. As you wrap, you can decide if you want a tight or loose bun based on your preference. Secure the ends with bobby pins, pinning them into the base of the bun.
Step 6: Secure with Hairspray
Once you’ve pinned everything in place, give your bun a light mist of hairspray to keep it secure throughout the day. If there are any flyaways, you can smooth them down with a bit of hair gel or a fine-tooth comb.
Step 7: Add Finishing Touches
Finally, if you'd like to dress it up a bit, now’s the time to add decorative accessories. Whether it’s a floral clip or a sparkling pin, these touches can elevate your side bun from basic to beautiful in no time.
Voilà! With these simple steps, you’ve created a classic side bun that’s not only elegant but super easy to achieve. Remember, practice makes perfect—so don’t hesitate to try different variations to find the style that works best for you!
Also Read This: How to Become a Verified Dailymotion Partner with Easy Steps
5. Variations of Side Bun Hairstyles for Different Occasions
When it comes to hairstyles, versatility is key! The side bun is a classic choice that can be adapted for almost any event, from casual brunch outings to formal galas. Let’s explore some variations of side bun hairstyles tailored for different occasions.
1. Casual Side Bun:
- Effortless Chic: For a laid-back lunch with friends, opt for a loose, messy side bun. Pull out a few strands to frame your face, combining comfort with charm.
2. Office-Ready Bun:
- Sleek and Professional: For the workplace, a smooth and polished side bun is perfect. Use a straightener before styling to keep things neat, and secure it with a hairpin for extra hold.
3. Date Night Glam:
- Romantic Touch: Consider a side bun with soft curls. They add volume and elegance, perfect for a romantic dinner. Pairing this with a delicate hair accessory can elevate the whole look!
4. Wedding or Formal Event:
- Elegantly Detailed: For a wedding, a side bun adorned with flowers or jeweled pins can create a breathtaking effect. Incorporating intricate braids can also add depth and texture to the hairstyle.
5. Party-Ready Bun:
- Fun and Flirty: Try a side bun with added volume or even a messy top section. You could tease the hair at the crown to give a little more drama. Don’t be shy to include colorful or bold hair ties and accessories!
Each of these variations can be customized further based on your personal style and hair type. As you experiment, you’ll find the perfect side bun for any occasion!
Also Read This: How to Make Easy Pop Up Cards: Creative Card Making on Dailymotion
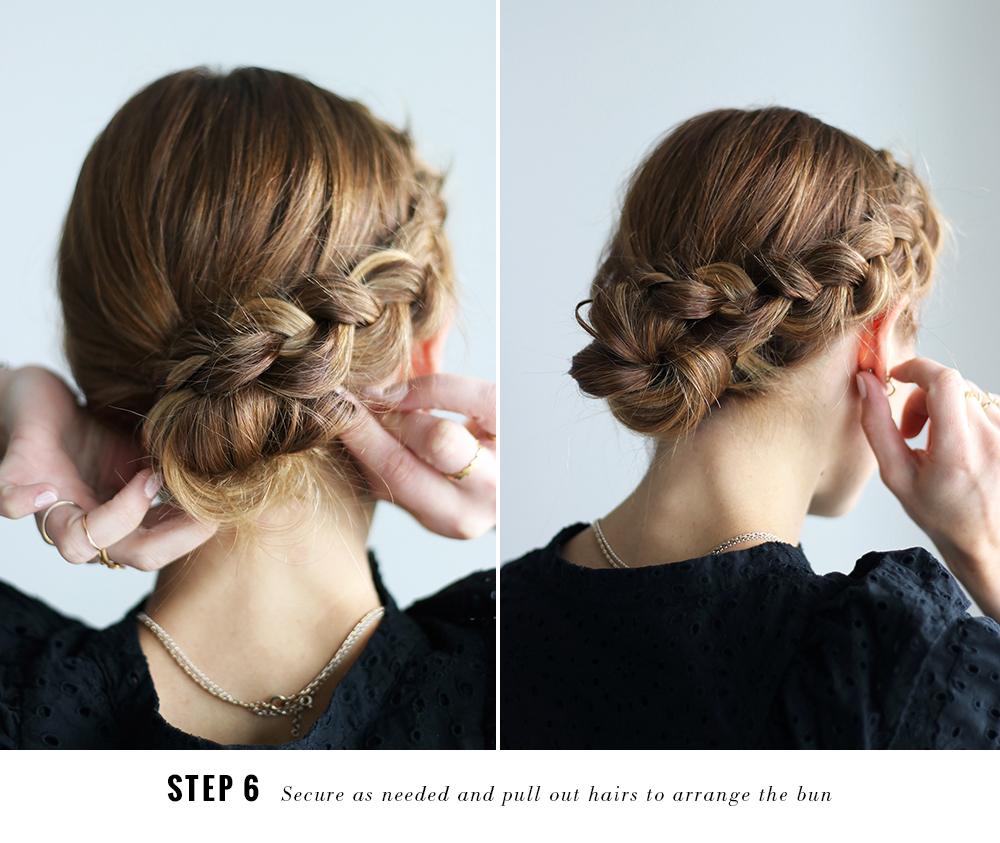
6. Maintenance Tips for Side Bun Hairstyles
While the side bun is a fabulous go-to hairstyle, keeping it looking fresh and stylish requires a bit of maintenance. Here are some practical tips to ensure your side bun stays *beautiful and intact throughout the day.
1. Use Quality Products:
Start with a good shampoo and conditioner suited for your hair type. Consider using a styling gel or mousse before styling, as they’ll help provide the hold needed for a secure bun.
2. Secure with Pins:
Always use bobby pins that match your hair color for a seamless look, and don’t shy away from adding extra pins for support, especially if you have thick hair.
3. Avoid Over-Brushing:
While you want your hair to look smooth, over-brushing can lead to frizz. Instead, use a brush only to detangle and apply a smoothing serum to maintain sleekness.
4. Protect While You Sleep:
Maintain the longevity of your style by protecting your hair while you sleep. Consider a loose braid or a silk scarf to minimize friction and tangling.
5. Refreshing the Bun:
If you plan on wearing your side bun for an extended period, a quick refresh is essential. Lightly spritz some hairspray* to control flyaways and revitalize the shape of your bun.
6. Regular Trims:
To keep your hair healthy, ensure you schedule regular trims. Splits and damaged ends can detract from any hairstyle, including your gorgeous side bun!
By following these simple maintenance tips, your side bun will not only look stunning for any occasion but also stay healthy and strong. Enjoy flaunting your elegant side bun with confidence!
Also Read This: Is Dailymotion Safe for Children?
7. Inspiration: Side Bun Hairstyles from Dailymotion
If you're looking to elevate your side bun game, Dailymotion is an incredible resource filled with inspiration and tutorials. There are countless videos showcasing the myriad of ways to style a side bun that can suit any occasion—from casual outings to formal events.
Here are a few types of side bun hairstyles you might find inspiring:
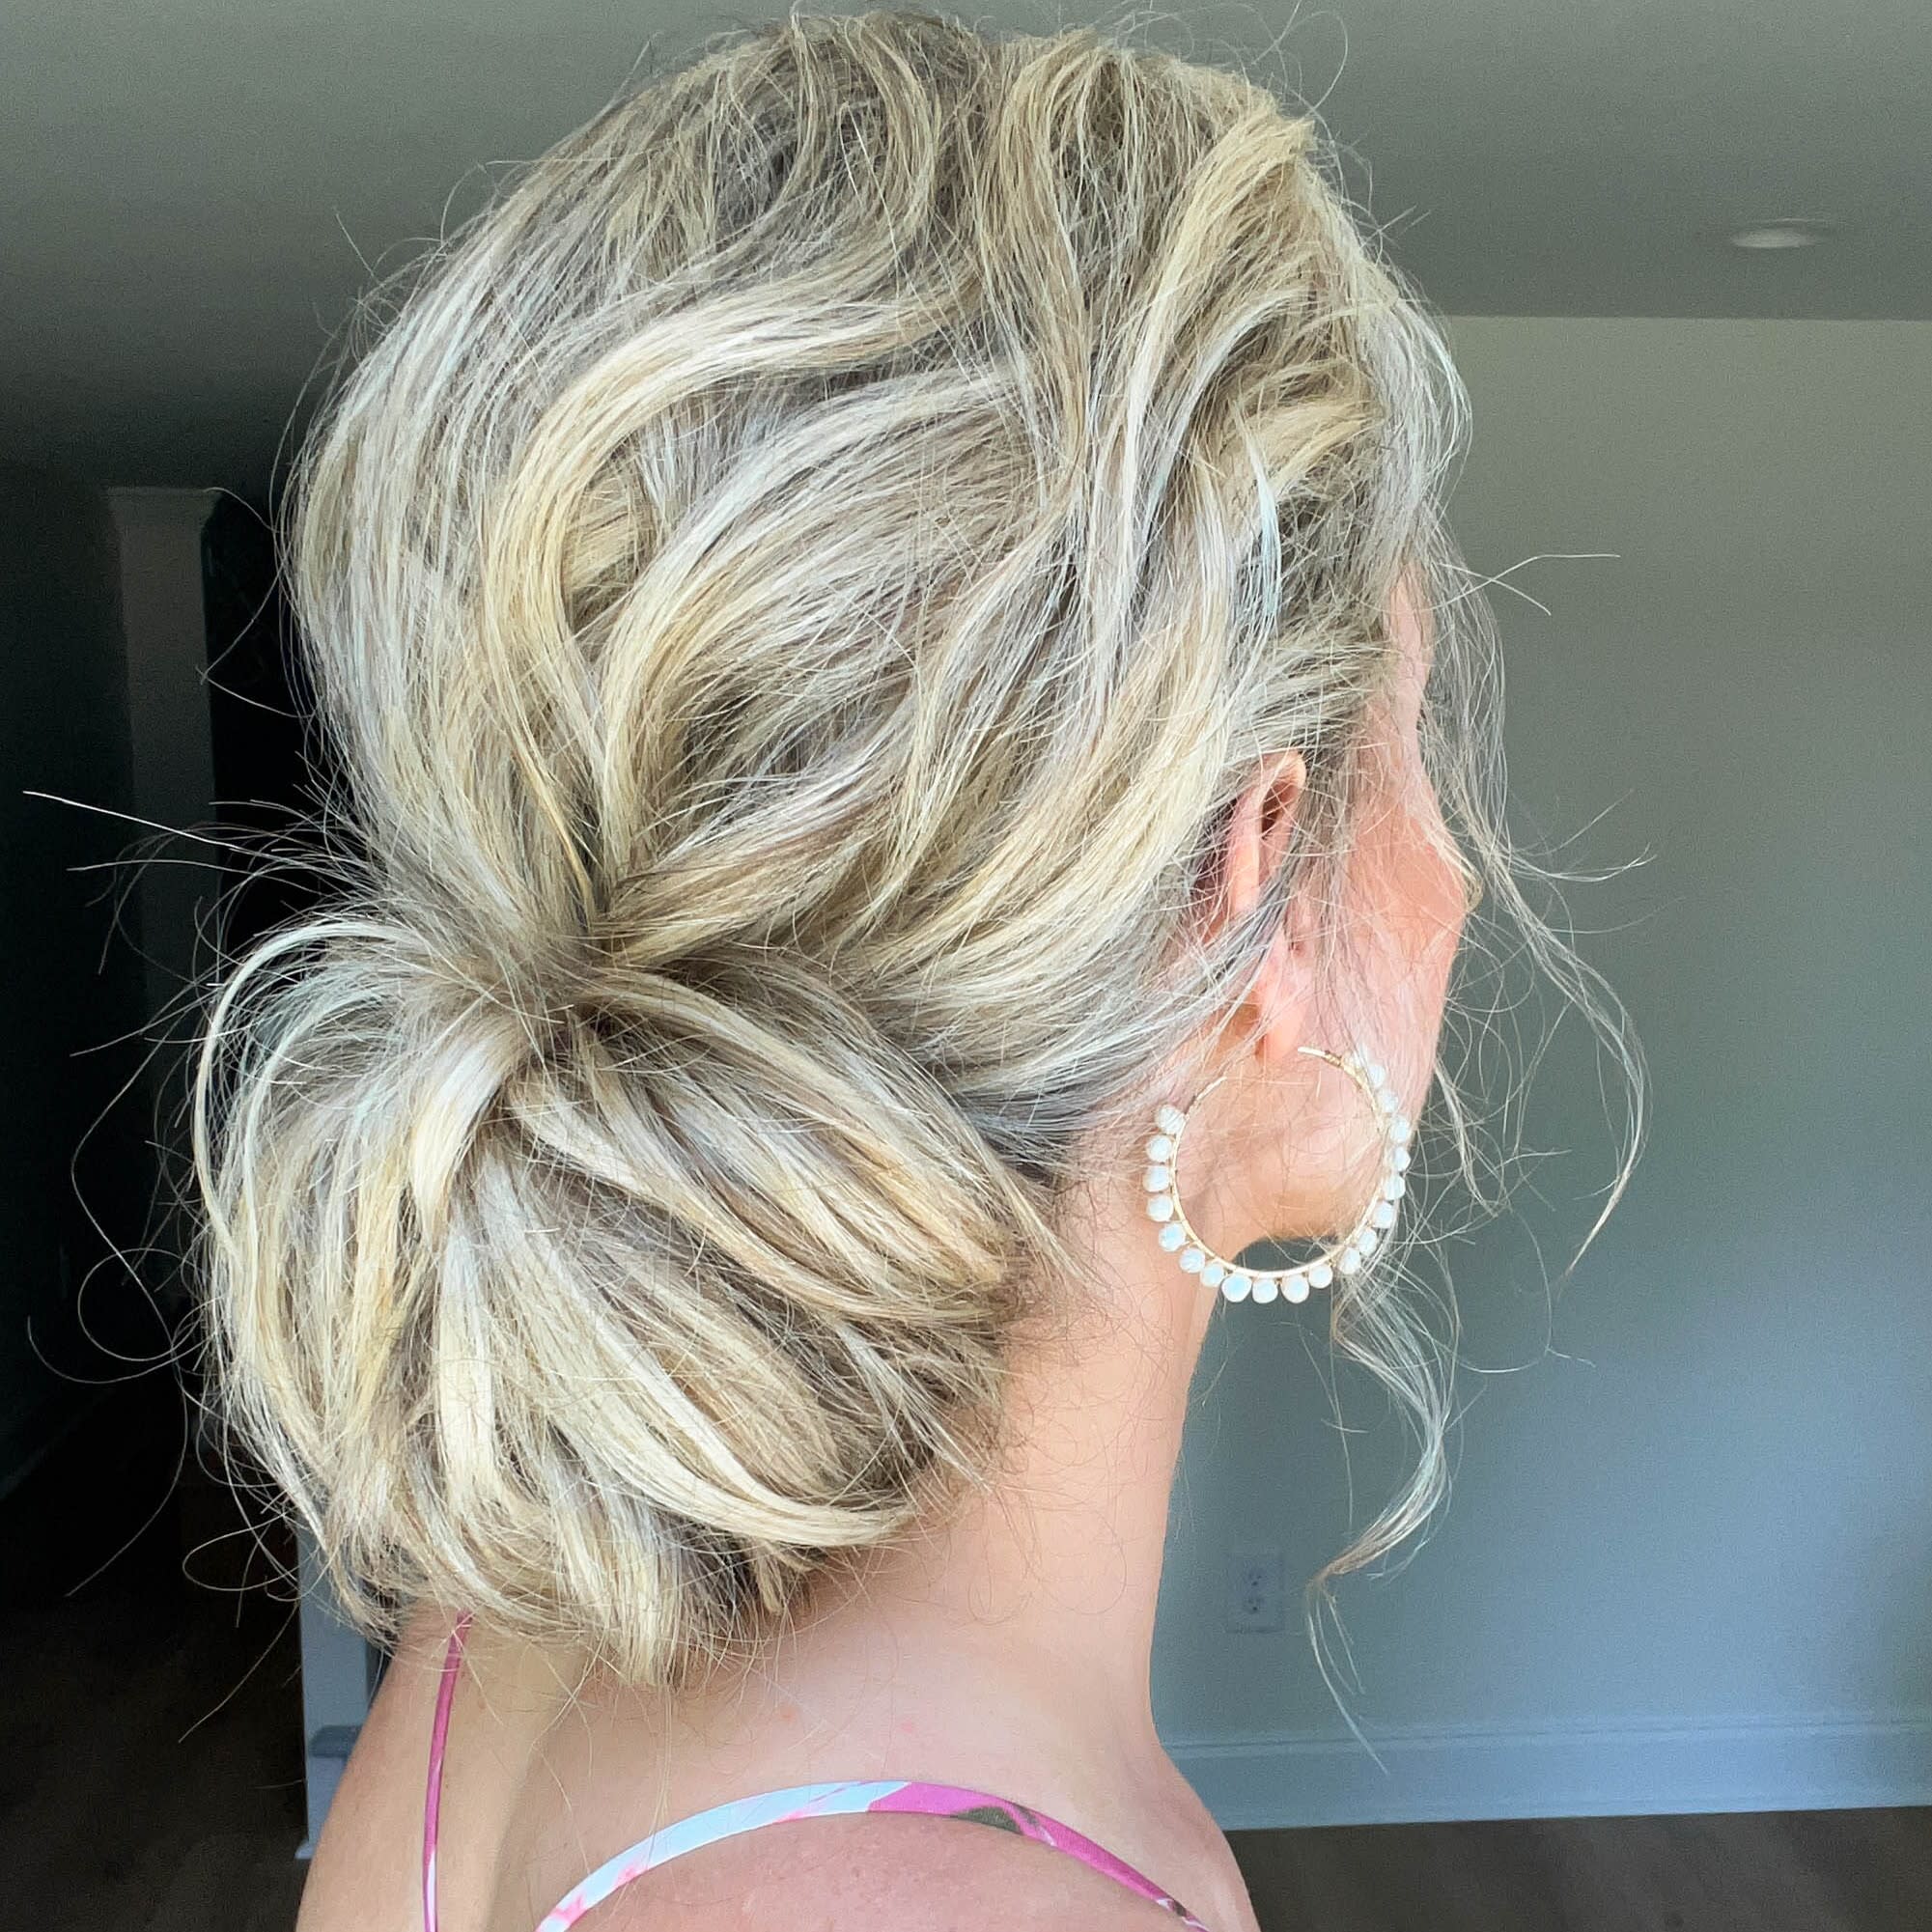
- Messy Side Bun: This relaxed style gives off a carefree vibe. The messy side bun can be achieved by loosely twisting your hair and pulling it to one side. Don't worry about making it look perfect; a few strands falling out can add to its charm!
- Classic Low Side Bun: This timeless style is elegant and works beautifully for formal occasions. It’s all about making your bun look polished and neat. Try using a smoothing serum to keep any flyaways in check.
- Wrapped Side Bun: For a touch of sophistication, consider a wrapped side bun. This involves taking a section of your hair from the bun and wrapping it around the base to create a seamless look. It’s stunning and simple!
- Twisted Side Bun: This version of a side bun adds an element of fun. By twisting sections of hair before gathering them into a bun, you create texture and dimension. It's perfect for casual daytime outings!
- Fishtail Braid Side Bun: This creative take combines braiding with your bun. You can start with a fishtail braid that transitions into a side bun, making your hairstyle both unique and eye-catching.
On Dailymotion, you can find tutorials on how to replicate these styles step by step. Just search for "side bun hairstyles," and you'll be greeted with a treasure trove of ideas. Many content creators share their tips and tricks, such as using specific products to hold your style or alternative methods to achieve volume. Watching these videos can help you visualize the look you want and make the process way easier.
8. Conclusion and Final Tips for Perfecting Your Side Bun
Now that you have a wealth of inspiration and know-how for creating stunning side buns, it's time to wrap things up with a few final tips that will help you perfect your look.
1. Choose the Right Products: The foundation of a great side bun starts with the right products. Use a good quality mousse or texturizing spray before styling to add volume. A lightweight hairspray will keep your bun in place without weighing it down.
2. Consider Your Hair Type: Different hair types may require different techniques. For fine hair, adding volume at the roots can make a big difference, while thick hair might need extra bobby pins to secure everything in place. Don't hesitate to experiment until you find what works best for you!
3. Practice Makes Perfect: Like any skill, mastering the side bun takes practice. Don’t be discouraged if your first attempts don’t turn out as expected. Keep experimenting with different styles until you find your signature side bun!
4. Accessorize: Adding a statement hairpiece, like a decorative pin or flower, can elevate your hairstyle, making it stand out. Just make sure it complements your outfit and doesn’t overpower the elegance of the side bun itself.
5. Don’t Rush: Take your time when creating your side bun. Quick styling can lead to mistakes or an uneven look. Enjoy the process and make it a moment of self-care!
With these tips and inspirations at your fingertips, you’ll be more than ready to rock your side bun in style. Whether you're dressing it up or keeping it casual, this timeless hairstyle can be a fantastic way to express your individuality. Happy styling!
 admin
admin


