Nail art brushes are essential tools for anyone looking to elevate their manicure game. Whether you're a professional nail technician or a DIY enthusiast, the right brushes can help you create stunning, intricate designs that showcase your creativity. With so many different brushes available, it can be a bit overwhelming for beginners. But don't worry! In this post, we'll break down the various types of nail art brushes and provide tips on how to effectively use them for your nail art projects.
Types of Nail Art Brushes and Their Uses
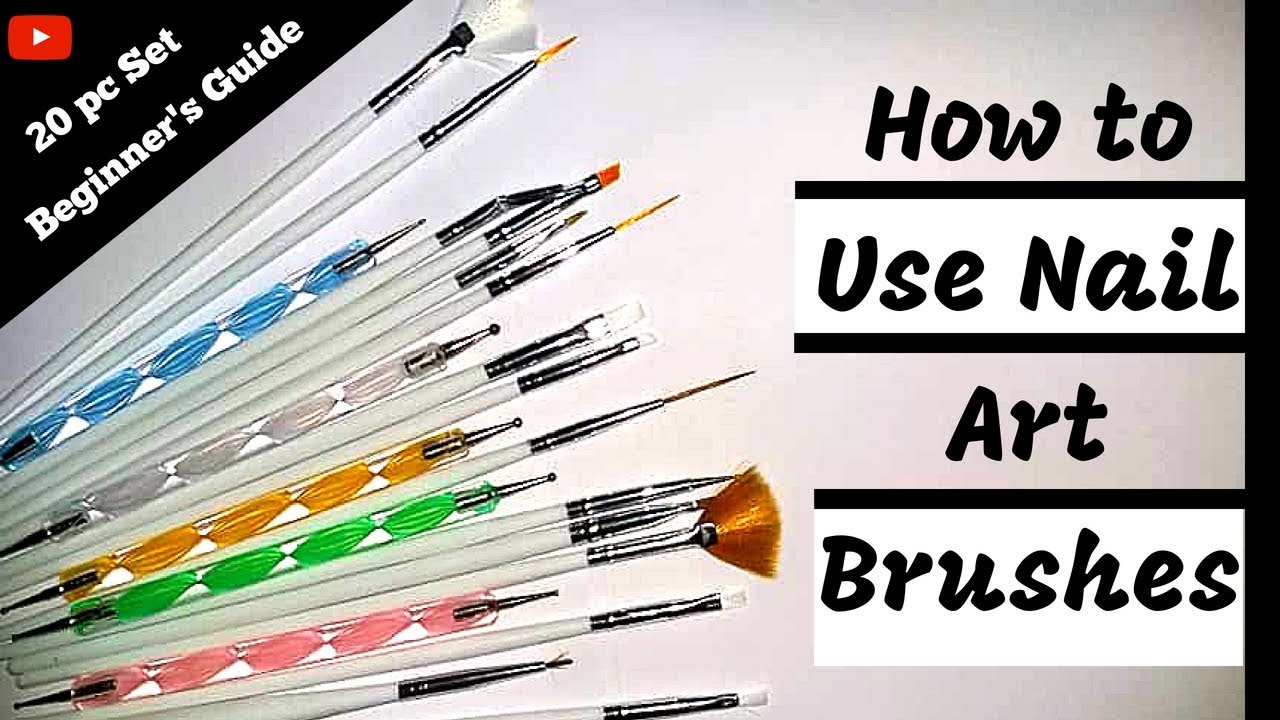
Understanding the different types of nail art brushes available can make a world of difference in achieving those intricate designs you’ve dreamed of. Here's a breakdown of the most common brushes you'll encounter:
- Detail Brush:
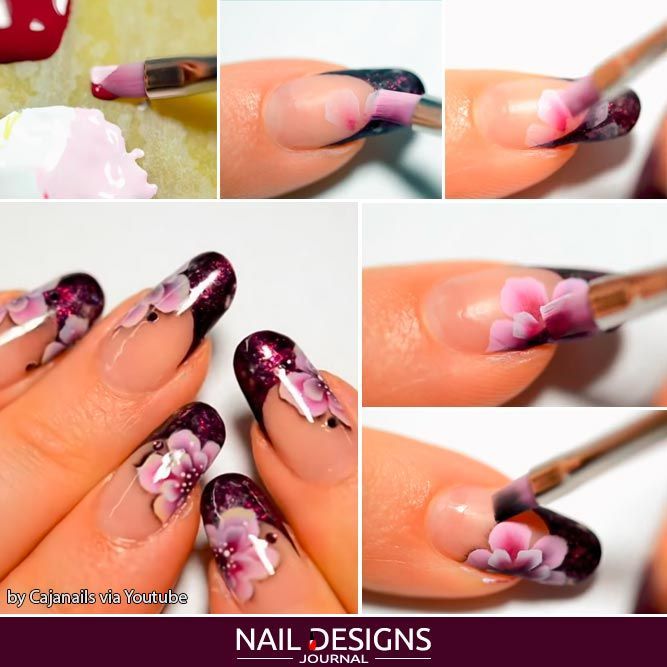
This brush has a thin, fine tip, making it ideal for creating intricate designs and fine lines. It's perfect for delicate work, such as floral patterns or detailed lettering.
- Striping Brush:
Striping brushes typically have long, flexible bristles, allowing you to create straight lines and patterns with ease. They're excellent for stripes, geometric designs, or any look requiring elongated strokes.
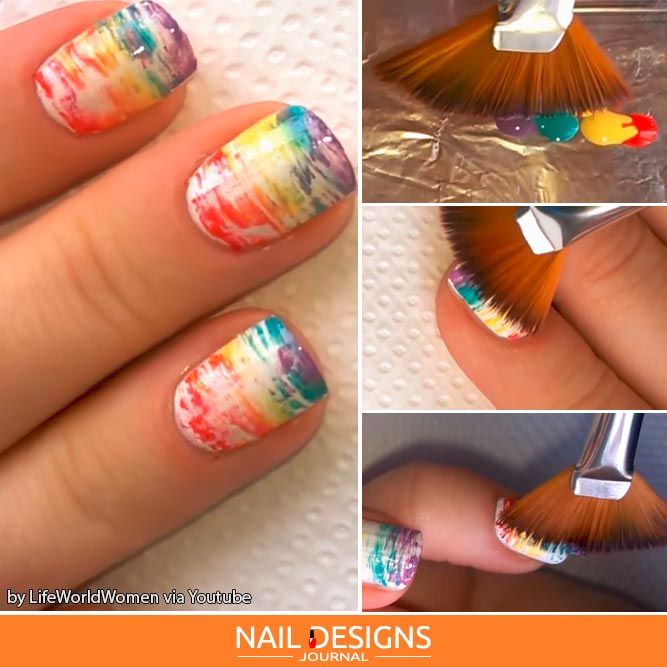
- Fan Brush:
The fan brush has a unique shape with bristles arranged like a fan. This brush is fantastic for various techniques, including sponging and creating texture effects on the nail. It’s also great for blending colors together.
- Dotting Tool:
While not exactly a brush, the dotting tool is essential in nail art. It has a rounded tip that allows you to create dots, flowers, and other shapes quickly. You’ll find it useful for adding details or embellishments.
- Gel Brush:
Specifically designed for working with gel nail products, these brushes have firm bristles that help apply and sculpt the gel effectively. They often come in various shapes (flat, angled) for different techniques.
- Cleaning Brush:
This brush is meant for cleaning up edges and removing excess polish around the cuticle area. A clean edge can make your nail art look professional and polished.
When selecting a brush, consider the style of nail art you want to create. The right brush can make your task much easier and help you achieve more impressive results. When starting out, it might be worth investing in a few essential brushes and gradually expanding your collection as your skills develop.
Pro Tip: Always keep your brushes clean! After each use, make sure to rinse out any polish or gel to ensure the bristles maintain their shape and longevity.
Nail art brushes open up a world of possibilities, allowing you to express your artistic side. Experiment with different brushes and techniques to discover what works best for you!”
Also Read This: Is Dailymotion.com Safe to Use? A Detailed Guide to Its Security Protocols
3. Essential Tips for Using Nail Art Brushes
Using nail art brushes can be incredibly rewarding, especially when you want to create detailed and intricate designs. However, there are a few essential tips to keep in mind to ensure you get the most out of your brushes. By following these tips, you'll not only improve your technique but also maintain the quality of your tools.
- Choose the Right Brush: Different brushes serve different purposes. Flat brushes are perfect for broad strokes, while liner brushes are great for fine details. Invest in a variety of brushes to cover all your design needs.
- Keep Brushes Clean: Always clean your brushes after every use. Nail polish can dry and harden, ruining the bristles. Use a gentle brush cleaner or acetone, and reshape the bristles before storing them.
- Use the Right Amount of Product: Dip your brush lightly into the polish. Too much product can cause uneven lines or blobs. It's easier to build up layers than to fix a mistake caused by excess paint.
- Practice Different Techniques: Get comfortable with your brushes by practicing various techniques. Swirls, dots, and lines can all be mastered with the right touch. Don't hesitate to experiment with different styles!
- Work on a Good Base: A smooth, well-curated base coat makes a huge difference when applying intricate designs. Make sure your base color is fully dry before starting your artwork.
- Utilize Tape and Stencils: For intricate designs, consider using tape or stencils to guide your brushwork. This can help you achieve sharper lines and more defined shapes without relying solely on your freehand skills.
Remember, the key to mastering nail art using brushes is patience and practice. The more you work with them, the more you'll understand how to wield them effectively. So grab your brushes, and let’s get creative!
Also Read This: Ultimate Guide to Baking a Zebra Cake with Dailymotion Video Tutorials
4. Techniques for Creating Detailed Nail Designs
Now that you've got your brushes and some essential tips under your belt, it’s time to dive into specific techniques for creating those stunning, detailed nail designs that’ll have everyone asking how you did it. Here are some popular techniques to help you bring your nail art dreams to life!
- Dots and Dashes: The classic dotting tool method is a must-know. Dip a dotting tool or the tip of your brush into polish and gently tap it onto your nails to create perfect dots. You can make intricate patterns by varying the size of the dots and spacing them out.
- Striping: A liner brush can create beautiful stripes. For clean lines, hold your brush at a 45-degree angle and apply light pressure. You can create various effects by varying the width of the stripes or layering different colors.
- Swirls and Curves: To create elegant swirls, load a thin brush with polish and anchor it at one end of the nail. Use a smooth wrist motion to guide the brush in a swirling motion. Practice makes perfect, so don’t be discouraged if it doesn’t come out right the first time!
- Marbling: For a stunning marble effect, apply a base color and let it dry. Then, using a thin brush, swirl two or more colors lightly on top. Dipping a toothpick can also help finesse the marbling effect.
- Layering Techniques: Don’t be afraid to layer different designs! Start with a base color, add details, and finish with topcoats for dimension. Each layer adds depth and can help the design pop.
With these techniques, your nail art can go from simple to spectacular in no time! Practice these styles, mix and match, and let your creativity flow. Dive in, experiment, and most importantly, have fun with your nail art brush collection!
Also Read This: How to Upload a Thumbnail to Your Dailymotion Video for Better Engagement
5. Common Mistakes to Avoid with Nail Art Brushes
Using nail art brushes can be a game changer for your nail designs, but there are a few common pitfalls that can affect your results. Here are some mistakes you might be making and how to avoid them:
- Not cleaning your brushes: One of the biggest mistakes is neglecting to clean your brushes after every use. Dried polish or acrylic can ruin the bristles and impact your designs. Take the time to clean them with a gentle brush cleaner or rubbing alcohol.
- Using the wrong brush for the job: Each brush has its own purpose! An angled brush is fantastic for creating clean lines, while a dotting tool is perfect for detailed dots or patterns. Familiarize yourself with different brush types and use them accordingly.
- Applying too much pressure: Many beginners press down too hard when using their brushes, leading to thick lines or uneven designs. Gentle strokes usually yield better results, allowing for more control and precision.
- Overloading the brush: It can be tempting to dip your brush deeply into nail polish, but too much product can lead to clumps and smeared designs. Instead, dip just the tip of the brush and add more as needed.
- Ignoring your brush’s condition: If your brush isn’t performing well, it might be due to fraying bristles or product buildup. If you notice your brush doesn’t have the same finesse as it used to, it might be time to invest in a new one.
Avoiding these common mistakes will take your nail art from basic to breathtaking. Remember, practice makes perfect. Don't hesitate to experiment with different techniques and brushes to find what works best for you!
Also Read This: How to Make Crochet Flowers Step by Step: Detailed Tutorial on Dailymotion
6. Caring for Your Nail Art Brushes
Your nail art brushes are your most valuable tools, and taking care of them will ensure that they last longer and perform better. Here’s how to properly care for your brushes:
- Clean them after each use: As mentioned earlier, cleaning your brushes immediately after use is essential. Use a brush cleaner or soak them in acetone for a few minutes, then gently reshape the bristles with your fingers.
- Store them correctly: Always store your brushes standing upright in a brush holder or in a pouch. This prevents the bristles from getting crushed or damaged. Avoid storing them tip-down in a container.
- Don’t let polish dry on the brush: If you forget to clean your brush and the polish dries, it can ruin it. If that happens, you can try soaking the bristles in acetone or brush cleaner to dissolve the polish.
- Use a brush guard: If you want to keep the brush heads in perfect shape, consider using a brush guard to protect them during storage. This is a simple but effective way to maintain their form.
- Replace them when necessary: No matter how well you care for them, brushes can wear out over time. If you notice the bristles fraying or losing their shape, it’s time to invest in a new brush.
By taking proper care of your nail art brushes, you can ensure they remain efficient and effective, helping you create stunning nail designs. A little love and attention can go a long way in extending the life of your tools!
Also Read This: How to Make Biceps Cuts: Simple Exercises on Dailymotion
7. Inspiration for Intricate Nail Designs
When it comes to nail art, inspiration can come from anywhere. Whether you’re flipping through a magazine, scrolling through Pinterest, or just looking at the world around you, there are countless sources to spark your creativity. Here are some fantastic ideas to inspire your next intricate nail design:
- Nature: The colors, patterns, and textures found in nature are perfect for nail art. Think floral designs, animal prints, or even the stunning hues of a sunset.
- Art and Fashion: Look at famous art pieces or the latest fashion trends for color combinations and patterns that scream sophistication and style.
- Seasonal Themes: Embrace the seasons! From vibrant flowers in spring to intricate snowflakes in winter, there's always something unique to depict.
- Geometric Patterns: These clean lines and shapes can create a modern and eye-catching appeal. Plus, they offer a great way to show off your nail art skills!
- Cultural Inspirations: Draw from traditional designs from various cultures around the world. From mandalas to unique symbols, these designs can add a personal touch to your nails.
Additionally, don’t forget about the power of social media! Instagram, TikTok, and even dedicated nail art forums are treasure troves of inspiration. You can follow artists, participate in challenges, or even just scroll through tags like #NailArt or #NailInspo to get your creative juices flowing. Remember, inspiration is everywhere, and the best designs come from your unique perspective.
8. Conclusion and Additional Resources
Nail art is not just a hobby; it's a form of self-expression that allows you to share your creativity with the world. As you embark on your journey to master intricate nail designs using brushes, remember to practice patience and embrace the learning curve. Each stroke with your brush is an opportunity to create something special, whether you’re painting delicate flowers or bold geometric shapes.
Before you dive into your next nail art session, here are some essential resources and tips to keep in mind:
- Tutorial Videos: Check out platforms like YouTube for step-by-step tutorials that guide you through various techniques. Watching skilled artists at work can be a game-changer!
- Nail Art Blogs: There are a plethora of blogs dedicated to nail art where experienced artists share their workflows, tips, and tricks. Sites like Allure and Nails Magazine are great places to start.
- Social Media Groups: Join communities on Facebook or Reddit where you can share your work, ask for feedback, and learn from fellow nail art enthusiasts.
- Books on Nail Art: Consider picking up a book that covers the fundamentals of nail art. Some authors delve deep into the history and techniques that can enrich your practice.
- Practice Makes Perfect: Don’t be discouraged by initial attempts. With each practice session, your skills will improve, and soon you’ll be able to create intricate designs with confidence!
So grab your brushes, let your creativity flow, and have fun experimenting with different techniques and designs. Remember, it’s all about enjoying the process and expressing yourself through your beautiful nails!
 admin
admin


