Introduction to YouTube Notifications
Have you ever felt overwhelmed by a flood of notifications from YouTube? You’re not alone! As one of the largest video platforms in the world, YouTube keeps users updated on everything—from new video uploads to comments on videos you’ve liked. While these notifications can be helpful, they can quickly become distracting. In this post, we’ll explore what
Also Read This: How to Bolden Text on YouTube: Easy Steps for Formatting Your Video Titles and Descriptions
Understanding the Importance of Managing Notifications
Managing your notifications is crucial for several reasons. Let’s break down why keeping your YouTube notifications in check can enhance your overall experience:
- Reduces Distractions: Constant notifications can disrupt your focus. By managing them effectively, you can enjoy your content without interruptions.
- Prioritizes Relevant Content: By customizing your notification settings, you can ensure you're only alerted about the content you care about. This means no more scrolling through missed notifications.
- Improves Mental Clarity: Too many notifications can create mental clutter. A streamlined notification system contributes to reduced anxiety and an improved viewing enjoyment.
- Boosts Engagement: When notifications are relevant, you're more likely to engage with the content. You’ll be alerted about new uploads from your favorite creators, ensuring you don’t miss out.
By taking the time to manage your YouTube notifications, you’re not just minimizing distractions; you’re also creating a viewing environment that suits your personal preferences. Picture this: instead of being inundated with alerts about videos you might not even watch, you only receive notifications about the creators and topics that spark your interest. This shift can significantly enhance how you experience the platform.
Furthermore, understanding notifications can unfold a world of advantages beyond just the viewing experience. Subscribers often miss out on essential content updates due to de-prioritized notifications, so being selective helps keep your favorite channels within reach.
Here's a simple checklist to summarize why managing your notifications is beneficial:
- Identify what matters to you: Are you interested in specific channels or topics?
- Decide the best timing: Are there specific times you’d prefer to receive notifications?
- Limit communication: Only allow alerts for new uploads or comments on important videos.
By implementing these strategies, you can take control of your YouTube notifications. Remember, a well-managed notification system allows you to keep your online space organized and centered around what you genuinely enjoy. So, let’s dive deeper into how you can delete or manage those pesky notifications and reclaim your YouTube experience!
Also Read This: Accessing and Using the Transcript Feature on YouTube Videos
3. Step-by-Step Guide to Delete YouTube Notifications on Desktop
Are those YouTube notifications piling up in your inbox? Don’t worry, we’ve got you covered! Deleting notifications on your desktop is straightforward. Let’s walk through the steps together.
Step 1: Open YouTube
First things first, launch your favorite web browser and go to youtube.com. Make sure you’re signed in to your account. You’ll want to see the notifications that are related to your activity and subscriptions.
Step 2: Access Notifications
Once you’re on the YouTube homepage, look for the bell icon at the top right corner of the screen. This is your notifications hub. Click on it to see a dropdown of all the alerts you’ve received.
Step 3: Review Your Notifications
In the notifications dropdown, you’ll see various alerts. This can include new uploads from channels you subscribe to, comments on your videos, or replies to your comments. Feel free to take a moment to browse through these notifications.
Step 4: Delete Notifications
To delete a notification, hover over the specific notification you want to get rid of. You’ll see a small "X" appear on the right side. Simply click this "X," and voilà, that notification is gone!
Step 5: Clear All Notifications (Optional)
If you’re looking to clear out all your notifications at once, you can do that too! At the very top of the notifications dropdown, look for a clear button. It may be labeled as “Clear All.” Click on it, and confirm your choice. This will help declutter your notifications quickly.
And there you have it! You’ve successfully cleared unwanted YouTube notifications from your desktop. It’s a great way to keep your inbox tidy and only see relevant notifications that interest you.
Also Read This: How Much Is 100k Views on YouTube Worth? Breaking Down Revenue Potential
4. How to Delete YouTube Notifications on the Mobile App
Now that we’ve tackled desktop notifications, let’s shift gear and look at deleting YouTube notifications on the mobile app. Whether you’re an Android or iOS user, these steps will help you stay organized on the go. Ready? Let’s dive in!
Step 1: Open the YouTube App
Launch the YouTube app on your mobile device. Make sure you’re logged into your account to access your notifications. This is your personal space where you can manage what you want to see.
Step 2: Access Notifications
Once you’re in the app, tap on the bell icon at the top right corner of your screen. Just like on the desktop, this icon takes you to your notification feed.
Step 3: Scroll Through Your Notifications
Now, great! You’re in the notifications section. Here, you can scroll through the alerts and see everything from new video uploads that you might’ve missed to comments on your own videos.
Step 4: Delete Notifications
To delete a single notification, simply swipe left on the notification to reveal a trash can icon or a delete option. Tap on it, and that notification will disappear! Easy peasy!
Step 5: Clear All Notifications (Optional)
If you feel like starting fresh, look for an option that says “Clear All” at the top of the notifications tab. Tap on it and confirm your action. This will wipe your notifications clean, making your app feel brand new.
And that’s it! You’ve successfully deleted unwanted notifications from your YouTube mobile app. It’s a quick process that keeps your app experience comfortable and personalized.
Also Read This: How to Add NBA League Pass to Your YouTube TV Account: A Complete Guide
5. Tips for Customizing Your YouTube Notifications
Customizing your YouTube notifications can really enhance your experience, making sure you get the updates you care about without the clutter of unwanted alerts. Here are some handy tips to fine-tune your YouTube notifications to match your preferences:
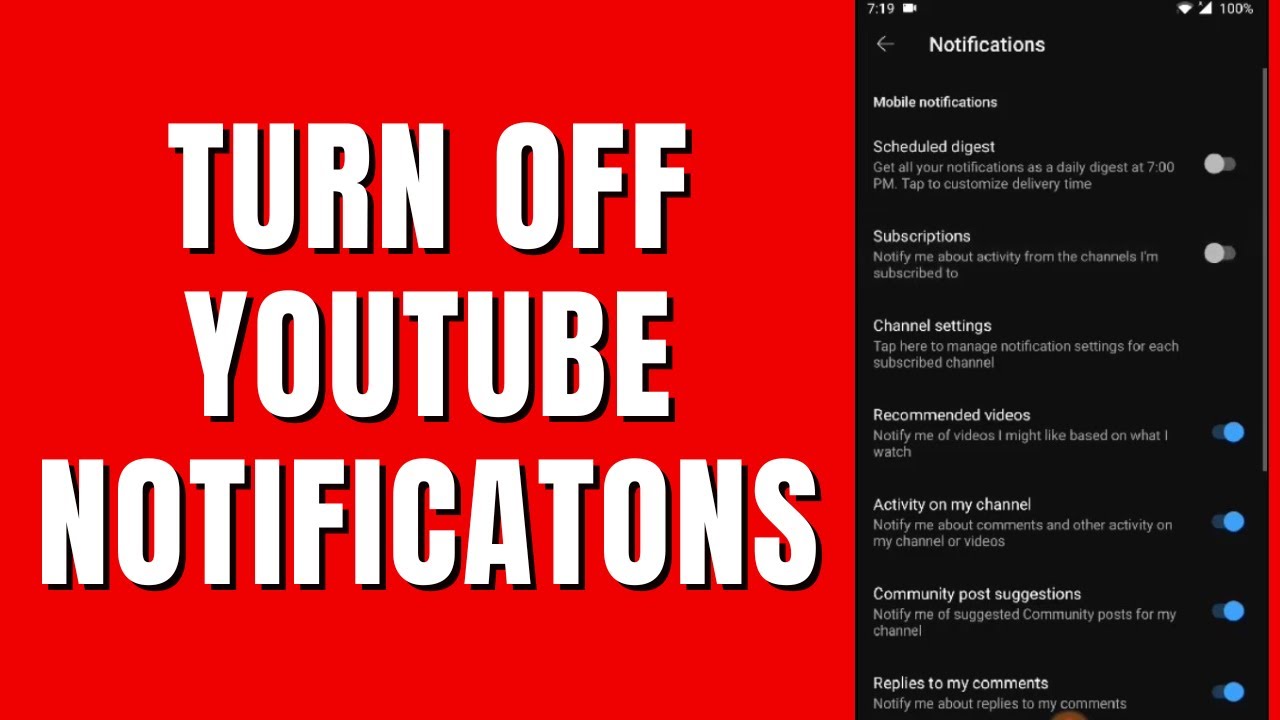
- Adjust Notification Settings: Head to YouTube’s settings by clicking on your profile picture in the top right corner. Then, select Settings. Navigate to Notifications where you can choose what types of notifications you want to receive, including comments, replies, and channel updates.
- Use the Subscription Bell: When you subscribe to a channel, don’t forget about the bell icon! Click it to select your notification preference for that channel. You can choose All, Personalized, or None. Going for Personalized can help reduce unnecessary alerts.
- Turn Off Notifications for Specific Channels: If there’s a channel you enjoy but don’t want to be notified about every new video, simply click on the bell icon and set it to None. This way, you can still watch their content whenever you like, without getting bombarded by alerts.
- Utilize the YouTube App Settings: If you’re using the YouTube mobile app, access the app settings by tapping on your profile picture and selecting Settings. Under Notifications, you can manage what you receive, including subscriptions and activity from loved ones.
- Limit Desktop Notifications: If you use YouTube on a browser, you can manage your notification preferences at the browser level as well! Check your browser’s settings to see whether you want to allow notifications. Sometimes, limiting it to just important updates can help keep your focus.
By following these tips, you can enjoy a tailored YouTube experience, focusing only on what truly matters to you!
Also Read This: How to Loop a YouTube Video on iPhone or iPad: Replaying Your Favorite Clips
6. Troubleshooting Common Issues with YouTube Notifications
Sometimes, despite adjusting your settings, you might find that YouTube notifications just aren’t working as they should. Here are some common issues and their fixes:
| Issue | Solution |
|---|---|
| Not Receiving Notifications | Check your notification settings in YouTube and your device settings. Make sure notifications are enabled for the YouTube app as well. |
| Too Many Notifications | Review your customized settings for individual channels and consider switching some to None or Personalized. |
| Receiving Notifications for Unsubscribed Channels | This might happen if you enabled notifications for trending or recommended content. Go into settings and adjust as needed. |
| Notifications Delayed | Sign out and sign back into your account. Sometimes, a quick refresh can resolve delays in notification delivery. |
| Browser Issues | Clear your browser cache and cookies. This can help resolve issues with receiving notifications on desktop. |
Don’t let notification hiccups ruin your YouTube experience! With these troubleshooting steps, you’ll be back to enjoying your favorite content without the headaches. Remember, technology isn’t perfect, but with a little patience, you can usually find a solution!
Conclusion: Staying Organized and Focused on YouTube
Managing your YouTube notifications effectively is crucial for maintaining a clutter-free digital experience. With endless content available at our fingertips, it’s all too easy to get overwhelmed. Here are a few tips to help you stay organized and focused while enjoying YouTube:
- Regularly Review Notifications: Set aside a few minutes each week to check your notifications. This helps you clear out what’s no longer relevant and ensures important updates aren’t missed.
- Customize Your Alerts: Adjust your notification settings to only receive updates that matter to you. For instance, consider disabling notifications for channels you rarely watch.
- Use Playlists: Organize videos into playlists based on themes or interests. This method reduces notification clutter while allowing you to access content efficiently.
In addition to these practices, utilizing YouTube’s features, such as the “Watch Later” list, can help you prioritize videos without the distraction of ongoing notifications. If you find yourself distracted by notifications, consider periodic breaks from the platform to reset your focus.
By taking control of your YouTube experience, you're not only promoting a healthier viewing habit but also enhancing your productivity. Remember, a well-organized notification system leads to greater enjoyment and satisfaction while exploring the vast world of YouTube.
 admin
admin


