If you're diving into the world of video editing, odds are you've heard of Sony Vegas Pro 13. This powerful software isn't just for the pros; whether you're a budding YouTuber or a seasoned filmmaker, it offers a user-friendly experience that makes editing a breeze. With its intuitive interface and robust features, you can create stunning videos without a steep learning curve. So, let's explore what makes Sony Vegas Pro 13 a go-to choice for many aspiring and established editors alike!
Key Features of Sony Vegas Pro 13
Sony Vegas Pro 13 is packed with features that cater to both novices and experts in the editing world. Here are some of the standout functionalities that you’ll find in this software:
- Multi-Cam Editing: Need to splice together footage from multiple cameras? Vegas Pro 13's multi-camera editing feature allows you to sync and switch between different angles effortlessly. This makes it ideal for event coverage or interviews.
- GPU Acceleration: With enhanced GPU acceleration, rendering tasks are faster and smoother. This harnesses the power of your GPU, which significantly reduces the time it takes to render high-resolution projects.
- Video Stabilization: Say goodbye to shaky camera movements! The built-in video stabilization tool can help smooth out those jittery shots. This feature is especially useful for action videos or travel vlogs where camera movement is unavoidable.
- Audio Control: Vegas Pro 13 excels in audio editing. It provides advanced tools to adjust levels, apply effects, and clean up tracks. The real-time preview lets you hear changes immediately, ensuring your audio matches your visuals perfectly.
- Built-in Effects and Transitions: Who doesn’t love spicing things up? With a variety of built-in effects and transitions, you can add professional touches to your videos. Explore options like color correction, grading, and 3D transitions to elevate your projects.
- Support for Various Formats: Vegas Pro 13 supports a wide range of video formats, so whether you're working with traditional formats or newer, high-efficiency codecs, you can import and export what you need without hassle.
In addition to these features, Sony Vegas Pro 13 offers robust support for plugins, allowing users to enhance their editing toolkit further. Whether you want to add custom transitions or unique audio effects, the plugin ecosystem is broad and diverse.
Finally, let's not overlook the user community and tutorial resources. Sony Vegas Pro 13 boasts a vast network of users who share tips, tricks, and templates online. So, if you ever find yourself stuck, there’s a world of knowledge at your fingertips. With all these features and a supportive community, mastering video editing with Sony Vegas Pro 13 is not just a dream—it's very much achievable!
Also Read This: Tips to Keep Your Husband Happy in Bed Using Dailymotion Resources
3. Installing Sony Vegas Pro 13
Getting started with Sony Vegas Pro 13 is super easy, but you want to make sure you're doing it right to avoid any hiccups down the road. Whether you're a seasoned video editor or just stepping into the world of video production, installation is the first crucial step. So, let's walk through it together!
Step 1: Check the System Requirements
Before diving into the installation, it’s essential to ensure that your computer meets the minimum system requirements. Here’s a quick checklist:
- Operating System: Windows 7, 8, or 10 (64-bit only)
- Processor: Multicore processor with 64-bit support
- RAM: 4 GB (8 GB or more recommended for HD)
- Graphics Card: DirectX 9 compatible graphics card or higher
- Disk Space: At least 1 GB of free space for installation
If your machine checks all the boxes, you're good to go!
Step 2: Downloading the Software
You have a couple of options for obtaining Sony Vegas Pro 13. The official website is the best place to start:
- Go to the Sony Vegas Pro website.
- Look for the download option for Vegas Pro 13. You might also come across a trial version if you're not ready to commit just yet!
- Follow the prompts to download the installer to your computer.
Step 3: Running the Installer
Once the download is complete, you’ll need to run the installer:
- Navigate to the folder where the installer file is located.
- Double-click on the installer to launch it.
- Follow the on-screen instructions.
- Choose your installation preferences, which might include selecting your desired language.
- Once you hit Install, sit back and let it do its magic!
Step 4: Activating Your Software
If you’ve purchased a license, you’ll need to activate the software post-installation:
- Launch Sony Vegas Pro 13.
- Enter your activation key when prompted.
- Once activated, you’re ready to start editing!
That's it! You've successfully installed Sony Vegas Pro 13. Now you're just steps away from creating stunning videos!
Also Read This: Download Your Dailymotion Playlist Easily with This Step-by-Step Guide
4. Basic Interface Overview
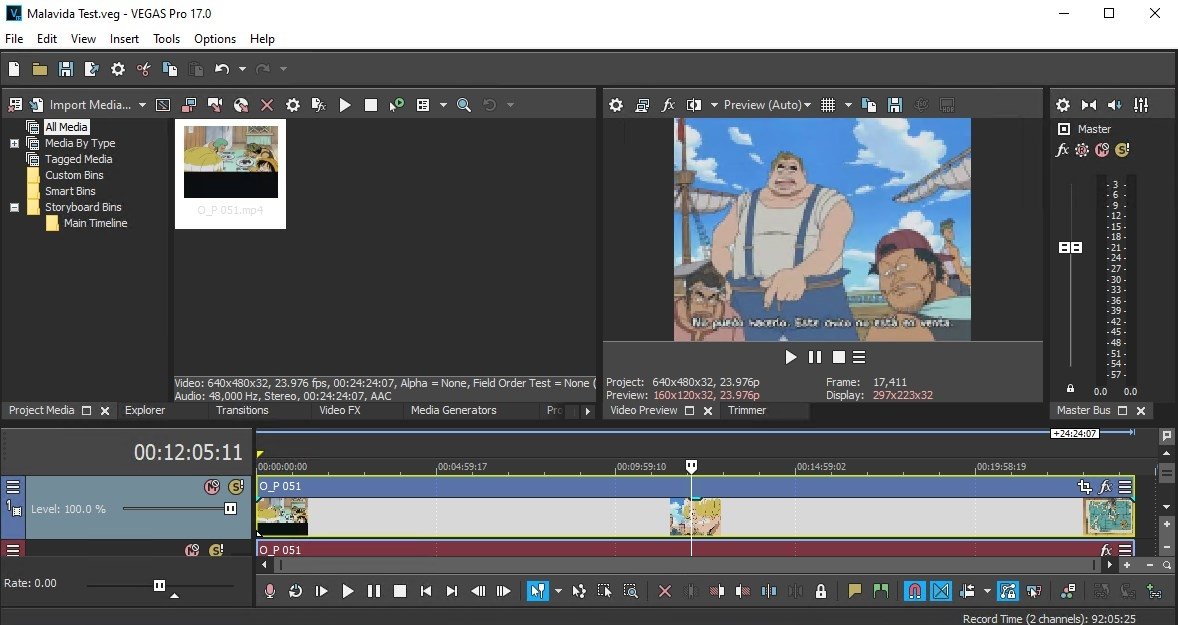
Now that you have Sony Vegas Pro 13 installed, let’s dive into the interface! First impressions matter, and Vegas Pro has a straightforward layout that makes video editing accessible.
Main Components of the Interface:
- Timeline: This is the heart of the software where you’ll arrange your video and audio clips. It’s a multi-track timeline, allowing you to add multiple video and audio tracks, layering them as needed.
- Preview Window: Located typically on the upper right, this is where you can watch your edits come to life in real-time. It allows you to see how your changes affect the overall video.
- Project Media Bin: Found on the left side, this is your library for all imported files. Here, you can access video clips, images, and audio tracks that you’re planning to use in your project.
- Toolbar: Above the timeline, the toolbar contains all the main tools needed for editing. From cutting clips to adding transitions, you’ll find everything you need with just a click!
- Render Settings: After editing, you’ll want to export your project. The render settings allow you to choose formats and quality, ensuring your final video looks just the way you want it.
One of the best things about Vegas Pro is the customizable workspace. You can rearrange panels and windows to fit your preferred editing style.
Tips for Navigating the Interface:
- Familiarize yourself with keyboard shortcuts to speed up your workflow.
- Customize your panels by docking or undocking them based on your editing needs.
- Always keep the Preview Window visible; it’s crucial for making precise edits.
With a little practice, you'll find that the layout is intuitive and user-friendly. Explore, click around, and don’t be afraid to get your hands dirty. Video editing is all about learning through doing!
Also Read This: How to Add Subtitles to Dailymotion Videos
5. Importing and Organizing Media
Before diving into editing, let’s talk about the foundational step that can set the tone for your entire project—importing and organizing your media.
Importing Media
When starting a new project in Sony Vegas Pro 13, the first thing you'll want to do is import your media files. This includes video clips, audio files, and images. To do this, you can either drag and drop your files directly into the timeline or use the File menu:
- Go to File → Import → Media.
- Select your desired files from the file explorer.
- Click Open to bring them into your project.
After importing, all your media files will appear in the Project Media window. It’s crucial to keep this area organized, especially if you’re working with a lot of content.
Organizing Your Media
Now, let’s turn our attention to organization. A neat and organized media library can save you tons of time during the editing process. Here are a few handy tips to keep everything in check:
- Create Bins: Just like folders on your computer, bins in Sony Vegas Pro allow you to group similar files together. Name them according to categories—like Video Clips, Audio Tracks, or Graphics.
- Label Your Clips: If you’re working with multiple video clips, labeling them can be immensely helpful. Right-click on your clip in the Project Media and select Properties to tag them with details.
- Utilize Thumbnails: Make sure to enable thumbnails for quick visual reference. This is especially useful when you have a lot of footage, allowing you to locate the right clip quickly.
Overall, the more organized your media is, the smoother your editing experience will be. You’ll spend less time searching for files and more time creating amazing content!
Also Read This: How to Watch Dailymotion Without Advertisements Enjoy Uninterrupted Videos
6. Essential Video Editing Techniques
Once you have your media organized, it’s time to get into the fun part: editing! Here are some essential techniques you need to master when using Sony Vegas Pro 13.
Cutting and Trimming Clips
One of the fundamental skills in video editing is knowing how to cut and trim your clips effectively. To trim a clip, simply hover over the edges until you see the trim handles. Click and drag to adjust. For cutting, place the playhead where you want to split the clip and use the S key to make the cut. You can then delete or move the segments as needed.
Transitions
Transitions add polish to your video and can make a significant difference in pacing. Sony Vegas Pro 13 offers a variety of transitions that you can access via the Transitions tab. Just drag your preferred transition between clips in the timeline, adjust the duration, and you’re good to go!
Adding Text and Titles
Text overlays can be crucial for providing context or enhancing storytelling. To add text:
- Go to Insert → Text Media.
- Choose a template or create your own style.
- Adjust font, size, and color as desired.
Once you’re happy with the text, drop it onto the timeline, position it as needed, and animate it if you wish using keyframes!
Color Correction and Effects
To give your video a professional touch, exploring color correction and effects is crucial. Sony Vegas Pro 13 comes with built-in tools for color grading. Select your clip, head to Video FX, and try out different effects like brightness, contrast, or color curves. Remember, subtle changes often make the biggest impact!
Incorporating these essential techniques will elevate your video editing skills from amateur to pro in no time. Thanks to the intuitive features of Sony Vegas Pro 13, you’ll find editing not only effective but also enjoyable. Happy editing!
Also Read This: Is Dailymotion Popular? Analyzing Its User Base and Reach
7. Adding Transitions and Effects
When it comes to enhancing your videos, adding transitions and effects in Sony Vegas Pro 13 can truly make your content pop. Transitions help to smooth the shifts from one clip to another, while effects can emphasize emotion or style, elevating your video from good to great.
Understanding Transitions
Transitions are the magic behind those seamless changes between scenes. In Sony Vegas Pro 13, you’ll find a plethora of transitions at your fingertips. Here’s how you can easily apply them:
- Access your transitions: Navigate to the Transitions tab located on the left panel. Here, you’ll see various categories and thumbnails of transitions available.
- Drag and drop: To apply a transition, simply drag it between the two clips on your timeline. You'll see it fit snugly into place.
- Customize your transition: Click on the transition in the timeline to open the properties panel. Here, you can adjust the duration and choose specific parameters that fit your vision.
Exploring Effects
Effects can dramatically alter the look and feel of your video. Sony Vegas Pro 13 offers a rich library of effects that allow for >dramatic changes, from simple color corrections to more complex visual enhancements.
- Accessing effects: Click on the Video FX tab in the left panel. You’ll find organized categories with different effects.
- Applying effects: Just like transitions, you can drag and drop an effect onto the clip in your timeline. You can have multiple effects on a single clip, allowing for creativity.
- Tweak the settings: Select the clip with the effect, and in the properties panel, make the necessary adjustments. This could involve changing parameters like intensity or blending modes.
Don’t be afraid to experiment! Some effects work wonders in tandem, and subtle adjustments can lead to stunning visual results. Remember to preview your work as you go; it’s crucial to see how everything flows together.
In summary, adding transitions and effects in Sony Vegas Pro 13 enhances the storytelling of your video and engages your audience. With just a bit of practice, you’ll master the art of transitions and effects in no time!
Also Read This: Creating GIFs from Dailymotion Videos
8. Working with Audio in Sony Vegas Pro 13
While video visuals are undoubtedly important, audio plays an equally crucial role in delivering a professional product. Fortunately, Sony Vegas Pro 13 makes it simple to work with audio tracks, ensuring that your sound matches the incredible visuals you create.
Importing and Organizing Audio
First, you need to have your audio ready to go. Whether you’re using voiceovers, music tracks, or sound effects, here’s how to import your audio into the project:
- Drag and drop: You can import audio files directly into your timeline by dragging them from your media explorer.
- File menu: Alternatively, you can go to File > Import > Media and select your audio files that way.
- Organize tracks: Keep your audio organized by placing them on separate tracks in the timeline. This makes it easier to manage and edit.
Editing Audio
Editing audio in Sony Vegas Pro is a breeze. You can cut, trim, or stretch audio tracks just like video to fit your timeline:
- Cutting audio: Use the Blade tool to slice audio tracks at specific points, which is perfect for syncing sound with video.
- Volume adjustment: Each audio track has a volume level, which you can adjust by dragging the line running through the audio track up or down.
- Fading in and out: To create smooth transitions in audio, you can easily add fade-ins and fade-outs by dragging the edges of the audio clip.
Enhancing Audio Quality
Sony Vegas Pro 13 also offers tools for enhancing your audio quality:
- Reverb and EQ: Access audio effects in the Audio FX tab. You can add effects like reverb, compression, or equalization to help improve clarity.
- Noise reduction: If you find background noise in your recordings, you can apply noise reduction filters to help clean things up.
- Adding sound effects and music: Incorporate sound effects or background music that match the tone of your video. It’s crucial to ensure the audio level is balanced.
Incorporating audio effectively in your video will not only enhance the viewer's experience, but also serve to elevate the overall quality of your projects. With practice, you’ll soon become adept at blending sound and visuals seamlessly in Sony Vegas Pro 13!
Also Read This: How to Master Makeup Step by Step with Dailymotion for Beginners
9. Exporting Your Final Project
Once you've pieced together your masterpiece in Sony Vegas Pro 13, the next crucial step is exporting your final project. This is where all your hard work transforms into a polished video that you can share with the world. But before you hit that export button, let’s walk through the process so you can achieve the best results possible!
First things first—make sure to review your project timeline. Check for any mistakes, audio issues, or visual inconsistencies. A final review can save you time later, especially if you need to make changes after exporting.
Once you're satisfied, it's time to export:
- Go to File > Render As: This will open the render settings where you can choose the format and settings best suited for your project.
- Select your format: Depending on where you plan to upload or use your video, you might want to select formats such as MP4, AVI, or MOV. For most users, MP4 is the best choice as it balances quality and file size.
- Choose a template: Sony Vegas Pro offers several render templates. You can select 'Internet HD 1080p' for a high-quality option suitable for sharing on platforms like YouTube.
- Customize your settings: If you want more control over the output, you can click on “Customize Template.” Here, you can adjust aspects like bitrate, subsampling, and frame rates.
- Specify your output location: Choose where you want to save your exported file. Make sure you name it something recognizable!
- Hit Render: Once you’ve double-checked everything, click on the ‘Render’ button and let Sony Vegas Pro do its magic.
After rendering, take a moment to watch your video. Look for any issues that might have slipped through during editing. If everything looks good, congratulations—you've successfully exported your video!
Remember, exporting in different formats can be beneficial if you plan to use the video across various platforms. So, don’t hesitate to experiment a bit!
Also Read This: Making an Origami Basket with a Handle Step-by-Step Dailymotion Guide
10. Tips and Tricks for Efficient Editing
Video editing can be a time-consuming process, but with a few smart strategies, you can make it much more efficient. Here are some nifty tips and tricks to streamline your workflow in Sony Vegas Pro 13:
- Utilize keyboard shortcuts: Familiarize yourself with common shortcuts. They can greatly speed up your editing process. For example, press "S" to split a clip or "Ctrl + Z" to undo an action.
- Organize your media: Keep your project organized by categorizing clips, audio, and images in folders. This saves time when you need to locate files later on.
- Use markers: Adding markers can be a lifesaver! They help you quickly find specific points in your timeline, especially during lengthy projects.
- Preview at lower quality: During editing, you might want to preview your video in a lower quality. This will ensure smoother playback, making it easier to focus on the edits.
- Work in multiples of your desired final resolution: If you’re editing a 1080p video, work with 1920x1080 resolution timelines. This avoids issues with scaling your video later.
- Save frequently: Nothing is worse than losing hours of work due to an unexpected crash. Make it a habit to save your project frequently.
Incorporating these tips into your editing routine will not only save you time but also enhance your overall experience. Remember, practice makes perfect! The more you edit, the more efficient you'll become. Have fun and keep honing your skills!
Conclusion and Next Steps
Mastering video editing with Sony Vegas Pro 13 opens up a world of creative possibilities. Through dedicated practice and exploration of the software's features, you can significantly enhance your video projects. To summarize, here are the key takeaways:
- Familiarize yourself with the user interface and essential tools.
- Experiment with transitions and effects to add flair to your videos.
- Utilize audio editing features to improve the overall quality of your projects.
- Explore the vast array of tutorials and resources available online for advanced techniques.
Your journey in mastering video editing does not end with this guide. Here are some recommended next steps:
- Create a portfolio: Start compiling your video projects to showcase your skills.
- Join online communities: Engage with other video editors for feedback and support on platforms like forums and social media groups.
- Stay updated: Regularly check for software updates and new features that could enhance your editing experience.
- Challenge yourself: Take on personal projects or contests to apply what you have learned in real-world scenarios.
By committing to continual learning and practice, you will not only improve your video editing skills but also unlock your creative potential. Dive into your next project with confidence and start editing like a pro!
 admin
admin


