Editing a YouTube video can feel like both an art and a science. Whether you're a seasoned creator or just starting, the editing process is crucial to your content's clarity and engagement. In this post, we’ll explore how long it typically takes to edit a video and delve into the nuances of the editing process. Understanding video editing not only saves you time but also enhances your overall production quality, allowing you to connect better with your audience.
The Importance of Video Editing for YouTube Success
Video editing is more than just trimming clips and adding transitions. It plays a vital role in the success of your YouTube channel for several reasons:
- Enhances Narrative Flow: Good editing can make your story more cohesive, blending clips seamlessly to maintain viewer interest.
- Engagement Boost: Effective cuts, graphics, and music can significantly enhance the viewing experience, keeping audiences glued to their screens.
- Brand Identity: Consistent editing styles help build a recognizable brand. This includes theme music, color grading, and specific fonts.
- Quality Presentation: High-quality edits showcase professionalism, making your content more trustworthy and appealing.
Now, let’s dive deeper into why each of these aspects matters:
Enhances Narrative Flow: A well-edited video guides your audience through the story you want to share. By cutting out unnecessary content and focusing on your main points, you create a more engaging experience. Think about your favorite YouTube videos; chances are, they keep you entertained and keep the narrative moving smoothly from one point to the next.
Engagement Boost: Ever noticed how some videos just seem to fly by while others drag on? Fast-paced edits, clever cutaways, and appropriate background music can elevate a basic video into something exciting. Visual aids, such as graphics or animated text, can highlight important ideas and help keep viewers engaged.
Brand Identity: When your audience watches one of your videos, they should feel like they’re experiencing your unique style. This identity keeps them coming back for more. By choosing specific colors, graphics, and even a signature intro or outro, you bring consistency to your channel, which can help foster loyalty among your viewers.
Quality Presentation: Nobody enjoys watching a video that seems thrown together and poorly edited. High production value communicates professionalism and respect for your viewers' time. Investing time in editing can lead to better retention rates and a more substantial subscriber base. For aspiring creators, remember—first impressions matter!
Ultimately, video editing can set the tone for your entire YouTube presence. While the time invested can vary—from a couple of hours to several days—understanding its importance can motivate you to refine your process and produce content that resonates with your audience. So, whether you're creating a quick vlog or a detailed tutorial, remember that good editing is your secret weapon for success on YouTube!
Also Read This: How to Download a YouTube Video Online for Offline Access
3. Factors Affecting Video Editing Time
When it comes to editing a YouTube video, the time it takes can vary dramatically based on several factors. Understanding these elements can help you estimate how long your editing sessions might last and manage your workflow efficiently. Let's dive into some of the most significant factors that can affect video editing time:
- Type of Content: Different types of videos require varying levels of editing. For example, a simple vlogging video may take less time compared to a highly produced tutorial or a short film. The more complex the content, the more time it might need.
- Video Length: As we'll explore in the next section, the length of your footage plays a crucial role in editing time. Longer videos typically need more attention and finer details.
- Edit Style: Your personal editing style can impact how long the process takes. If you like to add intricate transitions, effects, or animations, be prepared for a longer editing time. Conversely, a straightforward cut-and-paste style can be quicker.
- Familiarity with Software: If you’re new to your editing software, expect to spend more time learning the ins and outs. As you become more experienced, you'll find that you can edit more efficiently. So, investing time to learn your editing tools can pay off in the long run.
- Footage Quality: High-quality footage often leads to longer editing times, especially if it’s shot in high resolutions like 4K. These files take up more processing power and can slow down your editing workflow.
- Amount of Raw Footage: If you've filmed hours of footage, wading through it to find the best parts can be time-consuming. The more raw clips you have, the longer it will take to sift through and edit them down to the best content.
- Additional Elements: Adding graphics, music, voiceovers, or color grading can all add extra time to the editing process. Each component adds layers that need to be synced and polished.
In summary, a multitude of influences can affect how long the editing process will take. By understanding these factors, you can better prepare yourself for the time commitment involved in producing a polished video.
Also Read This: How to Download Audio from YouTube Videos for Use in Your Projects
4. Content Length and Complexity
Now that we've discussed the factors affecting video editing time, let's take a closer look at how content length and complexity specifically influence your editing journey. These two aspects play a key role in determining the overall time you’ll invest in editing your video, so let’s break it down.
Content Length: The length of your video can significantly impact your editing time. Here's a general guideline:
- Short Videos (1-5 minutes): Typically require less editing time. You can expect to spend somewhere around 1–2 hours for basic editing, depending on your style and the amount of raw footage.
- Medium-Length Videos (5-15 minutes): These usually need more attention, including cuts, transitions, and possibly B-roll. You might find yourself spending anywhere from 2-5 hours on editing.
- Long Videos (15+ minutes): Expect to dedicate significantly more time here, often ranging between 5-10 hours or more. The longer the footage, the more you'll have to analyze, edit, and refine.
Content Complexity: The complexity of your video content can also lead to variations in editing time. Some factors to consider include:
- Storytelling Elements: If your video relies on a narrative structure, you may need to spend additional time to ensure that the story flows smoothly.
- Multiple Camera Angles: If you've filmed from different angles, coordinating these angles during editing can be time-consuming.
- Special Effects and Transitions: Everything from animated text to motion graphics requires additional time to implement and refine.
- Dialogue and Audio Syncing: Ensuring that audio and video are synced properly takes patience, especially in longer, scripted videos.
In short, both the length and complexity of your content are critical in determining your video editing timeline. By understanding these elements, you can better allocate your resources and manage your expectations when diving into the editing process.
Also Read This: How to Revert YouTube Layout Back to Default: A Step-by-Step Guide
5. Editing Software and Tools Used
When it comes to editing YouTube videos, the software and tools you choose can make a significant difference in how long the editing process takes and the final product's quality. There are a variety of options available, ranging from beginner-friendly tools to professional-grade software. Here’s a quick rundown of some popular choices:
- iMovie: Ideal for Mac users, iMovie is a straightforward tool that offers a variety of templates and effects. It's user-friendly and perfect for beginners, but it might limit you in advanced editing techniques.
- Adobe Premiere Pro: A professional-grade software favored by many YouTubers, Premiere Pro offers a vast array of features for advanced editing. However, due to its complexity, it can take longer to learn and navigate.
- Final Cut Pro: Another top-notch tool for Mac users, Final Cut Pro is packed with powerful editing capabilities. It’s great for those who want to create high-quality content but, similar to Premiere, comes with a steeper learning curve.
- DaVinci Resolve: Known for its exceptional color grading capabilities, DaVinci Resolve combines video editing, visual effects, and audio post-production in one software. It's a fantastic option for serious creators who want professional results.
- HitFilm Express: This free software offers robust features including video editing and visual effects, making it an excellent choice for budding filmmakers.
Choosing the right software is essential because every tool has its strengths and weaknesses. If you’re just starting, it might be tempting to go straight for the pro-level software. However, it’s wise to pick something that matches your current skill level and gradually transition to more advanced tools as you grow comfortable with the editing process. Remember that your editing workflow can speed up significantly as you become more adept with your chosen software.
Also Read This: How Much YouTube Gamers Make Exploring Income from Gaming Videos
6. Editor's Skill Level and Experience
The skill level and experience of the editor play a crucial role in determining how long it takes to get a YouTube video ready for publishing. Whether you’re editing your own content or hiring a professional, the editor’s background can influence not just the editing duration but also the quality of the final product. Here’s how:
- Beginner Editors: If you’re new to video editing, expect to spend more time on basics like cutting, transitions, and adding music. Learning curves can slow down the process, so be patient with yourself! Tutorials are hugely beneficial during this phase.
- Intermediate Editors: With a bit of experience under your belt, you’ll find that you can work faster and with more confidence. You’ll start to develop your style and understand what works best for your videos, which can significantly cut down editing time.
- Professional Editors: A seasoned editor with years of experience knows the ins and outs of the software and can work quickly without sacrificing quality. They have honed their techniques and can integrate complex elements, like special effects, with ease. Hiring an editor at this level will typically yield professional results in a fraction of the time it would take a novice.
Ultimately, the editor's skill level can dictate not just how long the project takes but also the effectiveness of the storytelling in your video. If you’re keen on maintaining a specific style or adhering to a certain aesthetic, working with an experienced editor who understands your vision can bring your content to life more effectively.
Also Read This: How to See Someone's Subscribers on YouTube: A Quick Guide
7. Average Timeframes for Different Types of Videos
So, how long does it really take to edit a YouTube video? Well, the answer isn't quite straightforward. The editing time can fluctuate significantly based on several factors, including the type of content, the editor's skill level, and the complexity of the edits. Let's dive into some average timeframes for various video types!
- Talking Head Videos: For vlogs where a person is simply talking to the camera, editing might take around 1-2 hours. This includes basic cuts, adjustments for audio, and possibly adding some text or graphics.
- Workshops or Tutorials: These types involve more structured content and often require a lot of preparation. Expect to spend about 3-6 hours on editing, especially if you're incorporating multiple angles or visuals.
- Travel Videos: With a plethora of footage to sift through, editing travel vlogs can range from 6-12 hours. The challenge is to create a cohesive story from potentially hundreds of clips!
- Gaming Videos: These can also take a considerable amount of time—usually about 4-8 hours. Gamers might want to add overlays, special effects, and commentary, all of which require careful editing.
- Short Films or Documentaries: These are often the most time-consuming, often requiring anywhere from 10-20 hours or more, especially when you're dealing with script adherence, sound design, and color grading.
It's pivotal to remember that these numbers are just averages. A novice might need more time, while a seasoned editor could zip through edits in less time. Plus, each video project can bring its own unique challenges, affecting the overall editing duration.
In short, when setting your expectations for editing time, consider the type of video you're tackling. Planning ahead and being realistic about time commitments can help you avoid the stress of last-minute edits!
Also Read This: How to Change Your YouTube Account Email: A Step-by-Step Guide
8. Short Vlogs and Quick Edits
Now, let’s talk about those short vlogs that are all the rage. Quick edits can be a double-edged sword. On one hand, they promise fast turnaround times; on the other, they can compromise the quality if not done right. But fear not, with the right approach, you can achieve both speed and quality!
Short vlogs, typically ranging between 3 to 10 minutes, allow for a more informal editing process. Here’s how to streamline your editing:
- Plan Before You Shoot: Having a clear outline can severely cut down your editing time. Know what shots you want and create a quick storyboard or bullet points.
- Limit Your Footage: When filming, aim to take only the essential shots. Less footage means less time sifting through unnecessary clips during the edit.
- Utilize Templates: Save time by using preset transitions, color grading templates, and intro/outro graphics. This can drastically reduce repetitive tasks.
- Use B-Roll Effectively: Incorporate B-roll sparingly but effectively. A well-timed cut to B-roll can replace lengthy explanations and save you some editing time.
- Edit in Stages: Divide the editing process into manageable parts—like cutting, audio syncing, and color correction. This helps keep you organized and less overwhelmed!
With these strategies, editing a short vlog can realistically take 1-3 hours, depending on your experience and the complexity of the content. Remember, it's all about practice. The more you edit, the more efficient you'll become. Ultimately, short and quick doesn’t mean compromising on quality; it’s about smart editing!
So, whether you're preparing for a personal blog or trying to gather audience engagement with vibrant vlogs, mastering the quick edit will definitely elevate your YouTube game!
Also Read This: Reliving the Don Henley Classic: 'The End of the Innocence' on YouTube
9. Longer Educational or Tutorial Videos
When it comes to editing longer educational or tutorial videos, the timeline can stretch out significantly compared to shorter formats. Typically, these videos aim to provide valuable information, teach a skill, or walk viewers through complex processes, often requiring a meticulous approach to ensure clarity and engagement.
Here are some factors that influence the editing time for longer educational videos:
- Content Depth: The more comprehensive the content, the longer it will take to edit. You might find yourself cutting out unnecessary information to keep the video concise but thorough.
- Visual Aids: Incorporating graphics, animations, or on-screen text can enhance understanding but also requires additional time to create and integrate.
- Research: You might need to fact-check your information or cite sources, which adds another layer of time before you even hit the editing suite.
- Segmenting Information: Breaking down complex topics into digestible segments often involves more cuts and transitions to maintain viewer engagement throughout the video.
- Feedback Loops: Longer videos often benefit from a review process. You may share drafts with peers or experts for constructive criticism, which can elongate your editing timeline.
As a rule of thumb, for every hour of finished video, you might spend anywhere from 4 to 12 hours in post-production, particularly if the content requires heavy editing. The exact amount will vary depending on your editing style and the complexity of the material.
To streamline the process, consider these tips:
- Plan your script meticulously before filming to minimize re-shoots.
- Use templates for graphics or overlays to save time on design.
- Invest in software that allows multi-track editing for easier integration of various elements.
Though editing longer educational videos can be a time-consuming endeavor, the end product is usually worth the effort. A well-edited tutorial can significantly enhance learning and retention for viewers, making all that additional editing time feel justified.
Also Read This: How to Embed YouTube Videos in Emails: Easy Tips
10. Creative and High-Production Content
When we dive into the realm of creative and high-production content, the editing process takes on a whole new level of complexity. This type of video often includes intricate storytelling, advanced visual effects, cinematic techniques, and sometimes even a team of collaborators, all of which require a significant investment of time and resources.
Here’s what to keep in mind when editing creative and high-production material:
- Storyboarding: High-quality content often starts with a detailed storyboard or script. If you’ve invested time in this pre-production phase, the editing process can be more manageable, as you’ll have a clear direction.
- Visual Effects: Integrating visual effects, transitions, or 3D elements can be incredibly time-consuming. Depending on the complexity, this could double your editing time or more.
- Audio Production: Sound design plays a crucial role in high-production videos. Syncing audio, adding music tracks, and utilizing sound effects can take substantial time to perfect.
- Color Grading: Achieving the desired visual aesthetic often involves thorough color grading, which can be an art in itself. This process not only enhances the video’s look but can also significantly influence editing time.
- Collaboration: If you're working with a team, the review process can be more extended due to multiple rounds of approvals and contributions.
For high-production videos, you might find yourself spending anywhere from 10 to 30 hours or more per finished hour of content, depending on the project's scale. The key is ensuring that every frame resonates with your audience and conveys your narrative effectively.
So how can you optimize your editing time in this creative endeavor?
- Invest in advanced video editing software that supports multi-layer editing and efficient rendering.
- Utilize proxies for high-resolution footage to speed up the editing process.
- Practice your workflow: Developing a systematic approach will help you cut down on repetitive tasks.
At the end of the day, while editing creative and high-production content is undoubtedly labor-intensive, the reward lies in creating captivating videos that resonate deeply with your audience. It’s a labor of love that reflects your passion and creativity.
Also Read This: Is YouTube Removing Channel Banners? What Creators Need to Know
The Video Editing Process Explained
Editing a YouTube video is often perceived as a straightforward task. However, the reality is that it involves a series of steps, each requiring attention to detail and creative finesse. So, how does the process unfold?
First, planning is key. Before you dive into editing, approach the process with a structure. By outlining your video, you can identify the essential elements to focus on. What message do you want to convey? Is there a storyline or concept? Having a solid plan in place will streamline your editing process significantly.
Next comes the *importing phase. You’ll need to gather your recorded footage, and any additional audio, images, or graphics that will help enhance your video. Most editing software allows you to import multiple file formats, making it easy to consolidate everything in one place.
Once your footage is imported, it’s time to review and select the best clips. This part can be time-consuming. Watch everything and mark down the segments that truly resonate. Many editors prefer using markers or comments within their editing software to highlight these clips for easy access later on.
Now onto the cutting stage. Here’s where the magic happens! You’ll start placing your selected clips on the timeline. The goal is to create a cohesive narrative. This may involve:
- Trimming unwanted parts
- Rearranging segments for better flow
- Adding transitions to smooth over changes between clips
After the initial cut, it’s time for adding effects and enhancements. This includes color correction, adding text overlays, and incorporating B-roll footage where appropriate. Keep in mind that the aim is to enhance your storytelling – too many effects can distract from the message.
Next is the audio editing phase. Good audio can make or break a video. Adjust audio levels, remove noise, and consider adding background music or sound effects to elevate the viewing experience. Don’t forget to ensure that your audio levels are balanced – you want your viewers to hear every word clearly without straining.
Following this, you’ll want to review the entire video as a whole, checking for any discrepancies or areas that could benefit from further refinement. This is your chance to make those final tweaks, ensuring everything flows seamlessly together.
Finally, you’re ready for exporting your video. Here, you’ll select the right format, resolution, and settings that align with YouTube’s requirements. It’s always wise to preview the exported video before hitting that publish button. A last-minute re-watch can help catch anything you might have missed in the editing process!
Also Read This: How to Add Chapters to Your YouTube Video: Organizing Content for Viewers
Collecting and Organizing Footage
Now that you’re familiar with the editing process, let’s discuss one of the most important initial steps: collecting and organizing your footage. This part of the process can often be the most daunting, but a little organization goes a long way!
Start by creating a structured filing system on your computer or external drive. Here’s a suggested approach:
- Main Folder: Create a folder named after your video topic.
- Subfolders: Within this folder, create subfolders for:
- Raw Footage
- Audio Files
- Images/Graphics
- Project Files
This way, everything is neatly categorized and easy to find, saving you precious time during the editing phase.
As you start gathering footage, whether it’s from your camera, smartphone, or stock footage libraries, it’s crucial to adopt a consistent naming convention*. This means labeling files in a way that reflects their content. For example:
- Scene_1_A_Intro.mp4
- Scene_2_B_B-roll_Footage.mp4
This approach makes filtering through your files later much easier. Moreover, consider jotting down notes about each clip, including time stamps or highlights of what they showcase. A simple spreadsheet can work wonders for this!
Finally, once you have all your footage organized, back it up! Use external hard drives or cloud storage. You don’t want to risk losing your hard work due to a system crash. Having a backup ensures your footage is safe, and it lets you focus on the creative side instead of worrying about technical mishaps.
With everything appropriately organized and labeled, you’re now ready to move forward confidently into the editing process. Remember, being methodical at this stage sets the tone for a smoother, more efficient editing experience!
Also Read This: How to Upload YouTube Videos on Your iPhone: A Simple Guide
13. Initial Cuts and Rough Edits
When you first dive into editing a YouTube video, the initial cuts and rough edits are where the magic starts to happen. This stage is like the foundation of a house; if the foundation is solid, the rest of your video will stand strong. So, let’s unpack what this process looks like.
Once you've imported your footage into your editing software, it’s time to sift through all that raw material. You might find yourself with hours of video or just a few minutes, but the key is to watch everything closely. Here are some steps to consider during this phase:
- Review Your Footage: Watch everything from start to finish. Take notes on what you think works and what doesn't. This is also the time to identify the best takes.
- Cuts and Trims: Start making your initial cuts. Trim out any unnecessary parts, like long pauses or mistakes. The goal here is to get down to the essence of your video.
- Sequence Your Clips: Arrange your clips in a logical order. You may find that what you thought would work nicely doesn't flow as expected, so be open to rearranging things.
- Set a Rough Timeline: Create a rough timeline for your video, mapping out the beginning, middle, and end. This doesn't have to be perfect, but having a structure will greatly help in the subsequent editing stages.
At this stage, focusing on content rather than perfection is key. You’re basically laying down the skeleton of your video. Remember, you can always polish it later, but getting a good rough cut will provide you with a clearer direction moving forward. Plus, it’s incredibly satisfying to visualize the final product coming together!
Another tip: don't hesitate to step away for a moment if you get stuck. A fresh set of eyes, even if they're your own a few hours later, can help you see things from a new perspective. The more you edit, the more you'll develop your style, so don’t worry about it being perfect right out of the gate!
Also Read This: Step-by-Step Instructions to Activate YouTube Premium with a Code
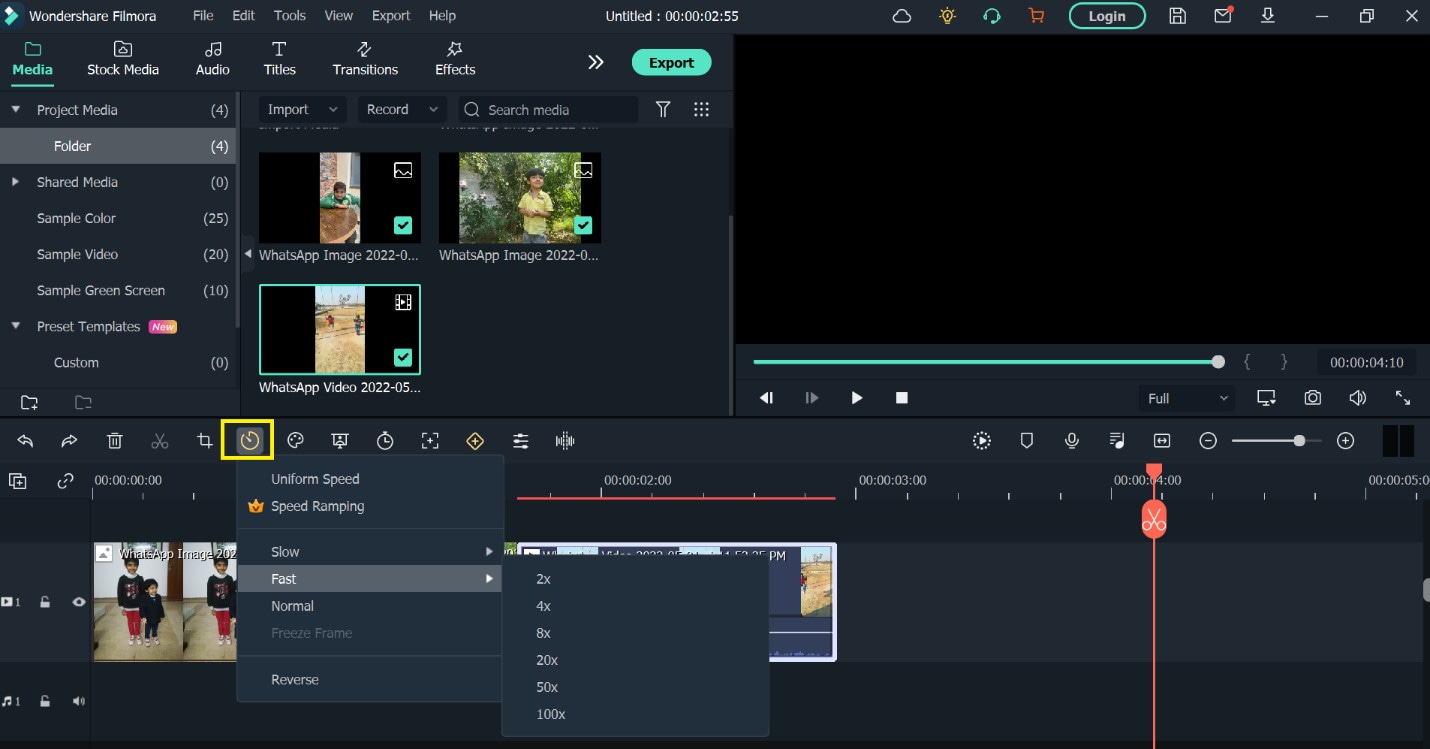
14. Adding Effects, Transitions, and Music
Now that your initial cuts are in place, it’s time for the fun part: adding effects, transitions, and music. This stage is where you can really let your creativity shine and enhance your video to keep viewers engaged.
First off, let’s talk about effects. Effects can range from basic color corrections to more advanced features like green screen or slow-motion clips. Here are some effective ways to incorporate them:
- Color Correction: Adjusting the color levels can drastically change the look and feel of your video. Aim for consistency across your clips to maintain a professional appearance.
- Text Overlays: Adding text for titles or annotations can provide viewers with important context or highlight key points. Keep it simple and readable.
- Visual Effects: These can be used sparingly to enhance the storytelling but avoid overdoing it. You want to enhance your content, not distract from it.
Next up, transitions! Transitions help in maintaining the flow of your video between different scenes or topics. Here are some types you might consider:
- Fades: A classic choice, fading in and out can help set the mood when transitioning between segments.
- Cuts: Simple cuts often work best, especially if the clips match in action, sound, or theme.
- Creative Transitions: Things like wipes, slides, or thematic transitions can be fun, but remember to keep them in line with your video’s style.
Finally, let’s chat about music. Choosing the right background music is crucial as it sets the tone and can enhance emotional engagement. Here’s how to effectively integrate music into your video:
- Select the Right Track: Consider your video's vibe—calm, energetic, informative? Choose music that aligns with your content.
- Volume Levels: Make sure your music is at an appropriate volume. You don't want it to drown out your voice; instead, it should complement your narration.
- Royalty-Free Options: Always use royalty-free music or tracks you have the rights to. Platforms like YouTube Audio Library or Epidemic Sound offer great choices.
Remember, this stage is where you get to play around a bit! Don’t hesitate to experiment with different effects, transitions, and music until you find the perfect mix that reflects your style and message.
Also Read This: How to Check If a YouTube Channel Is Monetized
15. Final Review and Exporting the Video
Once you’ve poured your heart and soul into editing your YouTube video, it’s time for the final review and exporting. This part of the process is crucial—kind of like the icing on the cake. It ensures that everything looks and sounds just the way you want it before you hit that magical upload button.
First up, you’ll want to sit down and watch your video all the way through. It’s a good idea to do this with fresh eyes—sometimes a day of rest can give you a clearer perspective. Look out for:
- Any awkward cuts or transitions
- Audio levels—make sure the dialogue, music, and sound effects balance nicely
- Visual elements, such as text overlays and graphics, to ensure they’re clear and on-point
- Overall pacing, to keep your audience engaged
After your watch-through, make any necessary adjustments. Don’t hesitate to go back and tweak those final bits, whether it’s re-recording a voiceover, adjusting color grading, or adding a fun animation here and there.
When you’re satisfied with the content, it’s time to export! This stage can vary significantly depending on the software you’re using. Generally, here are a few tips:
- Choose the right format: For YouTube, MP4 is a popular choice, as it balances quality with a manageable file size.
- Adjust your resolution: Consider exporting in 1080p at least, as this is HD quality and will look great on screens.
- Check your bitrate: Higher bitrates mean better quality, but they also increase file size. Find a good middle ground!
Finally, once your video is exported, give it another quick watch to make sure everything converted smoothly. Trust me; it’s worth taking that extra minute to ensure the final product is just as fabulous as you envisioned. After that, you’re ready to upload your video to YouTube. Congratulations, you did it!
Also Read This: How Do Bodycams Get on YouTube? The Process Behind Uploading Police Bodycam Footage to YouTube
16. Tips for Streamlining the Editing Process
Let’s face it: editing can be both a rewarding and time-consuming endeavor. However, there are several ways to streamline your editing process, allowing you to spend less time tinkering and more time creating. Here are some handy tips to make your editing sessions more efficient:
- Organize Your Files: Before you start, make sure all your video, audio, and graphics files are neatly organized. Create folders for raw footage, audio clips, images, and any other assets. This will save you from endless searching later.
- Create a Template: If you frequently use the same titles, intros, or graphics, create a project template. This way, you can easily duplicate it for future videos, keeping your workflow consistent.
- Use Keyboard Shortcuts: Familiarize yourself with the keyboard shortcuts for your editing software. It can drastically reduce your editing time, allowing for more fluid transitions between tasks.
- Edit in Sections: Instead of trying to tackle the whole video at once, break it down into manageable sections. Focus on editing one part at a time, which can make the process feel less overwhelming.
- First Draft = Rough Cut: Don’t aim for perfection on your first pass. Try to create a rough cut that includes all the necessary elements, then go back in for refinement. This approach will help keep your momentum up.
- Limit Your Choices: Too many options can lead to decision fatigue. When selecting music or graphics, have a curated list ready to speed up the decision-making process.
- Schedule Your Time: Set aside specific blocks of time for editing. By having dedicated editing sessions, you can dive deeper into your work and avoid distractions.
Lastly, remember to take breaks! Stepping away for a few minutes can give you fresh perspectives and the mental clarity needed to approach the next section of your video with renewed energy. Happy editing!
Conclusion: Setting Realistic Editing Timelines
Editing a YouTube video can vary significantly in duration, influenced by several factors. When planning your editing timeline, it’s crucial to consider the following aspects:
- Video Length: Longer videos generally require more time to edit. A good rule of thumb is to estimate approximately 1 hour of editing for every 10 minutes of finished video.
- Complexity of Edits: Simple cuts can be done quickly, but if you’re incorporating transitions, effects, and color grading, the time required can increase exponentially.
- Experience Level: Newer editors may take longer as they familiarize themselves with editing software. In contrast, seasoned editors can often work more efficiently.
- Resources Available: Access to templates, stock footage, and audio tracks can expedite the editing process. If you’re starting from scratch, expect longer timelines.
Here’s a quick breakdown of average editing times based on video type:
| Video Type | Estimated Editing Time |
|---|---|
| Vlogs | 2-3 hours for 10 minutes |
| Tutorials | 3-5 hours for 10 minutes |
| Gaming | 5-10 hours for 30 minutes |
| Short Films | 10-20 hours for 10-15 minutes |
Ultimately, setting a realistic editing timeline comes down to understanding your needs, resources, and experience level. By estimating your time wisely and factoring in potential roadblocks, you can streamline your editing process and meet your content creation goals more effectively.
 admin
admin


