Hey there! If you’re diving into React and want to spice up your applications with some images, you’re in the right place. Importing images might seem tricky at first, but once you understand how it works, it’s a breeze. This guide will help you navigate through the process with ease. We’ll cover the basics and give you the lowdown on using the public folder effectively, so you can showcase your visuals without a hitch!
Understanding the Public Folder Structure in React
When you create a new React application using Create React App (CRA), your project comes with a predefined structure. One of the key components of this structure is the public folder. Understanding what this folder contains and how to utilize it can make your image importing process much smoother.
Here’s a brief overview of the public folder:
-
Location: The public folder is located at the root of your React project. When you set up your app, you’ll see a folder named
publicalongside thesrcfolder. -
Contents: By default, you’ll find several files in this folder, including:
index.html: The main HTML file for your application.manifest.json: Provides metadata about your app.favicon.ico: Your app's icon for the browser tab.Your Images:This is where you can add images for easy access.
-
Static Assets: Any assets placed here are served as they are, meaning you don't need to import them into your components like you do with assets in the
srcfolder.
Now, why should you use the public folder for your images? Here are a few benefits:
- Accessibility: Images in the public folder can be accessed directly via the URL. This means you can reference them through a URL path without import statements, making it easier to manage them in certain situations.
- Performance: Images served from the public folder are cached by the browser, leading to better performance in the long run.
- Easy Management: If you have a lot of static assets that don't need to change frequently, keeping them in the public folder makes organization simpler.
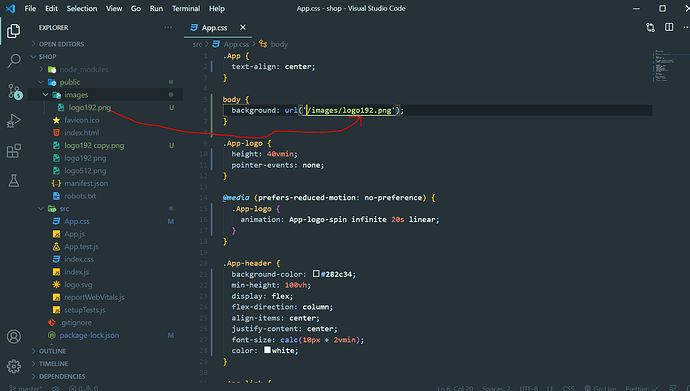
To use an image from the public folder, simply reference it with the relative path from the public folder. For example, if you have an image named logo.png stored directly in the public folder, you can include it in your components like this:
<img src="/logo.png" alt="Logo" />Remember, using the public folder is excellent for static assets that you don't intend to change often. For dynamic images or images that you need to import directly into your JavaScript files, you would typically want to place them within the src directory and import them accordingly.
Understanding this structure and method will help you streamline your React projects and ensure that your images display correctly for your users. Happy coding!
Also Read This: how do i center an image in photoshop
3. Step-by-Step Guide to Importing Images from the Public Folder

So, you’ve got your images nicely stored in the public folder of your React application, and now you're ready to use them. Don’t fret; it’s a simple process! Let's break it down into a few easy steps:
-
Step 1: Place Your Image in the Public Folder
First things first, make sure your image file is sitting pretty in the
publicdirectory. You can create subfolders if you want to keep things organized, likepublic/images. Just ensure you remember the path! -
Step 2: Use the Image in Your Component
Next, you can include images in your React components without worrying about imports. Instead of importing them, you’ll use a relative URL. Here's how:
{` `}
`}
Notice the leading slash? This tells React to look at the root of the
publicfolder for your image. -
Step 3: Accessing Images with the Public URL
If you want to dynamically load images or cache them, consider using
process.env.PUBLIC_URL. Here’s how:{` `}
`}
This is especially useful if you’re deploying to different environments and your absolute path might change!
-
Step 4: Consider Fallbacks
It’s always a good idea to add alternative text for accessibility and SEO. Don’t forget to include the
altattribute:{``}
And voilà! You've successfully imported an image from the public folder in your React app. It’s easy, right? Just remember that when images are located in the public directory, they can be accessed directly through URLs, making them accessible from anywhere in your application.
Also Read This: how to upload image to leonardo ai
4. Best Practices for Using Images in React Applications
Now that you know how to import images, let's delve into some best practices to ensure your React applications look great and perform well. Here are a few tips worth considering:
-
Optimize Your Images
Before uploading images, make sure to optimize them. This means compressing files to reduce their size without losing quality. Tools like TinyPNG or ImageCompressor can help. Smaller images load faster and enhance user experience!
-
Use Responsive Images
Different devices have different screen sizes, so using the
srcsetattribute can help deliver the best image for the device in use:{` `}
`}
This ensures your image adapts to various screen resolutions.
-
Lazy Load Images
If you're using many images, particularly on a single page, consider implementing lazy loading. This technique loads images only when they are in the viewport, which can drastically improve initial load times. You can use libraries like react-lazyload to make this implementation smooth.
-
Accessible Images
Don’t forget about accessibility! Always use descriptive
alttext for each image. This not only helps with SEO but also ensures that users with screen readers understand your content.
By following these best practices, you'll be better equipped to create a responsive and user-friendly React application. Images are a powerful way to engage users, so making sure they load quickly and look great should be a top priority!
Also Read This: How to Size Images for Getty Images Upload
5. Troubleshooting Common Issues with Image Imports in React
When working with images in React, particularly when importing them from the public folder, you might encounter a few hiccups along the way. Don’t worry; you're not alone! Here are some common issues and their solutions:
1. Incorrect PathingOne of the most frequent mistakes developers make is providing the wrong path to their images. Remember that when referencing images in the public folder, you should start with a forward slash. For example:
{` `}
`}Make sure the path matches the structure in your project. If you put your image inside a subfolder, the path should reflect that.
2. Image Not Found (404 Error)If you're getting a 404 error, it usually means that React can't find the image at the specified path. Double-check that:
- The image file is indeed present in the public folder.
- The file name and extension are correct — remember that file names in URLs are case-sensitive!
Sometimes, your browser might cache the page and not load the updated images, leading you to think there’s a problem. If you’re not seeing your changes reflected, try hard refreshing your browser or clearing the cache. You can usually do this with the shortcut Ctrl + F5 (Cmd + Shift + R on Mac).
4. Fallback for Broken LinksIf your images are missing or paths are incorrect, you could set a fallback mechanism using the onError attribute in your <img> tag:
{` { e.target.src = '/images/fallbackImage.png'; }} />`}This way, if your main image fails to load, a default image will be shown instead.
5. File Size and PerformanceLarge images can slow down your app, leading to poor performance and user experience. Always try to optimize your images before importing them. You can use various online tools or apps like TinyPNG or ImageOptim to compress images without sacrificing quality.
By keeping an eye on these issues, you’ll find that managing images from the public folder in your React projects becomes much smoother. And remember, it’s all part of the learning process!
6. Conclusion: Streamlining Image Management in Your React Projects
In conclusion, importing images from the public folder in React doesn't have to be a daunting task. By understanding the structure of your project and the nuances of file paths, you can easily manage your images and enhance your application's visual appeal.
Here’s a quick recap of what we’ve covered:
- Use the correct path for images in the public folder, starting with a /.
- Keep your images organized to avoid confusion.
- Optimize images for performance to ensure fast loading times.
- Be aware of caching issues, especially during development.
As you continue to build your React applications, maintaining a well-structured approach to image management will save you time and frustration. Incorporating well-optimized images not only enhances the user experience but also reflects well on your overall project management skills.
So go ahead! Experiment with images in your next React project, and don’t shy away from trying different techniques. With the right practices in place, you’ll be a pro at handling images in no time!
 admin
admin


