If you're diving into the world of video editing, Adobe Premiere Pro is likely on your radar. It’s an industry-leading software that empowers creators to bring their visions to life. But what if you could elevate your projects even further? Enter Adobe Stock—a treasure trove of high-quality images, graphics, and videos that seamlessly integrate with Premiere Pro. In this blog post, we’ll explore how these two powerhouse tools complement each other to enhance your video editing experience. Whether you’re a seasoned pro or just starting out, understanding their synergy can unlock new creative pathways for your projects.
Benefits of Using Adobe Stock in Your Video Projects
Using Adobe Stock in your video projects offers a plethora of benefits that can significantly elevate your editing game. Here’s why integrating Adobe Stock into Premiere Pro can be a game changer for your workflow:
- Access to a Vast Library: With millions of assets at your fingertips, Adobe Stock provides a wide range of high-quality images, footage, and templates. This extensive library can help you find the perfect visuals to complement your narrative, saving you time and boosting your creativity.
- Seamless Integration: The integration between Adobe Stock and Premiere Pro is nothing short of impressive. You can browse and license assets directly within the application, which means you don’t need to disrupt your workflow by switching between programs.
- Quality Over Quantity: Adobe Stock is known for its high-quality content. Each asset is curated, so you can trust that you’re using professional-grade imagery and footage in your projects.
- License Management Made Easy: Adobe Stock makes it simple to manage your licenses. When you license an asset, you can easily track and keep everything organized in one place, ensuring that you’re compliant with copyright laws and can avoid any legal headaches.
- Collaboration Features: If you’re working in a team, Adobe Stock allows for easy sharing of assets with your colleagues. This can streamline collaborative projects and ensure that everyone is on the same page.
- Customization Options: Many assets available on Adobe Stock come with customization options. You can modify and personalize videos and graphics directly within Premiere Pro, allowing for unique adaptations that suit your project.
In summary, leveraging Adobe Stock within Premiere Pro not only enhances the quality of your video projects but also enriches your creative process. With easy access to a wealth of resources and tools right in your editing suite, you can concentrate more on storytelling and less on sourcing visuals. Whether you’re crafting a corporate video, a social media clip, or an artistic endeavor, Adobe Stock can empower you to produce compelling content that stands out in today’s competitive landscape.
Also Read This: How to Protect Your Images from Unauthorized Use
3. Steps to Access Adobe Stock in Premiere Pro
If you’re excited to enhance your video editing projects with Adobe Stock, you’re in luck! Accessing Adobe Stock within Premiere Pro is straightforward. Just follow these easy steps:
- Open Premiere Pro: Begin by launching Adobe Premiere Pro on your computer. Make sure you’re using a version that supports Adobe Stock, as updates can sometimes add new features.
- Sign In: If this is your first time using Adobe Stock, you might need to sign in to your Adobe account. Enter your credentials in the available fields. Don’t have an account? Creating one is easy, just follow the prompts!
- Navigate to the Libraries Panel: On the right side of your workspace, find the Libraries panel. If you don’t see it, you can enable it by selecting Window from the top menu, then choosing Libraries.
- Access Adobe Stock: Within the Libraries panel, look for the Adobe Stock option. Clicking on it opens the Adobe Stock window. From here, you can browse or search for stock assets.
- Sync Your Assets: If you’ve found something you like, double-click on the asset or drag it directly into your timeline. Your selections will automatically sync with your current project.
And voila! You now have access to a vast library of professionally curated footage. The seamless integration means that you can preview and use stock assets without leaving your editing workflow. Remember, working with stock assets can significantly speed up your editing process and elevate the quality of your videos!
Also Read This: Troubleshooting LinkedIn Certificate Upload Issues
4. Searching for Stock Footage in Adobe Stock
Once you’re connected to Adobe Stock, it’s time to find the perfect footage for your project. Searching effectively can save you time and lead to better results. Here’s how to navigate this vast ocean of stock content:
- Use the Search Bar: At the top of the Adobe Stock window, you’ll find a search bar. Type in specific keywords related to the footage you need. For example, if you’re looking for nature shots, try using terms like “forests,” “mountains,” or “beaches.” The more precise you are, the better your search results will be!
- Apply Filters: After you hit search, use the filters available on the sidebar. You can refine your results by selecting video type, duration, resolution, and more. These filters help narrow down your options, especially when you’re dealing with a broad search.
- Explore Categories: Sometimes, browsing can be more effective than searching. Adobe Stock features various categories like nature, business, lifestyle, and much more. Clicking on a category allows you to explore visually appealing clips related to your project.
- Preview Clips: When you find a clip you’re interested in, click on it to see a preview. This feature helps you gauge whether the footage aligns with your creative vision. Pay attention to aspects like framing, color, and movement!
- Add to Your Project: If you love a clip and want to use it, simply drag it into your Premiere Pro timeline. If it’s a premium item, you may need to license it first. There are options available for purchasing single clips or subscribing for monthly access, depending on your needs.
With these tips, you can effectively find and integrate stock footage into your videos, making them visually stunning and professional. Happy editing!
Also Read This: Printing Large Images Across Multiple Pages
5. Previewing and Licensing Stock Assets
One of the most exciting features of integrating Adobe Stock into Premiere Pro is the ability to preview stock assets directly within your timeline. This makes it incredibly easy to find the perfect video clips, images, or graphics to enhance your project without having to leave the editing software. Here’s how you can effectively preview and license stock assets.
First, let’s talk about *previewing. After you’ve searched for stock assets using the Adobe Stock panel in Premiere Pro:
- Simply double-click on any asset to open a preview.
- You can also drag the asset into your timeline to see how it fits with your existing clips.
- Play around with the asset’s placement to check its visual compatibility and tweak your edits simultaneously.
Now, what about licensing*? If you find a stock asset that you absolutely love and want to use in your final project, you’ll need to license it. Here’s a quick rundown on how to do that:
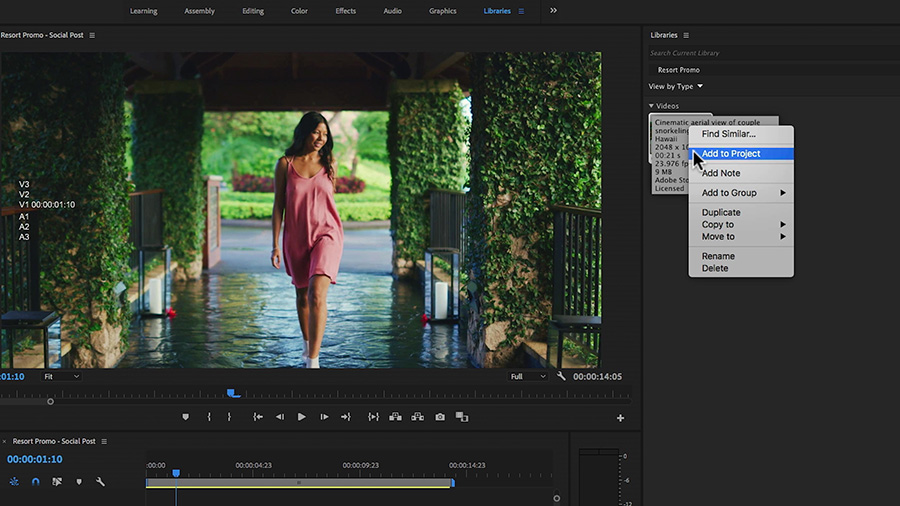
- After you've added the stock clip to your timeline, right-click on the clip.
- Select "License" from the context menu.
- Follow the prompts to complete your purchase through your Adobe account.
Don’t worry—the preview will remain in your project until you’re ready to license it. This allows you to experiment freely without the pressure of compiling costs until you finalize your edits. Plus, once licensed, the watermark will automatically disappear from your project!
By integrating this process smoothly into your workflow, you can save time and make effective creative decisions. Always keep in mind the licensing terms and make sure you comply with Adobe Stock’s guidelines. Happy editing!
Also Read This: Mastering Storyblocks After Effects Templates for Unique Edits
6. Inserting Adobe Stock Clips into Your Premiere Pro Project
So, you've found the perfect Adobe Stock clip and you're ready to insert it into your Premiere Pro project—how do you do it? Let’s break down the steps for seamless incorporation of stock clips into your editing flow.
The process is quite simple. Here’s a quick guide:
- Open the Adobe Stock Panel: If you haven't already, make sure you have the Adobe Stock panel open within Premiere Pro. You can find it under Window > Extensions > Adobe Stock.
- Search for Clips: Use the search bar in the panel to find stock clips that suit your project. You can filter search results by categories, orientations, and more to narrow down your options.
- Drag and Drop: Once you’ve found a clip, simply drag it from the Adobe Stock panel directly onto your timeline or into the Project panel. This action automatically places a reference clip in your project, which is an easy way to visualize it alongside your existing footage.
- Trim and Adjust: After inserting the clip into your timeline, feel free to trim and adjust it like any other clip. You can apply effects, change speeds, and make any necessary adjustments to ensure it perfectly aligns with the rest of your footage.
And here’s a little tip: if you’re working with multiple stock clips, consider organizing them into bins in your Project panel. This will keep your workflow clean and make it easier to locate assets later on.
Inserting Adobe Stock clips into your Premiere Pro project not only enhances the visual appeal but also expands your creative possibilities. The library of footage available can elevate your storytelling, regardless of the type of project you’re working on. So go ahead—explore, insert, and bring your vision to life!
Also Read This: How to Get 10 Free Adobe Stock Images
7. Editing and Customizing Stock Footage in Premiere Pro
Once you’ve integrated Adobe Stock into Premiere Pro and downloaded your desired clips, it’s time to unleash your creativity! Stock footage is versatile, but it often requires some customization to fit the style and tone of your video. Here’s how to effectively edit and tailor stock footage within Premiere Pro:
Trimming and Cutting: Start by trimming your stock footage to ensure it aligns with the pacing of your project. Use the Razor Tool (C) to cut clips at precise points. This is particularly helpful in removing sections that don’t contribute to your story or in creating quick transitions between clips.
Cinematic Effects: Enhance the visual appeal of your stock footage by applying effects. Think color grading, unless the footage is already styled to fit your vision. Color correction can give an entirely different mood to the clips. Use the Lumetri Color panel for adjusting brightness, contrast, saturation, and applying color LUTs (Look-Up Tables) to achieve a specific look and feel.
- Stabilization: If your clip is shaky, utilize the Warp Stabilizer effect. This tool helps smooth out jittery footage, giving it a more professional touch.
- Speed Adjustments: Play around with the speed—speeding up footage can create dynamism, while slow-motion can help emphasize emotional moments.
- Overlaying Graphics and Text: Consider superimposing text or graphics onto your stock footage. This can be done easily with the Essential Graphics panel, allowing you to add titles or captions that resonate with your viewers.
Audio Customization: Don’t forget about audio! If your footage includes audio that doesn’t fit your project, feel free to mute or replace it. Premiere Pro integrates easily with Adobe Audition for advanced audio editing, ensuring every aspect of your video sounds as good as it looks.
Using these techniques, you'll not only make the stock footage uniquely yours but also create a seamless narrative flow. Remember, the goal is to integrate these clips so they feel natural within your story.
Also Read This: Moving Images in HTML for Responsive Design
8. Tips for Effectively Using Stock Assets in Your Video Editing
Stock assets can be game changers in a video production. However, to maximize the impact of these resources, consider these expert tips:
- Choose Quality Over Quantity: Always select high-quality footage that enhances rather than distracts. Look for assets with good resolution and appropriate framing that can seamlessly blend into your project.
- Maintain Visual Consistency: Aim for a cohesive look across all stock assets. Utilize similar color tones, lighting, and styles to ensure everything meshes well. This creates a polished, professional appearance.
- License Thoroughly: Understand the licensing agreements associated with your stock clips. Different projects might require different licensing options. Knowing what you can and can't do legally can save you a lot of hassle down the line.
- Blend with Original Footage: Use stock assets to complement your original footage rather than replace it. This can enrich your storytelling and add layers to your narrative.
- Experiment with Layering: Don't hesitate to layer stock clips creatively. For instance, you can blend multiple stock clips to create a unique visual effect, or juxtapose shots of landscapes with close-ups of your subjects for greater emotional impact.
- Stay Organized: Keep your stock footage organized in neatly labeled bins within Premiere Pro. This helps you efficiently locate and utilize your assets without wasting time searching.
By embracing these strategies, you’ll elevate your video editing game. Remember, stock footage is a powerful tool, but like any tool, it works best when used thoughtfully and creatively! So, dive in and start transforming your videos into stunning visual narratives.
Conclusion and Additional Resources
Integrating Adobe Stock into Premiere Pro can significantly enhance your video editing workflow, providing access to a vast library of high-quality images, graphics, and videos. By utilizing Adobe Stock, you can save time and elevate your projects with professional assets that resonate with your audience. Remember to explore the following resources to maximize your use of Adobe Stock:
- Adobe Stock Tutorials: Check out the official Adobe Stock tutorials for step-by-step guides on how to incorporate stock assets seamlessly into your projects.
- Adobe Premiere Pro Help Center: The Premiere Pro Help Center offers valuable articles and support for troubleshooting and optimizing your editing experience.
- Creative Cloud Community: Join the Adobe Creative Cloud Community to connect with other creatives, share tips, and discover new ways to use Adobe Stock effectively.
- Webinars and Workshops: Attend live or recorded Adobe webinars focusing on stock integration and best practices.
By leveraging these resources, you can further enhance your skills and make the most of Adobe Stock in your video editing projects. Stay creative and continue to explore the dynamic features that Adobe Stock and Premiere Pro offer!
 admin
admin


