Building your own remote-controlled (RC) car can be an exciting adventure! Not only do you get to unleash your creativity, but you also learn valuable skills in electronics and mechanics. Whether you're a hobbyist or just looking for a fun weekend project, this DIY guide will walk you through the essential steps to create an RC car that you can be proud of. Let’s dive into the basics of what it takes to get started!
Materials Needed for Your DIY RC Car
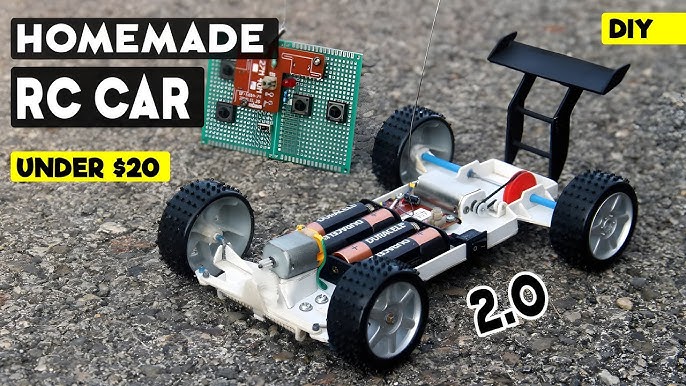
Before you roll up your sleeves and start building, you'll need to gather some materials. Here’s a handy list to help you out:
- Chassis: You can buy a pre-made chassis or create one from materials like plastic, wood, or aluminum.
- Wheels: Choose wheels that suit your terrain. Soft tires work well on rough surfaces, while hard tires are better for smooth surfaces.
- Motor: A suitable electric motor is essential. Look for a brushed or brushless motor that matches your RC car’s size.
- Battery: LiPo (Lithium Polymer) batteries are popular for their power-to-weight ratio. Ensure your battery matches the voltage requirements of your motor.
- Electronic Speed Controller (ESC): This device controls the speed of your motor. Choose one that’s compatible with your motor and battery.
- Remote Control and Receiver: A 2.4GHz radio system is recommended for better range and less interference.
- Servo: This small motor helps with steering. A standard 9g servo is usually sufficient for most beginner builds.
- Wires and Connectors: You'll need these for connecting all electronic components. Make sure to have heat shrink tubing for insulation.
- Tools: Don't forget tools like a soldering iron, wire cutters, screwdriver, and a hot glue gun to put everything together.
With these materials in hand, you’re on the right track to building an awesome RC car! Remember, the choices you make about each component will affect your car's performance, so take your time to research and select the best options for your project. Happy building!
Also Read This: How to Watch Age-Restricted Videos on Dailymotion
3. Step-by-Step Instructions to Assemble Your RC Car

Building your own RC car can be an exciting and rewarding project! Let’s break it down into manageable steps so you can get your car up and running in no time.
Step 1: Gather Your Materials
- Chassis: You can either purchase a pre-made chassis or create one using plastic or wood.
- Wheels: Choose wheels that suit your desired speed and terrain.
- Motor: A brushless motor is preferable for speed, while a brushed motor is easier to handle for beginners.
- Battery: Lithium Polymer (LiPo) batteries are popular, but ensure they match your motor's requirements.
- Electronic Speed Controller (ESC): This unit controls the motor's speed and direction.
- Radio Transmitter and Receiver: These components let you control your car remotely.
- Miscellaneous Tools: You’ll need a screwdriver, soldering iron, and some wires.
Step 2: Assemble the Chassis
Start by deciding where you want to place the motor on your chassis. Most often, the motor is mounted at the rear for balance. Secure it with screws or zip ties.
Step 3: Install the Wheels
Attach the wheels to the chassis. Ensure they spin freely and are secured tightly. If you want additional grip, consider using rubber tires.
Step 4: Connect the Motor to the ESC
Using your soldering iron, connect the motor to the ESC. Make sure the wires are connected correctly (positive to positive, negative to negative).
Step 5: Wiring the Battery
Connect the battery to the ESC. Ensure you use the appropriate connectors and double-check your connections to avoid shorts.
Step 6: Set Up the Radio Receiver
Connect the receiver to the ESC and position it securely on the chassis. This component is crucial as it communicates between your transmitter and the car.
Step 7: Test Your Connections
Before sealing everything, power up the system to ensure that all components are functioning correctly. Check the throttle response and steering.
Step 8: Final Assembly
Once you’ve confirmed everything works, secure all components with zip ties or double-sided tape. You can also add any decorative elements to give your RC car a personal touch!
Also Read This: Master the Art of Bra Making at Home with Dailymotion Tutorials
4. Tips for Optimizing Performance and Durability

Congratulations on building your RC car! Now, let’s talk about some tips to enhance its performance and ensure it lasts longer on the track.
Tip 1: Regular Maintenance
Keep your RC car clean and periodically check all components for wear and tear. Dust and dirt can affect performance, so wipe it down after each session.
Tip 2: Choose the Right Battery
Opt for a battery that matches both your motor and your intended use. For longer run times, a higher capacity LiPo battery is ideal, while a lighter battery can improve speed.
Tip 3: Tuning the Suspension
If your car has adjustable suspension, experiment with different settings to find what works best for your driving style and the terrain. A stiffer suspension can improve handling on rough surfaces, while a softer setup may give better traction on smoother tracks.
Tip 4: Upgrade the Motor
When you’re ready to take it up a notch, consider upgrading to a more powerful motor. Look for brushless options if you desire higher speeds, but ensure your ESC can handle the additional power.
Tip 5: Optimize Tire Choice
Different tires can significantly impact your car’s performance. For off-road, use larger, knobby tires for better grip. For racing on smooth surfaces, smaller, slick tires will reduce friction and increase speed.
Tip 6: Fine-Tune the Gear Ratio
Adjusting the gear ratio can alter your car’s speed and torque. A higher ratio increases speed but may reduce torque, while a lower ratio does the opposite. Find a balance that suits your driving style!
Tip 7: Avoid Overheating
Keep an eye on the temperature of your motor and ESC. If they get too hot, it could damage your components. Installing a cooling fan can help maintain optimal temperatures during intense runs.
By following these tips and maintaining your RC car, you’ll ensure it performs well and lasts for many races to come! Happy building!
Also Read This: How to Apply Contact Lenses for the First Time: Tips for Beginners
5. Common Mistakes to Avoid When Building an RC Car

Building your own RC car can be an exhilarating project, but it's easy to make mistakes along the way. Here are some common pitfalls to watch out for:
- Poor Planning: Jumping into a build without a clear plan can lead to chaos. Spend some time sketching your design and gathering all necessary components before you start.
- Ignoring Weight Distribution: A well-balanced RC car performs better. Avoid placing all heavy components on one side; try to distribute weight evenly for better handling.
- Overlooking Wire Management: Messy wiring can lead to shorts and other electrical issues. Use zip ties or electrical tape to keep everything organized and secure.
- Choosing Incompatible Parts: Ensure that all your components work well together. For instance, pairing a high-voltage battery with a low-voltage motor can lead to disaster. Double-check specifications before making your purchases.
- Neglecting Testing: Don’t skip the testing phase! It’s crucial to troubleshoot any issues before taking your car out for a spin. A little test-run can save you a lot of headaches later.
By being aware of these common mistakes, you can steer clear of unnecessary frustrations and enjoy the process of building your RC car. Remember, every expert was once a beginner!
6. How to Customize Your RC Car for Unique Features
Once your RC car is up and running, the fun doesn’t have to stop there! Customizing your vehicle can add personality and enhance performance. Here are some creative ways to make your RC car truly yours:
- Paint and Decals: Unleash your inner artist! Use spray paint or brush-on paint to give your car a vibrant look. Add decals from your favorite shows or brands for a personal touch.
- Upgraded Tires: Consider changing your tires based on the terrain where you'll be driving. Soft, grippy tires are great for off-road adventures, while slick tires work well on smooth surfaces.
- LED Lights: Adding LED lights can make your RC car stand out, especially during night runs. You can choose from a variety of colors and setups to create an eye-catching effect.
- Custom Chassis: If you’re feeling ambitious, you could design and build a custom chassis. Materials like carbon fiber or aluminum can provide added durability and a unique look.
- Sound Effects: For an exciting twist, integrate a sound module that mimics engine sounds. This can take your driving experience to the next level!
Customization is where your creativity shines. Don't hesitate to try new ideas and experiment with different features. Each modification you make will not only enhance your RC car's performance but also make it uniquely yours!
 admin
admin


