Have you ever wanted to create something special from just a piece of paper? Making a paper box is not only fun but also practical! Whether you need a gift box or a storage solution, this step-by-step guide will walk you through the process. With Dailymotion's easy tutorial, you’ll be crafting your own paper boxes in no time. Let’s get started!
Materials Needed for Making a Paper Box
Before diving into the crafting, let’s gather everything you’ll need. Don’t worry; the materials are simple and often found around your home. Here’s a quick list:
- Paper: You can use any paper like construction paper, cardstock, or even recycled paper.
- Scissors: A good pair of scissors will help you cut the paper neatly.
- Ruler: For precise measurements, a ruler is essential.
- Pencil: Use a pencil to mark your cutting lines.
- Glue or Tape: To secure the edges of your box, you'll need glue or adhesive tape.
- Decorative Elements (optional): Stickers, washi tape, or markers to personalize your box.
Now, let’s break down each material:
- Paper: The type of paper you choose can impact the sturdiness and look of your box. For a simple and elegant design, cardstock is a great option. If you’re looking for something colorful, construction paper works beautifully!
- Scissors: Make sure they’re sharp for clean edges. Dull scissors might lead to jagged cuts, which can affect the final look of your box.
- Ruler: A standard 12-inch ruler is perfect for measuring your paper. Make sure it’s straight to get accurate dimensions.
- Pencil: A light hand with the pencil will help you avoid visible marks on your finished box.
- Glue or Tape: If you want a quick assembly, tape is your best friend. For a more permanent hold, opt for glue. Just be patient and let it dry!
- Decorative Elements: This is where your creativity shines! Add your personal touch to the box with fun designs or your favorite colors.
Once you have all your materials ready, you're just a few steps away from creating something wonderful. In the next section, we'll outline the easy steps to transform your materials into a beautiful paper box. Exciting, right? Let’s keep going!
Also Read This: How to Download from Dailymotion (2019): Updated Method for Video Access
3. Step 1: Choose the Right Paper

Getting started on your paper box creation journey is all about selecting the right materials. The type of paper you choose can significantly affect the box's durability and appearance. Here are some fantastic options to consider:
- Cardstock: This thick and sturdy paper is perfect for making boxes that need to hold their shape. It's available in a variety of colors and patterns, so you can pick something that matches your style!
- Origami Paper: If you're going for a decorative touch, origami paper offers vibrant colors and unique designs. Just keep in mind that it’s thinner, so your box might be more delicate.
- Wrapping Paper: This option is great for gift boxes. It comes in countless designs and can add a festive touch. Just make sure to use a thicker type to ensure it holds up well.
- Recycled Paper: For the eco-conscious crafter, recycled paper is an excellent choice. It’s often sturdy enough for box-making and adds a rustic charm.
Consider your box's purpose when choosing your paper. If it's for a special gift, you might want something more decorative. If it's for everyday use, cardstock or recycled paper might be your best bet. Once you've picked your paper, you're ready to move on to the next step!
Also Read This: Integrating YouTube and Dailymotion with Sync Features
4. Step 2: Measure and Cut the Paper

Now that you've chosen your paper, it’s time to measure and cut it to the right size. This step is crucial because precise measurements will ensure your box fits together perfectly. Here’s a simple guide to help you:
What You'll Need:
- A ruler or measuring tape
- A pencil for marking
- Scissors or a craft knife
- A cutting mat (if using a craft knife)
Step-by-Step Measurement Process:
- Determine the Box Size: Decide on the dimensions of your box. A common size for small gift boxes is 6 inches by 6 inches by 4 inches. You can adjust these measurements based on your needs.
- Mark Your Paper: Using your ruler, measure out the dimensions on your paper. For a box, you’ll need a square piece for the base and additional strips for the sides. For example, for a 6-inch box, you’ll want a 12-inch square for the base and four 6-inch by 4-inch strips for the sides.
- Cut the Paper: Carefully cut along the lines you marked. If you're using a craft knife, make sure to apply firm, even pressure for a clean cut. Always cut on a cutting mat to protect your surfaces!
Once you've cut out your pieces, take a moment to double-check their sizes. It’s much easier to fix mistakes now than later! With your paper pieces ready, you're all set for the fun part—assembling your box!
Also Read This: How to Make a Paper Gun That Shoots Fun Craft Tutorial on Dailymotion
5. Step 3: Folding Techniques Explained
Now that you have your paper cut to size, it’s time to dive into the fun part—folding! This is where your paper box starts to take shape. Let’s break it down into easy-to-follow techniques.
1. The Valley Fold: This is the most basic fold you’ll need. To make a valley fold, take the paper and fold it toward yourself, so the crease creates a "V" shape. Ensure that the edges line up perfectly; this precision will help in the overall sturdiness of your box.
2. The Mountain Fold: Opposite to the valley fold, this one takes the paper away from you, creating a peak-like shape. It’s useful for creating the sides of your box. Practice this fold by pushing the paper up, forming a triangular crease.
3. Creasing: After each fold, use your fingernail or a bone folder to press down the crease firmly. A good crease makes a huge difference in how well your box holds its shape.
4. Corner Folds: This step is crucial for the corners of your box. Fold each corner inward at a 45-degree angle towards the center line. This creates not just a neat look but also adds to the box's stability.
As you practice these techniques, don’t worry about perfection on your first try. It’s all about getting a feel for the paper and mastering the angles. To help visualize these folds, you might want to check out Dailymotion for tutorial videos that can show you exactly how it's done!
Once you’ve got the hang of the basic folds, your paper will start transforming into a box shape. Just remember to keep your folds sharp and your edges aligned. With a little patience, you’ll be amazed at what you can create!
Also Read This: How to Deactivate Facebook Account Temporarily on Dailymotion: A Quick Guide
6. Step 4: Assembling Your Paper Box
Fantastic! You’ve folded your paper and now it’s time to assemble everything into a lovely box. This is where the magic happens, and you’ll see your hard work come to fruition.
Gather Your Materials: Before you start assembling, make sure you have everything you need at hand: your folded paper, some glue or tape, and maybe some decorative items if you want to jazz up your box!
1. Start with the Base: Lay your folded paper flat on a surface, with the folded edges facing up. If your folds were done correctly, you should see the outline of the box starting to emerge. Now, take the corners and bring them together to form the base, making sure the edges match up neatly.
2. Secure the Corners: Use glue or tape to secure the corners together. A little bit goes a long way; you don’t need excessive amounts. Just dab a bit where the paper overlaps to keep everything in place. If you used tape, cut small pieces and apply them at the joins for a clean look.
3. Finish Up the Sides: Once the base is secure, it’s time to lift the sides up. Fold each side up towards the center of the box, making sure they fit snugly against the base. Again, secure these with glue or tape. The corners should now be nicely aligned, forming the walls of your box.
4. Add a Lid (optional): If you want a lid for your box, cut out an additional piece of paper, slightly larger than the base, and repeat the folding techniques to create a lid that fits snugly over the top.
And there you have it! Your paper box is now fully assembled. Feel free to decorate it with markers, stickers, or any embellishments you have on hand. It’s a great way to personalize your box and make it truly unique.
Assembling your paper box can be a fun activity, especially if you're doing it with friends or family. Share your creations on social media, and inspire others to make their own! Happy crafting!
Also Read This: Don’t Ever Wipe Tears Without Gloves – A Powerful Story on Dailymotion
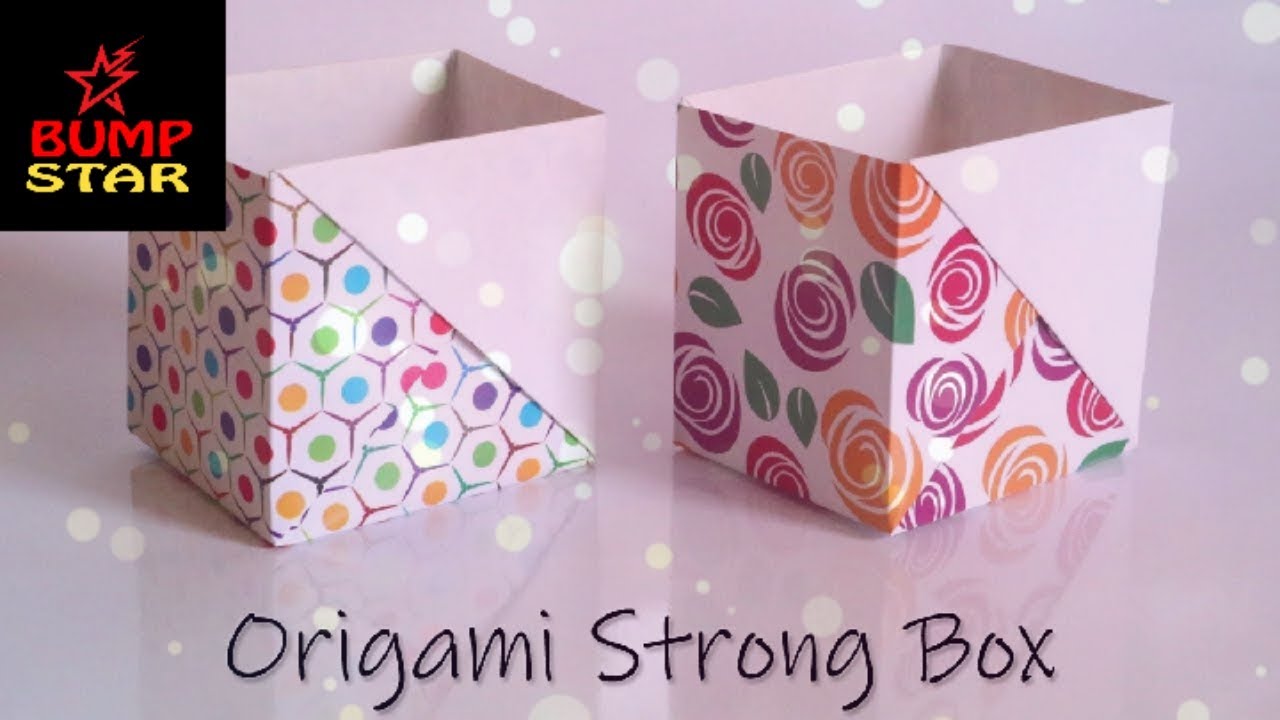
7. Step 5: Decorating Your Paper Box
Congratulations on crafting your paper box! Now comes the fun part: decorating it. This is where you can let your creativity shine. Here’s how to make your box truly unique:
1. Choose Your Theme
- Consider the purpose of your box. Is it for a gift, storage, or just for fun? This can guide your decoration choices.
- Popular themes include floral, geometric, and holiday-specific designs.
2. Gather Your Supplies
Before you start, collect all the materials you might need:
- Markers, colored pencils, or paints
- Stickers and washi tape
- Glitter or sequins for some sparkle
- Glue or double-sided tape for layering
3. Personalize with Art
Get artistic! You can:
- Draw or paint: Create designs directly on the box using markers or paint. Simple patterns like stripes or polka dots can be delightful.
- Use stickers: Stickers can add personality, and they’re super easy to apply. Consider themed stickers that match your box's purpose.
- Washi tape: This decorative tape comes in various colors and patterns. Use it to border edges or create designs.
4. Add Texture
Don’t be afraid to mix materials! Adding texture can make your box visually interesting:
- Try gluing on fabric swatches or lace for a softer look.
- Glue on buttons or beads for a 3D effect.
5. Finishing Touches
Once you’re happy with your main decorations, consider sealing it with a clear spray or mod podge to protect your artwork. This will keep it looking fresh and add a bit of shine!
Remember, the goal is to have fun! Your paper box should reflect your personality, so don’t hesitate to experiment and make it your own.
Also Read This: Create a Paper Gun with a Shooting Trigger
8. Common Mistakes to Avoid
While making a paper box can be a straightforward process, there are a few common pitfalls you might encounter. Here’s a handy list to help you avoid them:
- Using the Wrong Paper: Not all paper is created equal. If you use paper that’s too thin, your box may collapse. Aim for cardstock or sturdy paper to ensure durability.
- Skipping Measurements: Always measure twice and cut once! Skipping this step can lead to uneven sides or a box that doesn’t hold its shape.
- Neglecting the Fold: Creasing your folds properly is key to a clean finish. Use a bone folder or the edge of a ruler to create sharp, precise folds.
- Overstuffing the Box: If your box is meant to hold items, be mindful not to overload it. Overstuffing can lead to tearing or deformation.
- Forgetting to Decorate Last: If you decorate before assembling the box, you may end up with scuff marks or misaligned designs. Always finish your assembly first!
By keeping these tips in mind, you’ll enhance your box-making experience and ensure that your final product is both functional and beautiful. Enjoy the process and happy crafting!
Also Read This: Educational Videos for Speaking English on Dailymotion Simplified
9. Conclusion and Next Steps
Congratulations! You've successfully learned how to make a paper box using Dailymotion's easy tutorial. Crafting a paper box is not only a fun activity but also a practical skill that can come in handy for various occasions like gift-giving or organizing small items around your home.
As we wrap up this guide, here are some next steps you might consider:
- Experiment with Different Sizes: Once you’ve mastered the basic box, try adjusting the measurements to create larger or smaller boxes. This is a great way to tailor your projects to your specific needs!
- Decorate Your Boxes: Take your boxes to the next level by decorating them with washi tape, stickers, or even painting them. Personalizing your boxes can add a unique touch, especially if you’re giving them as gifts.
- Share Your Creations: Don’t keep your newfound skills to yourself! Share photos of your paper boxes on social media or with friends and family. You might inspire someone else to start crafting!
- Try Advanced Techniques: If you're feeling adventurous, look for tutorials on advanced paper folding techniques. Origami and other paper crafts can offer exciting challenges and beautiful results.
Remember, practice makes perfect! The more you create, the better you'll get. Happy crafting!
10. FAQs About Making Paper Boxes
Got questions? We’ve got answers! Here are some frequently asked questions about making paper boxes that might help you out:
1. What type of paper is best for making paper boxes?
For beginners, cardstock is a great option because it’s sturdy and holds its shape well. If you want a more decorative look, craft paper or scrapbook paper can also be excellent choices.
2. Can I make a paper box without any special tools?
Absolutely! All you need are some basic supplies: paper, scissors, and a ruler. A bone folder can help with creases, but it's not necessary.
3. How do I ensure my box flaps fit correctly?
When measuring and cutting, always double-check your dimensions. Use a ruler for straight lines and make sure your folds are crisp for a perfect fit.
4. Can I use recycled paper for my boxes?
Yes! Using recycled paper is a fantastic way to be eco-friendly. Just make sure the paper is sturdy enough to hold the shape of your box.
5. How can I make my paper box waterproof?
To make your paper box more resistant to moisture, consider using a waterproof spray sealant after you've finished crafting. Just ensure it's applied in a well-ventilated area.
Whether you’re new to crafting or looking to refine your skills, these tips and answers should guide you on your paper box journey. Enjoy crafting!
 admin
admin


