Curling hair with a straightener might sound a bit unconventional, but trust me, it’s a game-changer! If you’re looking for beautiful waves or bouncy curls without investing in multiple tools, you’re in the right place. This technique is not only efficient but also saves space in your beauty arsenal. Plus, straighteners are designed to glide smoothly, making it easier to achieve that perfect curl. So, grab your straightener, and let’s get started on this exciting hair journey!
Benefits of Using a Straightener for Curling
Using a straightener for curling comes with a whole host of benefits that might surprise you. Let’s dive into some of the most compelling reasons to try this method:
- Versatility: A straightener is not just for straightening! With a little practice, you can create various styles, from loose waves to tight curls.
- Time-Saving: If you’re short on time, using a straightener can quickly give you the curls you desire. You can curl sections of hair faster than with traditional curling irons.
- Less Heat Damage: Many modern straighteners come with advanced technology that reduces heat damage. Curling with a straightener can sometimes be gentler on your hair than using a traditional curling iron.
- Easy to Use: Once you get the hang of it, curling with a straightener is straightforward. It requires less precision than some curling tools, making it beginner-friendly.
- Long-Lasting Results: Curls created with a straightener often hold better throughout the day due to the direct heat and the way the hair is wrapped around the plates.
In addition to these benefits, you can also achieve a more natural look. Straighteners allow you to customize the size and shape of your curls, giving you complete control over your hairstyle. You can choose to have beachy waves or perfectly polished curls, all with the same tool!
So, if you haven’t tried curling your hair with a straightener yet, what are you waiting for? It's a fun and creative way to change your look with just one tool. Keep reading for a detailed step-by-step guide to mastering this technique!
Also Read This: How to Make Coffee with Milk Easy Coffee Recipe on Dailymotion
3. Essential Tools and Products Needed
Before diving into the art of curling your hair with a straightener, let’s make sure you have all the essential tools and products at your fingertips. Having the right gear not only ensures a better outcome but also makes the process smoother and more enjoyable. Here’s what you’ll need:
- Flat Iron: Choose a straightener with rounded edges for easier curling. A ceramic or tourmaline plate is preferable, as it distributes heat evenly.
- Heat Protectant Spray: This is crucial! It shields your hair from the high temperatures of the straightener, preventing damage and keeping your locks healthy.
- Hair Clips: These come in handy for sectioning your hair. It’s much easier to curl small sections rather than trying to manage all your hair at once.
- Brush or Comb: A wide-tooth comb or brush helps to detangle your hair before styling, ensuring a smoother curling process.
- Hair Spray: A good finishing spray will help set your curls, keeping them bouncy and beautiful throughout the day.
- Optional: Curling Wand: While the goal is to use a straightener, having a curling wand can be useful for touch-ups or different styles.
With these tools in hand, you're ready to start curling! Remember, practice makes perfect. Don’t be discouraged if your curls don’t turn out just right the first time. With a little patience, you'll master this technique in no time.
Also Read This: Learn to Play the Happy Birthday Tune on Guitar Using Dailymotion Resources
4. Step-by-Step Guide to Curling Your Hair
Now that you’re equipped with the essentials, let’s get into the nitty-gritty of curling your hair with a straightener. Follow these simple steps for gorgeous curls:
- Prep Your Hair: Begin with clean, dry hair. Apply a heat protectant spray evenly throughout your locks to safeguard them from heat damage.
- Section Your Hair: Using your hair clips, divide your hair into manageable sections. Start with the bottom layer, clipping the rest up. This way, you can focus on one section at a time.
- Set the Temperature: Depending on your hair type, adjust your straightener to the appropriate heat setting. For fine hair, aim for around 300°F, while thicker hair can handle 400°F or more.
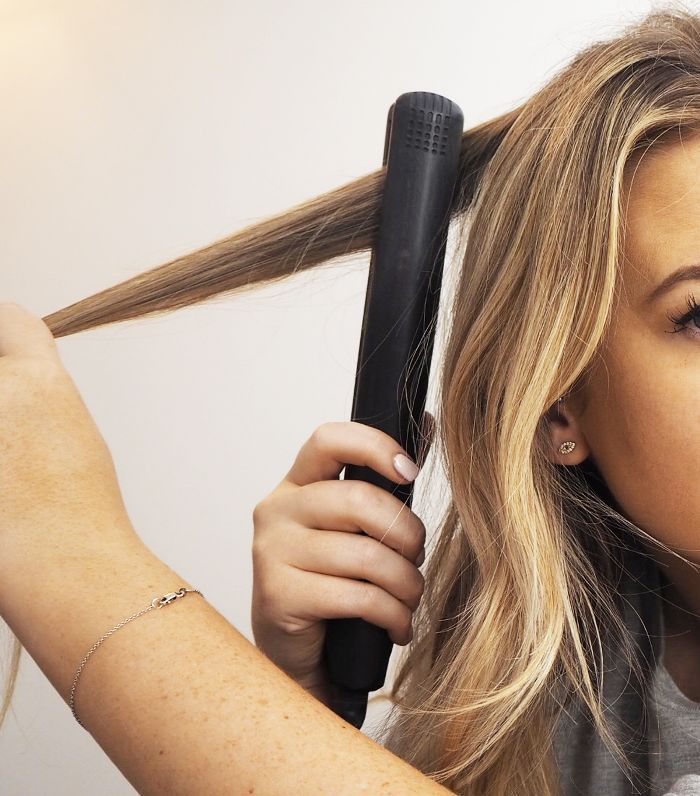
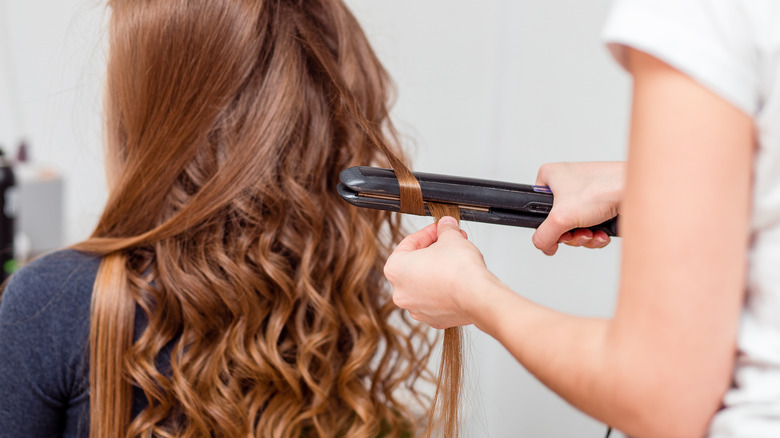
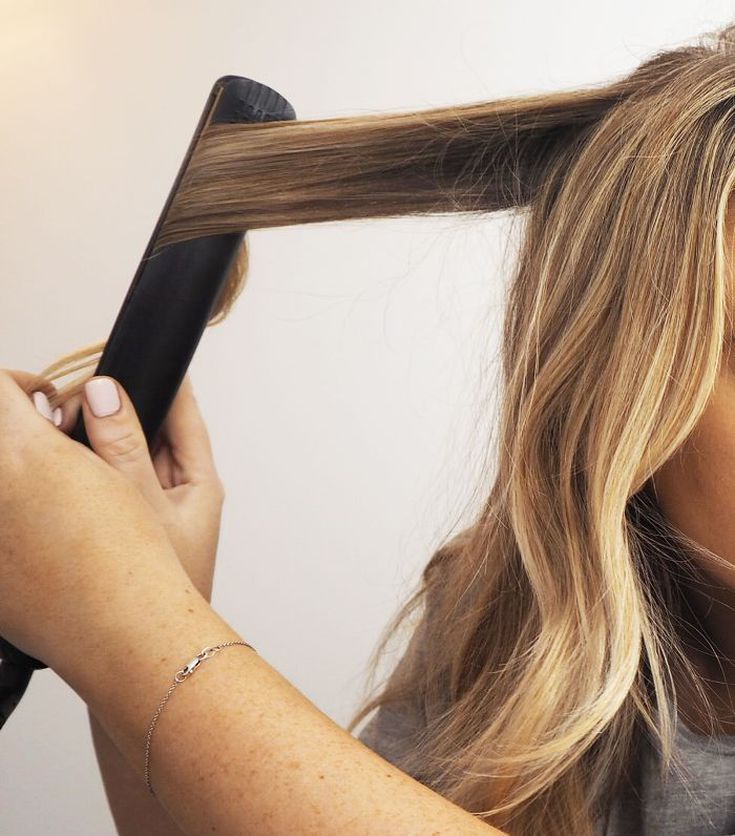
- Start Curling: Take a small section of hair (about 1 inch wide) and place it between the plates of the straightener. Rotate the straightener 180 degrees away from your face. Slowly glide the straightener down the hair shaft, allowing the hair to wrap around the plates.
- Release and Style: After a few seconds, release the hair gently. You should see a beautiful curl forming. Repeat this process all around your head, alternating curl directions for a more natural look.
- Cool and Set: Once you’ve curled all your hair, let the curls cool for a few minutes. This helps them set. Then, lightly run your fingers through the curls to separate them for a more relaxed look.
- Finish with Hair Spray: To ensure your curls last all day, spritz a light hold hairspray over your finished style. This adds shine and keeps your hair looking fabulous.
And there you have it! With just a few steps, you can achieve stunning curls using a straightener. Enjoy experimenting with different sizes and styles of curls to find what suits you best!
Also Read This: How to Make Electricity at Home with Salt Water Fun DIY Project on Dailymotion
5. Tips for Achieving Different Curl Styles
Curling your hair with a straightener can open a world of styling possibilities! Depending on the look you’re going for, there are various techniques to achieve different curl styles. Here are some tips to help you master those styles:
1. Loose Beach Waves: For a relaxed, beachy look, use a wider section of hair (about 2 inches). Start by positioning the straightener vertically, then wrap the hair around the barrel, turning the straightener a quarter turn as you glide down. This creates soft, flowing waves.
2. Bouncy Curls: If you’re aiming for tighter, bouncier curls, use smaller sections (about 1 inch). Clamp the hair with the straightener and twist it away from your face, holding it for a few seconds. Keep the curls in place by pinning them up until they cool.
3. Vintage Glam Curls: For a classic Hollywood vibe, use the straightener to create structured curls. Start at the root, clamp down, and twist the straightener a full turn while pulling down. This will give you those elegant, defined curls reminiscent of the golden age of cinema.
4. Spiral Curls: To achieve spiral curls, hold the straightener vertically and wrap the hair around the barrel tightly. The key is to keep the tension even as you pull down. This technique works best on shorter hair for a fun, youthful look.
5. Half-Up, Half-Down Style: Mix and match curls by curling only the bottom half of your hair. This style keeps your look fresh and fun. Start curling from the mid-lengths of your hair downwards, leaving the top section straight for contrast.
Experiment with these styles, and don’t hesitate to adjust the size of your hair sections and the heat settings on your straightener. Everyone’s hair is unique, so find what works best for you!
Also Read This: How to Make Creative Paper Gift Boxes at Home
6. Common Mistakes to Avoid When Curling Hair
Even with the best intentions, curling your hair with a straightener can lead to some common hiccups. Here are mistakes to watch out for, along with tips to avoid them:
- Using Too Much Heat: High temperatures can damage your hair and create frizz. Always start at a lower temperature and increase gradually if needed. Most hair types do well between 300°F and 350°F.
- Skipping Heat Protectant: Never skip this crucial step! Using a heat protectant spray before styling helps shield your hair from damage and keeps curls looking shiny.
- Not Letting Curls Cool: Curls need time to set. If you unravel them too soon, they’ll fall flat. Consider pinning your curls up until they cool down completely to maintain their shape.
- Curling in the Same Direction: For a more natural look, alternate the direction of your curls. Curl some sections towards your face and others away. This creates movement and dimension.
- Using Dirty Hair: Styling dirty hair can make curls less effective. Grease and product build-up can weigh your hair down. Try to curl hair that’s clean, or use dry shampoo to refresh it.
Avoiding these common mistakes will make your curling experience smoother and more enjoyable. With practice, you’ll be able to achieve stunning curls while keeping your hair healthy!
Also Read This: Enhancing Accessibility on Dailymotion with Closed Captioning
7. How to Maintain Your Curls Throughout the Day
So, you've taken the time to curl your hair with a straightener, and you want those beautiful waves to last all day long. Nobody wants to spend time styling their hair only to have it fall flat within a few hours. Here are some practical tips to help keep your curls looking fabulous:
- Use a Good Hairspray: Before curling, applying a light hold hairspray can work wonders. Once you've finished styling, a final spritz of a stronger hairspray will help lock those curls in place. Try to avoid heavy formulas that can weigh your hair down.
- Avoid Touching Your Hair: It’s tempting to run your fingers through your curls, but this can lead to frizz and loss of shape. If you must, do it gently and sparingly.
- Embrace the Pineapple Method: If you're planning to sleep with curls or want to keep them overnight, gather your curls at the top of your head in a loose, high ponytail. This helps prevent flattening and retains volume.
- Use the Right Products: Opt for lightweight styling creams or curl enhancers that won’t weigh your hair down. Look for products specifically designed for curly or wavy hair.
- Carry a Travel Size Hair Spray: For those busy days, it’s always helpful to have a mini hairspray in your bag. A quick touch-up can bring your curls back to life!
Another clever trick is to use a silk or satin scarf to wrap your hair when you're not active. This fabric minimizes friction, helping to keep your curls in shape. Overall, maintaining your curls is a combination of the right products, techniques, and a little love!
8. Conclusion and Final Thoughts
Curling your hair with a straightener can transform your look and add a touch of elegance or playfulness, depending on the style you choose. With just a little practice, you'll become a pro at creating beautiful curls that can last all day. Remember, the key is not just in the curling process but also in how you care for those curls afterward.
As you experiment with different techniques, don't hesitate to make adjustments based on your hair type and personal preferences. Every head of hair is unique, and finding what works best for you can be a fun journey!
In summary, curling your hair with a straightener is not only time-efficient but also versatile. Whether you’re preparing for a special occasion or just wanting to switch up your everyday look, these curls can add flair to your style. So grab that straightener, and let your creativity shine!
Happy curling!
 admin
admin


