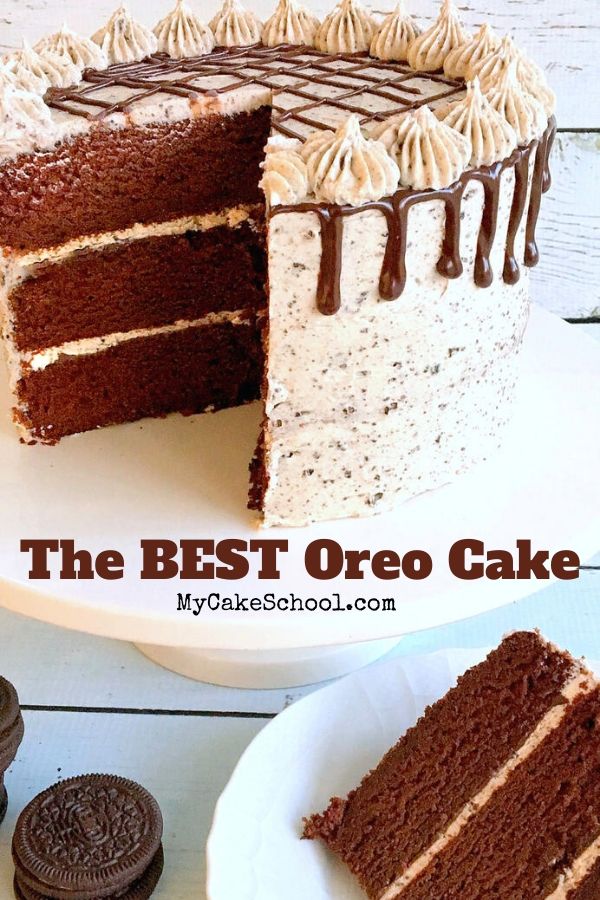
Welcome to the delightful world of Oreo cake, a treat that brings together the best of both worlds—rich, moist cake and the iconic, creamy crunch of Oreos! This cake is perfect for birthdays, celebrations, or just a sweet indulgence on a cozy afternoon. Whether you're a seasoned baker or a beginner, this recipe is straightforward and sure to impress your friends and family. Let’s dive into what you'll need to whip up this delicious dessert!
Ingredients Needed for Oreo Cake
To create the perfect Oreo cake, you'll need a few essential ingredients. Here’s a simple list to get you started:
- For the Cake:
- 1 ¾ cups all-purpose flour
- 1 ½ cups granulated sugar
- ½ cup unsweetened cocoa powder
- 1 ½ teaspoons baking powder
- 1 ½ teaspoons baking soda
- 1 teaspoon salt
- 2 large eggs
- 1 cup whole milk
- ½ cup vegetable oil
- 2 teaspoons vanilla extract
- 1 cup boiling water
- 1 cup crushed Oreos (for added flavor in the cake)
- For the Frosting:
- 1 cup unsalted butter, softened
- 4 cups powdered sugar
- ½ cup cocoa powder
- ½ cup heavy cream
- 2 teaspoons vanilla extract
- 1 cup crushed Oreos (for topping)
With these ingredients in hand, you're all set to start baking! Each component contributes to the overall flavor and texture, ensuring that your Oreo cake is as decadent as it is irresistible. Don’t forget to gather your baking tools too, like mixing bowls, a whisk, and cake pans, to make the process smoother. Ready to get started? Let’s make some magic in the kitchen!
Also Read This: Fun Paper Nails Craft Step-by-Step Guide on Dailymotion
3. Step-by-Step Instructions to Make Oreo Cake
Alright, let’s dive right into the fun part—making that scrumptious Oreo cake! Follow these step-by-step instructions, and you’ll have a dessert that will wow everyone at your next gathering!
Ingredients You'll Need:
- 1 ½ cups all-purpose flour
- 1 cup granulated sugar
- ½ cup unsweetened cocoa powder
- 1 teaspoon baking powder
- ½ teaspoon baking soda
- ½ teaspoon salt
- 3 large eggs
- 1 cup buttermilk
- ½ cup vegetable oil
- 2 teaspoons vanilla extract
- 1 cup boiling water
- 15 Oreo cookies, crushed
Step 1: Preheat the Oven
First things first, preheat your oven to 350°F (175°C). This ensures that your cake bakes evenly and beautifully.
Step 2: Prepare Your Baking Pans
Grease two 9-inch round cake pans with butter or non-stick spray. To make removing the cakes easier, you can also line the bottoms with parchment paper.
Step 3: Mix the Dry Ingredients
In a large mixing bowl, sift together the flour, sugar, cocoa powder, baking powder, baking soda, and salt. This helps to aerate the mix and combines all those dry ingredients perfectly.
Step 4: Combine Wet Ingredients
In a separate bowl, whisk together the eggs, buttermilk, vegetable oil, and vanilla extract until smooth. Once ready, add this mixture to the dry ingredients.
Step 5: Combine and Add Hot Water
Mix everything together until just combined. Then, slowly add the boiling water to the batter. Don’t worry if the batter seems thin; that’s exactly what you want for a moist cake. Stir in the crushed Oreo cookies.
Step 6: Bake the Cakes
Pour the batter evenly into the prepared pans. Bake for 30 to 35 minutes, or until a toothpick inserted in the center comes out clean. Let them cool in the pans for about 10 minutes before transferring to a wire rack.
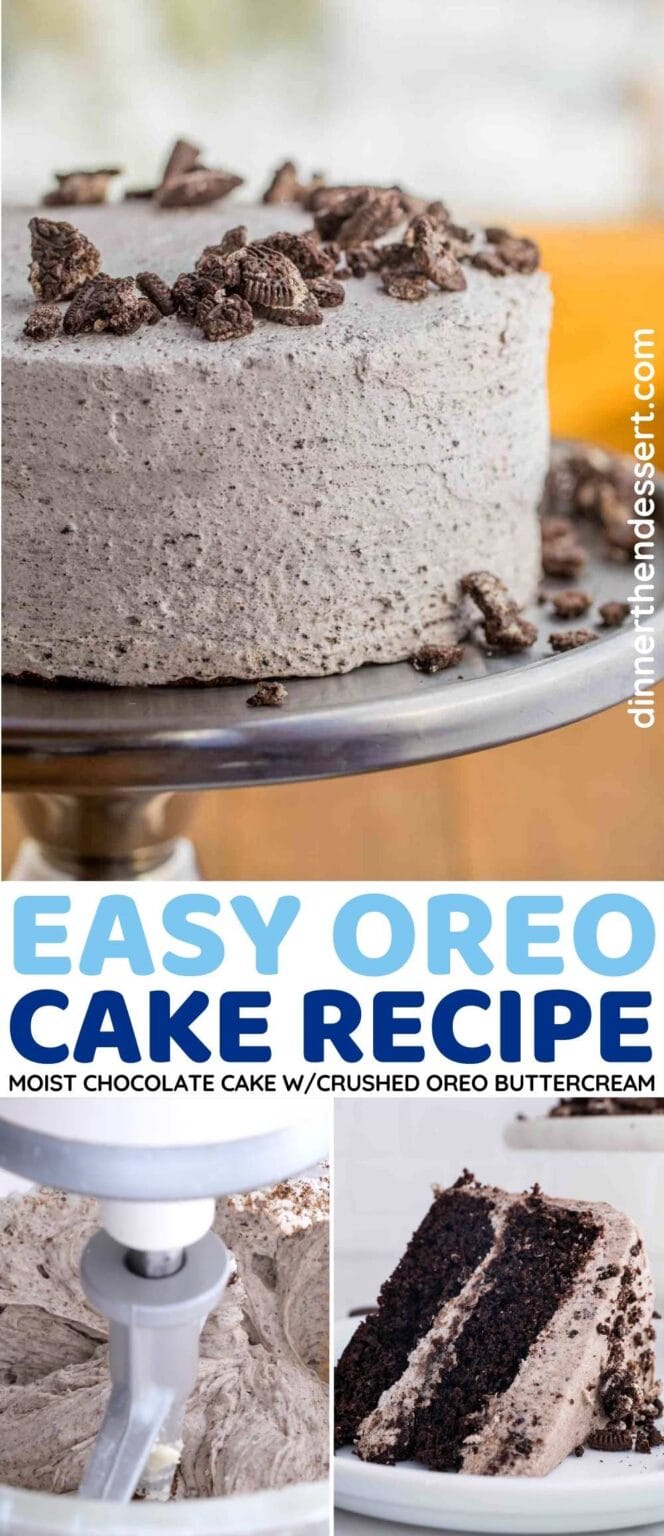
Step 7: Frosting Time!
Once the cakes are completely cool, it’s time to frost! You can use a classic cream cheese frosting or a whipped cream topping and sprinkle more crushed Oreos on top for that extra flair.
And there you have it—a delicious Oreo cake ready to impress!
Also Read This: How to Use Other Dailymotion Viewers: Explore Alternative Ways to Watch Videos
4. Tips for Perfecting Your Oreo Cake
Now that you’ve got the basic recipe down, let’s talk about some tips to elevate your Oreo cake to the next level. These little tricks can make a big difference in flavor and texture!
Tip 1: Use Fresh Ingredients
Fresh eggs and high-quality cocoa powder can significantly enhance the flavor of your cake. Don’t skimp on quality; it’s worth it!
Tip 2: Don't Overmix
When combining your wet and dry ingredients, mix until just combined. Overmixing can lead to a tough cake, and we want it to be tender and moist!
Tip 3: Experiment with Fillings
Consider adding a layer of Oreo filling or vanilla pudding between the cake layers for an extra surprise! It adds creaminess and complements the chocolate perfectly.
Tip 4: Chill Your Cake Before Frosting
Allow your cake to cool completely, and if possible, chill it in the fridge for a bit before frosting. This helps the frosting to set better and makes the cake easier to slice.
Tip 5: Balance the Sweetness
If you find your frosting too sweet, cut it with a bit of cream cheese or sour cream. It adds a delicious tang that balances the sweetness of the Oreos!
Tip 6: Top with Whipped Cream
A dollop of whipped cream on each slice is a delightful addition! It lightens the dessert and gives it a beautiful presentation.
With these tips in your back pocket, you’re on your way to creating the ultimate Oreo cake that everyone will rave about! Enjoy the baking adventure!
Also Read This: How Dailymotion Thrives in a Competitive Market
5. Serving Suggestions for Oreo Cake
When it comes to enjoying your delicious Oreo cake, the presentation and accompaniments can elevate the experience to a whole new level. Here are some fun and creative serving suggestions to make your Oreo cake stand out at any gathering:
- Oreo Cake Slices with Ice Cream: Pair a slice of your cake with a scoop of vanilla or cookies and cream ice cream. The creamy texture complements the rich chocolatey flavor of the cake beautifully.
- Chocolate Ganache Drizzle: For an extra indulgent treat, drizzle some warm chocolate ganache over each slice before serving. This adds a luscious touch that chocolate lovers will adore.
- Whipped Cream Topping: A dollop of freshly whipped cream on top of your cake slice can enhance the flavor profile. You can even sprinkle some crushed Oreos on the cream for added crunch!
- Serve with Fresh Berries: Adding a side of fresh strawberries or raspberries not only brightens up the plate but also provides a refreshing contrast to the richness of the cake. It’s a delightful balance!
- Oreo Cake Parfaits: For a fun twist, layer crumbled Oreo cake with whipped cream and chocolate sauce in a glass. This makes for an eye-catching dessert that’s perfect for parties.
Remember, presentation matters! You can use a decorative cake stand and garnish the serving area with whole Oreos or mint leaves to add a pop of color. Whether it's a birthday party, a casual get-together, or just a special treat for yourself, these serving suggestions will definitely impress your guests!
6. Frequently Asked Questions about Oreo Cake
Making an Oreo cake can spark a few questions, especially if it’s your first time venturing into the world of baking. Here are some frequently asked questions and their answers to help you along your baking journey:
- Can I use homemade Oreo cookies for this recipe? Absolutely! Homemade Oreos will add a personal touch to your cake. Just ensure they’re baked and cooled completely before using them in your recipe.
- What can I use instead of eggs? If you’re looking for an egg substitute, you can use unsweetened applesauce, mashed bananas, or flaxseed meal mixed with water. Each option will slightly change the texture, so choose based on your preference!
- How should I store leftover Oreo cake? Store any leftover cake in an airtight container at room temperature for up to three days. If you want to keep it longer, refrigerate it for up to a week. Just make sure to let it come to room temperature before serving for the best flavor!
- Can I freeze Oreo cake? Yes! Wrap the cake tightly in plastic wrap and then in aluminum foil before freezing. It can last for up to three months. When you're ready to enjoy it, simply thaw it in the refrigerator overnight.
- Can I add other flavors to the cake? Definitely! You can incorporate different extracts like mint or almond for a unique twist. Just be careful not to overpower the Oreo flavor!
If you still have questions, don’t hesitate to ask fellow bakers or check out online forums. The baking community is always ready to help with tips and encouragement. Happy baking!
 admin
admin


