Welcome to our guide on changing the bit depth of an image! Bit depth is essential in determining how much color information each pixel can hold in your images. It influences the quality and detail of your visuals, making it crucial for photographers, designers, and anyone who works with digital graphics. Let’s dive into what bit depth really means and why it matters!
Understanding the Importance of Bit Depth in Images
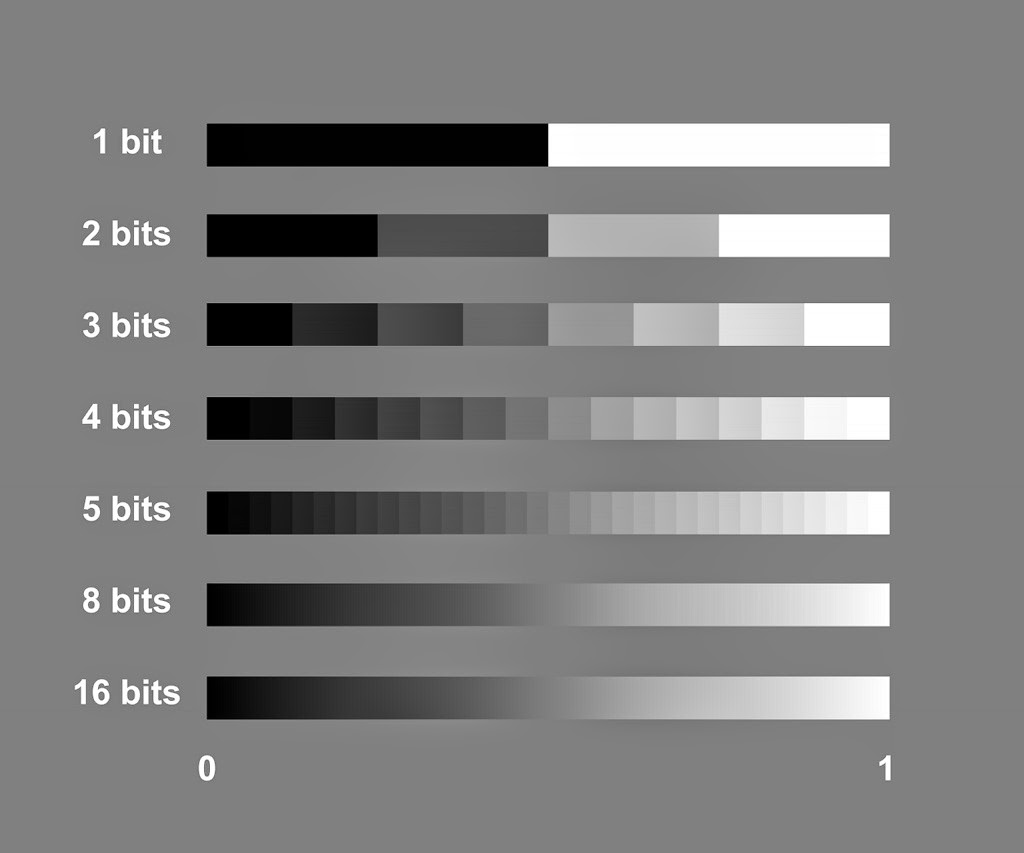
Bit depth refers to the number of bits used to represent the color of a single pixel in an image. More bits mean more color options, resulting in better quality images. Here’s a quick breakdown:
- 1-bit: Black and white only (2 colors).
- 8-bit: 256 colors, suitable for simple graphics.
- 16-bit: 65,536 colors, providing smoother gradients.
- 24-bit: Over 16 million colors, the standard for true color images.
- 32-bit: Includes an alpha channel for transparency, used in advanced graphics.
So, why is bit depth important? Here are a few reasons:
- Color Variety: Higher bit depth allows for a wider range of colors and shades, making your images look vibrant and true to life.
- Smoother Gradients: With more bits, the transition between colors becomes less abrupt, reducing banding effects and making images appear more polished.
- Editing Flexibility: Working with higher bit depth images allows for more flexibility during editing, as you have more color information to manipulate without sacrificing quality.
Let’s consider a practical example. Imagine you’re editing a landscape photo. If the image has a low bit depth (like 8-bit), you might notice banding in the sky during edits, as there aren’t enough colors to create a smooth gradient. However, if you start with a 16-bit or 24-bit image, you’ll have a richer palette to work with, leading to a more stunning final result.
In conclusion, understanding bit depth is crucial for anyone involved in digital imagery. Whether you’re capturing, editing, or sharing, the bit depth of your images directly impacts the quality and effectiveness of your work. Stay tuned for more insights on how to adjust bit depth effectively!
Also Read This: VectorStock Is Ideal for Both Beginner and Expert Designers
3. Tools Required to Change Bit Depth

Changing the bit depth of an image isn’t as complicated as it may sound, and you don’t need a PhD in computer science to do it! There are several handy tools that can help you adjust the bit depth with ease. Here’s a quick rundown of some popular options:
- Adobe Photoshop: A powerful and widely-used tool, Photoshop allows you to easily change the bit depth of your images. It’s perfect for both novices and pros alike!
- GIMP: If you're looking for a free alternative to Photoshop, GIMP is a fantastic choice. It offers many functionalities, including the ability to adjust bit depth.
- Paint.NET: Another free tool, Paint.NET is user-friendly and packed with features for image editing, including bit depth modification.
- ImageMagick: For those who are comfortable with command-line tools, ImageMagick is incredibly powerful. It offers a plethora of options for batch image processing, including changing bit depth.
- Online Converters: Websites like Convertio or Online-Convert can change an image's bit depth without the need for software installation. They’re perfect for quick adjustments.
Each of these tools has its own strengths, so feel free to choose one that you’re most comfortable with! Whether you prefer a robust software like Photoshop or a simple online converter, you’ll find plenty of options to suit your needs.
Also Read This: How to Use Adobe Stock in Premiere
4. Step-by-Step Guide to Changing Bit Depth
Now that you have your tools ready, let’s dive into the actual process of changing the bit depth of an image. I’ll walk you through the steps using two popular tools: Adobe Photoshop and GIMP. Let’s get started!
Using Adobe Photoshop
- Open Your Image: Launch Photoshop and open the image you want to modify.
- Access the Image Mode: Navigate to Image in the top menu, then go to Mode.
- Select Bit Depth: You’ll see options like 8 Bits/Channel, 16 Bits/Channel, and 32 Bits/Channel. Choose the desired bit depth.
- Save Your Image: Once you’ve made your selection, save the image by clicking File and then Save As to ensure you keep the original file intact.
Using GIMP
- Open Your Image: Start GIMP and load the image you wish to edit.
- Change the Image Mode: Click on Image in the menu, then select Mode, followed by RGB if it isn’t already in that mode.
- Adjust Bit Depth: Go to Image again, choose Precision, and select the desired bit depth.
- Export Your Image: To save your changes, go to File and select Export As. Choose your format and save!
And there you have it! Changing the bit depth is straightforward whether you’re using Photoshop or GIMP. Remember, always keep a backup of your original image in case you want to revert back. Happy editing!
Also Read This: How to Upload a YouTube Video Longer than 15 Minutes
5. Common Issues When Changing Bit Depth
Changing the bit depth of an image might seem like a straightforward task, but several common issues can arise during the process. Let’s explore these pitfalls to help you navigate them effectively.
Color Banding: One of the most frequent problems you may encounter is color banding. This occurs when an image has insufficient color depth to represent smooth gradients. For example, reducing an image from 16-bit to 8-bit can lead to visible steps between colors, especially in areas with subtle shading, like skies or shadows. To mitigate this, consider using dithering techniques to create the illusion of more colors.
Loss of Detail: Lowering the bit depth can also mean sacrificing image detail. For instance, if you convert a high-quality image from 16-bit to 8-bit, you may notice a reduction in sharpness and detail. Always preview your image after changing the bit depth to ensure that important details haven’t been lost.
File Size Changes: While reducing bit depth typically decreases file size, the relationship isn't always linear. Sometimes, you might find that a 16-bit TIFF file compresses poorly when downsampled to 8 bits due to the nature of the image content. Keep an eye on your file size and test different formats to find the best option.
Software Compatibility: Not all software handles bit depth changes well. For example, some programs might not support 16-bit images, causing errors or unexpected results. Always use reliable software or image editors known for robust handling of different bit depths, like Adobe Photoshop or GIMP.
Color Profile Mismatches: Changing bit depth can also affect how color profiles are applied. Make sure to check that your color profile (RGB, CMYK, etc.) is appropriately set after changing the bit depth. Otherwise, you may end up with colors that look drastically different from what you intended.
6. Best Practices for Working with Bit Depth
To make the most out of your images while changing their bit depth, following some best practices can ensure high-quality results. Here are some to keep in mind:
- Always Work in a Copy: Before making any changes, always create a copy of the original image. This way, you have a fallback if the changes don't yield the desired results. It’s like having a safety net that gives you peace of mind.
- Use High-Quality Sources: Start with high-resolution images that have a greater bit depth. This will provide more headroom when you need to make changes, ensuring the final product maintains quality.
- Test Different Formats: Different file formats handle bit depth changes differently. Experiment with formats like PNG, TIFF, and JPEG to see which maintains the best quality during your edits.
- Consider Your Output: Think about where the image will be displayed or printed. For digital displays, 8-bit might suffice, while high-quality prints might require 16-bit or even higher for the best results.
- Regularly Calibrate Your Monitor: Ensure that your monitor is calibrated properly. This will help you see accurate colors as you work on bit depth adjustments. A calibrated monitor ensures that the changes you make are represented accurately on-screen.
By understanding these common issues and adhering to best practices, you can navigate the complexities of changing bit depth with confidence. Happy editing!
 admin
admin


