Have you ever stumbled upon a stunning image on a website and thought, "I need this for my project!"? Well, you're in luck! Copying images from web pages can be a straightforward process when you know the right steps. Whether you want to save a photo for personal use or for a presentation, understanding the methods involved can make your life a lot easier. In this post, we’ll explore how to copy images seamlessly and what you need to consider about their usage.
Understanding Copyright and Image Use
Before you dive into the world of image copying, it’s crucial to understand copyright and how it affects the images you find online. Copyright laws protect the creators' rights, meaning that most images you see on the internet are owned by someone. Here are some key points to keep in mind:
- Original Ownership: The person who captures a photo or creates a digital artwork often holds the copyright.
- Creative Commons Licenses: Some images are available under Creative Commons licenses, which may allow you to use them freely or with certain restrictions. Always check the license type.
- Fair Use: In some instances, using an image without permission might be considered “fair use,” especially for educational purposes. However, this is a gray area and varies by situation.
- Attribution: If you plan to use an image that requires attribution, make sure to credit the creator properly, often by including their name and a link to their work.
So, how can you ensure you’re respecting copyright while copying images? Here are a few tips:
- Look for Public Domain Images: Websites like Unsplash, Pixabay, or Pexels offer images that are free to use without worrying about copyright.
- Check the License: If you find an image you love, click on it to see if there’s any information about its license.
- Contact the Creator: If you’re unsure about using an image, reach out to the creator for permission. Many are happy to share their work as long as you ask respectfully.
- Use Images Responsibly: Even if an image is free to use, consider how it fits within the context of your project or post. Respect the creator’s intent.
By understanding these elements, you can confidently copy images while respecting the rights of others. Remember, being conscientious about copyright not only protects you legally but also fosters a spirit of respect within the creative community. Happy image hunting!
Also Read This: how to print an image onto a shirt
3. Methods to Copy Images on Different Devices
Copying images from a web page can vary depending on the device you’re using. Let’s break down the methods for different devices so you can easily snag that perfect picture!
On Windows and Mac Computers
If you're on a desktop or laptop, the process is straightforward. Here’s how you can do it:
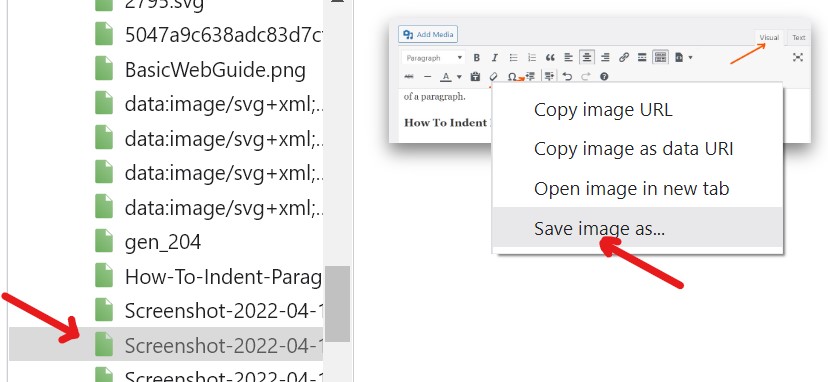
- Windows: Right-click on the image, and a menu will pop up. Select “Save image as...” Choose your desired location, name the file, and hit “Save”.
- Mac: Similar to Windows, right-click (or Ctrl+click) on the image and select “Save Image As...”. Again, choose where to save it and click “Save”.
On Mobile Devices
Need to copy images on your smartphone? No problem! Here’s a quick guide:
- iPhone: Tap and hold the image until a menu appears. Select “Add to Photos” to save it directly to your photo library.
- Android: Similar to iPhones, tap and hold the image until options pop up. Select “Download image” or “Save image” to save it to your device.
Each device has its quirks, but once you get the hang of it, you’ll be copying images in no time!
Also Read This: Rotating an Image in Snipping Tool: Easy Steps
4. Using Right-Click to Save Images on Desktop
One of the easiest ways to copy an image from a web page on a desktop is by using the right-click method. Let’s dive into the steps and some handy tips!
The Right-Click Process
Right-clicking is your friend! Here’s how to do it:
- Navigate to the image you want to save.
- Right-click on the image to open the context menu.
- Select “Save image as...”.
This will open a dialog box where you can choose the destination folder on your computer. It’s a simple yet effective way to get the image saved.
Tips for Successful Saving
Sometimes, right-clicking might not work due to restrictions on the website. Here are a few tips to help you out:
- Check for Restrictions: Some websites may disable right-click functionality. If that’s the case, try using a different method, like taking a screenshot.
- Use Keyboard Shortcuts: If right-click isn’t an option, you can use keyboard shortcuts. On Windows, press Shift + S to take a screenshot, while on Mac, use Command + Shift + 4 to capture a selected area.
By mastering the right-click method, you’ll have a seamless experience saving images from the web, making your content collection process a breeze!
Also Read This: How to Shoot and Edit High-Quality Product Photos
5. Copying Images on Mobile Devices
Copying images from web pages on mobile devices can seem a bit tricky at first, but once you know the ropes, it’s pretty straightforward! Whether you’re using an Android or an iOS device, the steps are quite similar, and you can save those images to your gallery in just a few taps.
For Android Users:
- First, navigate to the webpage that has the image you want to copy.
- Long press on the image until a menu pops up.
- Select Download image or Save image, depending on your browser.
- Voila! The image is now saved in your device's gallery.
For iOS Users:
- Open Safari (or your preferred browser) and find the image you want to save.
- Tap and hold the image until an options menu appears.
- Select Save Image.
- Your image will be saved to the Photos app, ready for you to use!
One thing to keep in mind is that some websites may have restrictions on image downloading. If you encounter a site like that, it might be worth trying a different approach!
Additionally, remember that if the image is part of a gallery or a larger interactive element, you might need to tap to open it first. But once you do that, the long press technique still applies!
6. Using Screenshot Tools as an Alternative
Sometimes, copying images directly isn’t an option due to restrictions or other technical hurdles. That’s where screenshot tools come in handy! They’re a great alternative to capture images when the standard downloading methods don’t work.
Using Built-in Screenshot Features:
- For Windows: Press PrtScn to capture the entire screen or Alt + PrtScn to capture only the active window. You can paste it into an image editing program like Paint and save it from there.
- For macOS: Press Command + Shift + 4, then drag to select the area of the image you want to capture. The screenshot will automatically save to your desktop.
- For Mobile Devices: Generally, you can take a screenshot by pressing the Volume Down + Power button simultaneously on Android or the Side + Volume Up buttons on iOS. The screenshot will be saved to your photos.
Screenshot Tools: There are also various screenshot applications available that offer additional features. Tools like Snagit or Lightshot allow you to capture specific regions, annotate your screenshots, and share them easily.
After capturing a screenshot, you can crop the image to focus on the part you want, especially if the webpage contains other elements that aren’t necessary for your use. This way, you get a clear image without distractions!
Utilizing screenshots can be a lifesaver when you want to save an image that’s just out of reach. Just remember to respect copyright and usage rights, particularly if you’re sharing the screenshots publicly!
 admin
admin