Introduction to Pop-Up Cards
Welcome to the whimsical world of pop-up cards! These delightful creations are not just a feast for the eyes; they’re also a heartfelt way to convey your emotions. Whether it’s a birthday, anniversary, or just a simple "thinking of you," pop-up cards add that extra sparkle to any occasion. Imagine opening a card and having a beautiful scene or message spring to life right before your eyes—it's like magic! In this guide, we’ll dive into the fascinating realm of pop-up cards, making crafting them a breeze.
Also Read This: Achieve 6-Pack Abs in Just One Week with Dailymotion’s Top Strategies
Materials Needed for Crafting Pop-Up Cards
Ready to embark on your pop-up card journey? Before we get started with the fun part, let’s gather our supplies. Here’s a handy list of materials you’ll need:
- Cardstock: This sturdy paper is the backbone of your card. Choose a color that suits your design—white, pastels, or vibrant hues all work wonderfully!
- Scissors: A good pair of scissors is essential for cutting out your designs and card shapes.
- X-Acto Knife: Perfect for intricate cuts, especially for detailed pop-up elements.
- Ruler: To measure and ensure straight lines—precision is key!
- Pencil: A pencil for sketching designs before cutting, preventing any irreversible mistakes.
- Glue: Choose a strong adhesive. Liquid glue or glue sticks work well for paper projects.
- Decorative Materials: Stickers, markers, colored pencils, or washi tape to add that personal touch.
- Bone Folder: This handy tool helps create crisp folds in your cardstock.
Once you have all your materials assembled, you’re ready to roll! Don’t worry if you don’t have everything on hand—most materials can be easily substituted. For instance, if you’re out of cardstock, regular paper can work in a pinch; just ensure it’s sturdy enough to hold your pop-up elements.
Now that we’ve gathered our supplies, let’s unleash our creativity! Stay tuned for the next steps where we’ll explore designing your pop-up card and the fun techniques to bring your vision to life. Happy crafting!
Also Read This: How High 2 Streaming on Dailymotion: Full Movie Access
3. Step-by-Step Instructions for Making Your First Pop-Up Card
Making your first pop-up card is an exciting journey into the world of creativity! Whether it’s for a birthday, a holiday, or just to say hello, a pop-up card adds that special touch. Let’s dive into a simple process that will guide you through it.
What You'll Need:
- Cardstock or thick paper (for durability)
- Scissors
- Craft knife (be careful!)
- Ruler
- Pencil
- Glue or double-sided tape
- Decorative materials (markers, stickers, etc.)
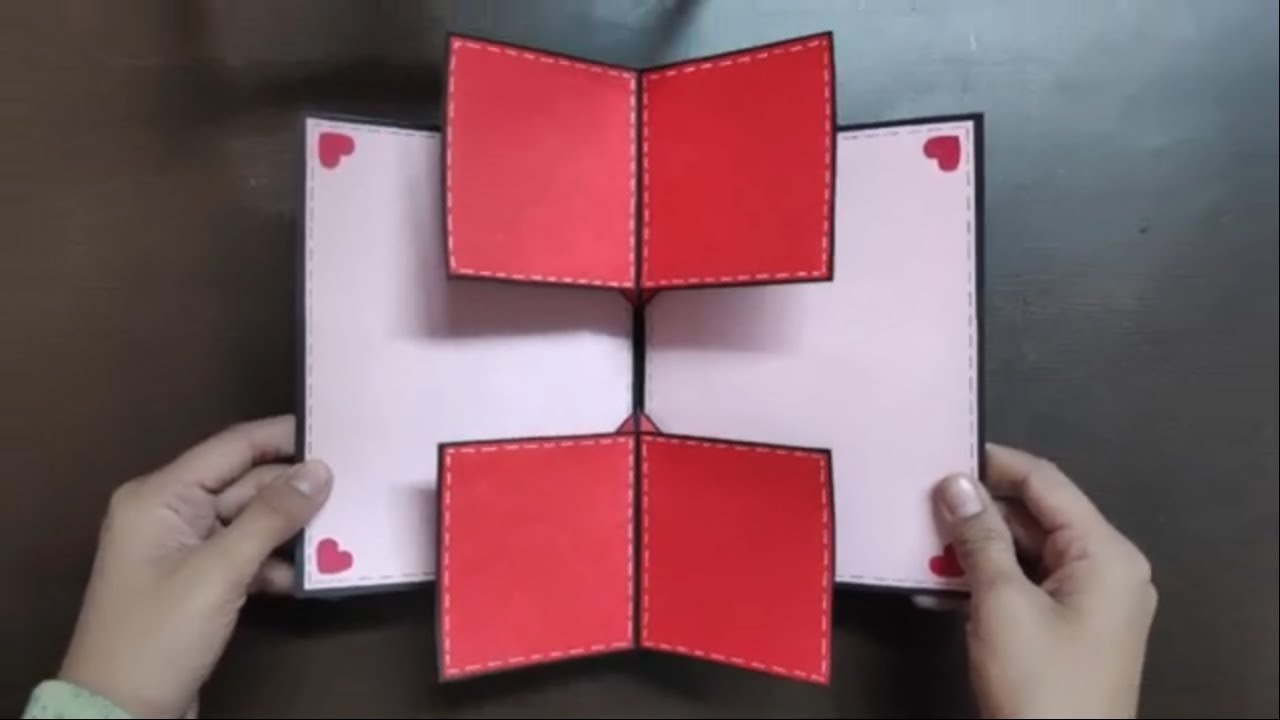
Step 1: Prepare Your Base Card
Start with a piece of cardstock. Fold it in half to create the base of your card. This is the main structure where all the magic will happen. Your folded card should be about 5 by 7 inches for a standard size, but feel free to experiment with dimensions!
Step 2: Create the Pop-Up Mechanism
To make the pop-up, you’ll need a piece of cardstock that will act as the pop-up element. Cut a rectangular piece about 3 inches tall and 6 inches wide. This will fold in half to create your pop-up element.
Step 3: Score and Fold
Using the ruler, measure and lightly score down the center of your rectangular piece. This is where you will fold it in half to create your pop-up. Once scored, fold it to create a crisp edge.
Step 4: Cut the Slots
Now, mark where your pop-up will sit on the base card. Make two small cuts (about 1 inch long) on the folded edge of the base card. These slots will hold your pop-up piece securely. Ensure the cuts are parallel and spaced correctly so the pop-up stands straight.
Step 5: Insert the Pop-Up
Now, slide the folded pop-up piece into the slots you just made. Open the card to see it spring up! Adjust it until it stands straight and centered.
Step 6: Secure It
Once you're happy with the positioning, apply glue or tape to secure the pop-up in place. Make sure it’s well-adhered, so it doesn’t flop over when the card opens.
Step 7: Decorate!
This is where you can let your creativity shine! Draw, paint, or use stickers to decorate both the pop-up element and the card’s interior and exterior. You can even write a heartfelt message on the inside before sealing it up!
And voilà! You’ve just made your first pop-up card. Remember, practice makes perfect, so don’t hesitate to try different designs and techniques!
Also Read This: How to Cook Pizza in a Pressure Cooker
4. Tips for Designing Unique Pop-Up Cards
Now that you've got the basics down, let’s explore some tips to take your pop-up cards to the next level. After all, the uniqueness of your design is what will truly impress your loved ones!
Think Outside the Box
When designing, consider themes that resonate with the occasion. For example, a garden party theme could feature flowers and butterflies, while a birthday card could incorporate balloons and cake. Get inspired by your surroundings or current trends!
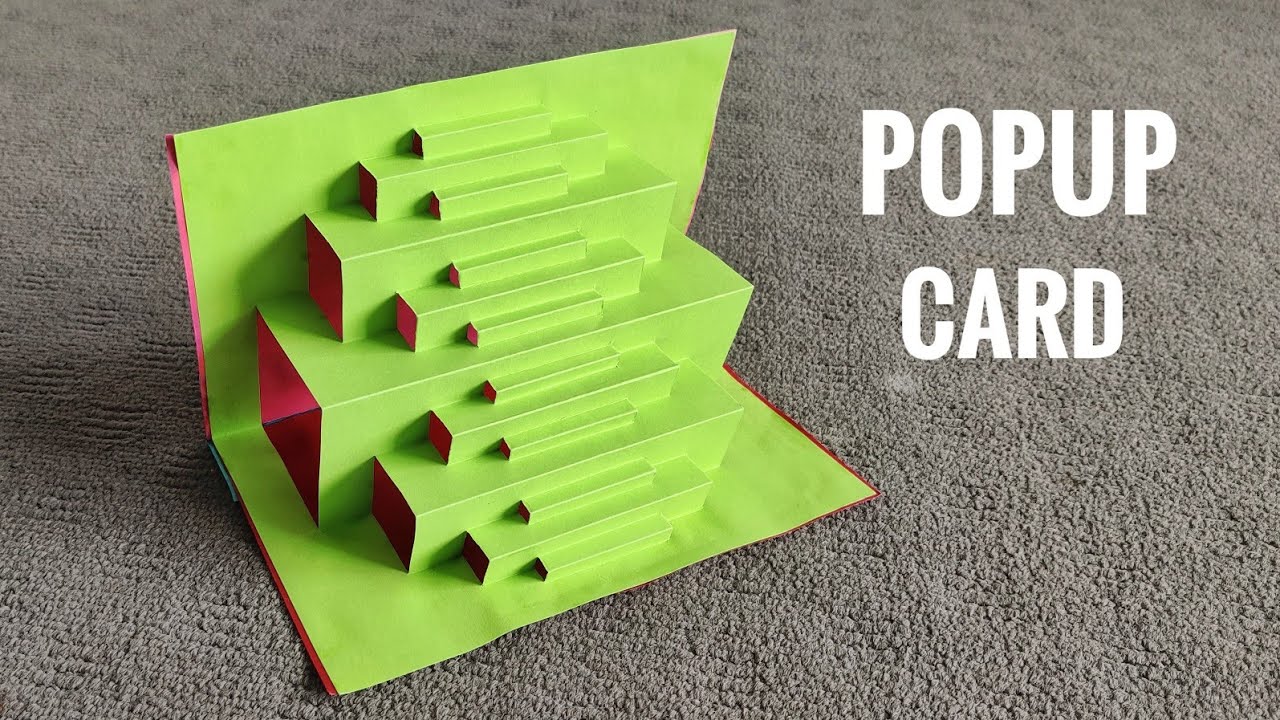
Use Layers for Depth
Layering is a great technique to add dimension. Instead of a single pop-up element, try adding multiple layers. For instance, a background layer of a sunset, a middle layer of mountains, and a foreground layer of trees can create a stunning 3D effect.
Experiment with Different Shapes
Don’t limit yourself to rectangles and squares! Try circular cards or even shaped cards (like a heart or star). These unusual shapes will make your pop-up card stand out immediately!
Incorporate Movement
Adding elements that move can really wow the recipient. Consider using a slider mechanism where part of the pop-up slides in and out as the card opens. It’s a little more complex but totally worth the effort!
Don’t Forget the Envelope
Your unique card deserves an equally special envelope. You can decorate the envelope to match the card theme. A simple design can elevate the entire gift-giving experience!
Make It Personal
Finally, remember that the most cherished cards are often the most personal. Include meaningful messages, personal jokes, or memories that relate to the person you're giving it to. This thoughtfulness adds an invaluable touch!
By following these tips, you’ll be well on your way to becoming a pop-up card pro. Each card you create will be a reflection of your creativity and thoughtfulness, making them truly special for anyone who receives one!
Also Read This: How to Mix Hair Color and Developer with Dailymotion Tutorials
5. How to Use Dailymotion for Video Tutorials
Creating pop-up cards can be a fun and rewarding craft, and what better way to share your techniques than through video tutorials on Dailymotion? This platform is perfect for showcasing your step-by-step processes in an engaging format. Let’s dive into how to effectively use Dailymotion for your video tutorials!
First things first, you’ll want to set up your Dailymotion account if you haven't already. Once that’s done, consider the following steps to create engaging video content:
- Plan Your Content: Before hitting the record button, outline your tutorial. Break it down into easy-to-follow sections. For instance, you might cover materials needed, step-by-step procedures, and finishing touches.
- Choose Your Equipment: You don’t need fancy gear to get started. A smartphone with a good camera works well! Just ensure your workspace is well-lit and tidy.
- Record Your Video: Start recording your tutorial, keeping your tone friendly and encouraging. Talk through each step clearly and show close-ups of your techniques. If you make a mistake, don't worry! A little giggle about it can make your video even more relatable.
- Edit for Clarity: Use simple editing software to clean up your video. Trim unnecessary pauses and enhance audio quality. Adding text overlays or annotations can help reinforce key points.
- Upload to Dailymotion: Once your video is polished, it's time to upload it. Choose a catchy title and write a brief description that summarizes what viewers will learn. Use relevant tags to increase visibility.
Finally, don’t forget to encourage engagement! Ask viewers to leave comments with their creations or questions, and respond to them to build a community around your craft.
6. Showcasing Your Pop-Up Cards: Sharing Ideas and Inspiration
Once you've mastered the art of creating pop-up cards, sharing your creations on Dailymotion can inspire others and help foster a community of fellow crafters. Here’s how you can effectively showcase your pop-up cards and share your ideas.
First, consider creating a series of videos that highlight different designs. For example, you could have themed tutorials for occasions such as birthdays, holidays, or even unique events like anniversaries. This gives your audience a variety of options and keeps them coming back for more!
Here are some specific ideas for your Dailymotion content:
- Design Videos: Create videos showing how to design a pop-up card from scratch. Focus on the inspiration behind your designs, incorporating sketches or mood boards to give viewers insight into your creative process.
- Show and Tell: After creating a few cards, do a showcase video! Flip through your completed cards, describing what makes each one special. This not only showcases your work but also provides ideas for viewers.
- Collaboration Videos: Partner with other crafters! Create collaborative videos where you both demonstrate a technique or share different styles. This cross-promotion can expand your audience!
- Challenges: Start a challenge where you and your viewers create pop-up cards based on a specific theme or material. Share your creations and encourage viewers to upload theirs to Dailymotion.
In addition to videos, consider creating a community space where viewers can upload images of their pop-up cards. This could be through a dedicated hashtag or a special video response challenge. Watching others get creative can spark new ideas and keep the crafting spirit alive!
By sharing your unique designs and encouraging others to do the same, you’ll cultivate a vibrant community on Dailymotion that celebrates the beauty of handmade pop-up cards. Happy crafting!
 admin
admin


