Welcome to the world of DIY Italian dough! If you're looking to create stunning floral decorations for events or just for fun, you've come to the right place. Italian dough is incredibly versatile, allowing you to sculpt, mold, and paint your creations to perfection. With a few simple techniques, you can craft lifelike flowers that will impress anyone who sees them. So, let’s dive into the ingredients and get started on this delightful journey of creativity!
Ingredients Needed for Italian Dough
Before we roll up our sleeves, let’s gather the essentials. Making Italian dough is straightforward, and you probably have most ingredients at home already. Here’s what you’ll need:
- Flour: 2 cups - All-purpose flour works best for a sturdy dough.
- Salt: 1 cup - This acts as a preservative and adds texture.
- Water: 1 cup - Use warm water to help dissolve the salt better.
- Vegetable Oil: 2 tablespoons - This gives the dough elasticity.
- Food Coloring: Optional - For vibrant flower colors, choose gel-based food coloring.
- Essential Oils: Optional - A few drops can add a pleasant fragrance to your creations.
Now, let’s break down these ingredients a bit further:
- Flour: The foundation of your dough. It provides the structure needed to hold your flower shapes. You can experiment with different types of flour for unique textures!
- Salt: Beyond its preserving qualities, salt helps enhance the dough's firmness, ensuring your flowers won't crumble easily.
- Water: Essential for binding the ingredients together. The warmer the water, the easier it is to mix the dough.
- Vegetable Oil: This is the secret ingredient for making your dough smooth and pliable. It allows for easier sculpting.
- Food Coloring: Unleash your inner artist! Combine colors to create stunning shades for your petals and leaves. Remember, a little goes a long way!
- Essential Oils: While not necessary, adding a few drops of your favorite essential oil can create a delightful scent, enhancing the overall experience of your craft.
Once you've gathered all your ingredients, you're just a step away from creating beautiful floral designs. Ready to unleash your creativity? Stay tuned for the next steps in crafting your Italian dough flowers!
Also Read This: How to Copy a Video from Dailymotion: Detailed Instructions for Downloading
3. Step-by-Step Guide to Making Italian Dough
Making Italian dough at home is easier than you think! With just a few simple ingredients and some patience, you can create a fantastic base for your flower creations. Let’s dive into the step-by-step process. Ready? Let’s roll!
Ingredients:
- 2 cups all-purpose flour
- 1 cup water (room temperature)
- 1 teaspoon salt
- 2 tablespoons vegetable oil
Instructions:
- Mix Dry Ingredients: In a large mixing bowl, combine the flour and salt. Stir them together until they’re well blended.
- Add Wet Ingredients: Create a well in the center of the flour mixture. Pour in the water and vegetable oil. This is where the magic begins!
- Combine: Using a fork or your hands, start incorporating the flour into the water mixture. It will be a bit sticky at first, but that’s perfectly fine!
- Knead the Dough: Turn the mixture out onto a floured surface. Knead the dough for about 5-10 minutes until it’s smooth and elastic. If it’s too sticky, sprinkle a little more flour as you knead.
- Rest: After kneading, wrap the dough in plastic wrap or cover it with a damp cloth. Let it rest for at least 30 minutes. This helps to relax the gluten, making it easier to shape later.
- Roll Out: Once rested, divide the dough into smaller portions. Roll each portion out into thin sheets. Aim for about 1/8 inch thickness; this will make it easier to shape into flowers.
And voilà! Your Italian dough is ready to be transformed into beautiful flower creations. Remember, the key is to practice and have fun with the process. Each flower you create will be a unique masterpiece!
Also Read This: Download Dailymotion Videos for Free Using Online Tools
4. Techniques for Shaping Flowers with Italian Dough
Now that you’ve mastered the dough, let’s explore some creative techniques for shaping those gorgeous flowers. There are countless styles to choose from, but we’ll focus on a few fundamental methods that will get you started on your floral journey!
1. Petal Formation: To create realistic petals, roll out your dough into thin sheets. Use a round cutter or a knife to cut out petal shapes. You can make them pointed or rounded based on the flower type you want to replicate.
2. Layering: Most flowers, like roses, have layered petals. Start with a base petal, and then add smaller petals on top, slightly overlapping them. Use a bit of water or edible glue to secure each layer. This technique adds depth and dimension!
3. Texturing: To give your flowers a lifelike appearance, consider adding texture. You can use a small knife or a petal tool to create veins and ridges on each petal. This step enhances the visual appeal of your flowers and makes them pop!
4. Stamen and Centers: Don’t forget the flower centers! Roll tiny balls of dough and attach them to the centers of your flowers. For added detail, you can use thin strips of dough to create stamen. Just remember to use a little water to stick everything together.
5. Drying: Once shaped, allow your flowers to dry completely. You can leave them at room temperature or use a dehydrator for quicker results. Just be patient, as this step is crucial for achieving durability.
Experiment with different flower types and colors, and don’t hesitate to let your creativity shine! The more you practice, the more skilled you’ll become. Happy crafting!
Also Read This: Crafting Paper Hearts – Step-by-Step Guide on Dailymotion
5. Creative Flower Designs You Can Make
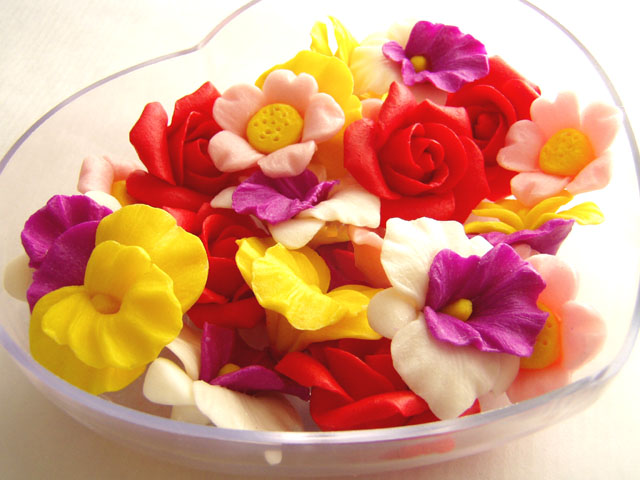
Creating beautiful floral designs with Italian dough is a delightful way to express your creativity. Whether you're a seasoned crafter or just starting, these fun flower designs will inspire you to get crafty! Here are a few ideas to spark your imagination:
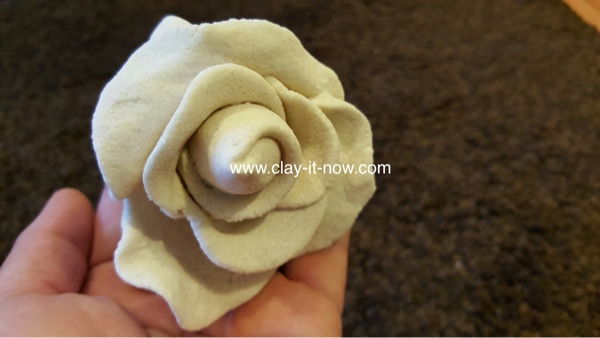
- Roses: Start by rolling a small ball of dough into a flat circle. Cut the edge into a wavy pattern, then roll it up tightly to form the rose. Layer additional circles around the base to create full petals.
- Daisies: Roll out a flat disc, then use a small round cutter to make the center. For the petals, use a leaf-shaped cutter and attach them around the center. Add a bit of yellow dough in the middle for that classic daisy look.
- Tulips: Shape a teardrop for the tulip's body and use a small piece of dough to create a green stem. You can flatten the teardrop slightly at the top to give it more of a tulip shape.
- Sunflowers: Start with a round base for the center and then roll tiny balls for the seeds. For the petals, use a petal cutter and arrange them around the center. The vibrant colors really pop!
- Orchids: These stunning flowers can be made by creating a small oval for the base, then making two larger oval shapes for the petals. Add some detailing with a fine tool to give them texture.
Once you’ve mastered these basics, don’t be afraid to experiment! Mix colors, combine different flower types, or even create unique hybrids. The beauty of crafting with Italian dough is that your only limit is your imagination. Plus, these flowers make fantastic decorations for special occasions or home decor!
Also Read This: How to Connect TP-Link Router with PC: A Complete Guide Featured on Dailymotion
6. Tips for Storing and Preserving Your Dough Flowers
Once you've poured your heart into crafting those beautiful Italian dough flowers, you'll want to make sure they stay in perfect condition. Here are some practical tips to help you store and preserve your creations:
- Keep Them Dry: Moisture is the enemy! Store your dough flowers in a cool, dry place, away from direct sunlight. A closed box or a sealed container can do wonders in keeping them safe from humidity.
- Avoid Heavy Pressure: Stack your flowers carefully. If you're storing multiple flowers, place a sheet of tissue or parchment paper between layers to prevent them from crushing each other.
- Seal with Varnish: For longer-lasting flowers, consider applying a clear acrylic spray or varnish. This will not only enhance their appearance but also protect them from dust and fading.
- Use Silica Gel: To absorb any excess moisture, placing silica gel packets in your storage box can help maintain a dry environment, especially if you live in a humid area.
- Display with Care: If you’re showcasing your flowers, opt for a display case to minimize dust accumulation. Keep them out of direct sunlight to prevent color fading over time.
By following these tips, your Italian dough flowers will remain as vibrant and lovely as the day you made them. Enjoy your crafting journey and the beauty each flower brings to your life!
Also Read This: How to Close a Dailymotion Account: A Complete Guide for Deleting Your Profile
7. Where to Find Tutorials on Dailymotion
If you're looking to dive deeper into the world of DIY Italian dough creations, Dailymotion is a fantastic resource. It's often overlooked compared to platforms like YouTube, but it has a treasure trove of video content that can help you master your craft. Here’s how to make the most of Dailymotion for your dough tutorials:
- Search for Specific Keywords: Start by typing in keywords like "DIY Italian dough," "flower dough tutorials," or "dough crafts" in the Dailymotion search bar. This will yield a variety of videos from different creators, so you can choose the ones that resonate with your style.
- Follow Popular Creators: Once you find a few creators whose style you enjoy, consider following them. Many artists on Dailymotion offer a unique spin on traditional techniques, and subscribing ensures you won't miss their new content.
- Engage with the Community: Dailymotion has a vibrant community of creators and viewers. Don’t hesitate to leave comments or questions on videos. Engaging with others can lead to valuable tips and even new friends who share your passion for dough crafting.
- Explore Playlists: Some creators curate playlists of related videos. This can be a great way to follow a series of tutorials that build on each other, allowing you to progress from beginner to more advanced techniques seamlessly.
- Use Dailymotion's App: If you enjoy watching videos on the go, download the Dailymotion app. It’s user-friendly and allows you to save your favorite tutorials for offline viewing, perfect for those moments when you’re ready to get your hands doughy!
For example, one popular Dailymotion channel features a series on making intricate dough flowers, guiding you step-by-step from the basics to more complex designs. Watching these videos can provide visual guidance that complements the written tutorials you may find elsewhere, ensuring you grasp each technique thoroughly.
8. Conclusion and Next Steps
Congratulations on embarking on your DIY journey with Italian dough! Whether you're crafting beautiful flowers for a celebration or simply enjoying a creative outlet, the possibilities are endless. As we wrap up this guide, here are some next steps to consider:
- Practice Regularly: The more you practice, the better you’ll become. Set aside time each week to experiment with different techniques and designs. Don’t be afraid to make mistakes; they’re a crucial part of the learning process!
- Join Online Communities: Platforms like Facebook or Reddit have groups dedicated to dough crafting. Joining these communities can provide inspiration, feedback, and support as you refine your skills.
- Create Your Own Tutorials: Once you feel confident in your abilities, consider sharing your knowledge. Create your own videos or blog posts to inspire others. Teaching is a fantastic way to solidify what you’ve learned!
- Explore Advanced Techniques: Once you master the basics, challenge yourself with more advanced projects. Look for tutorials that incorporate colors, textures, and different forms of dough to expand your creative repertoire.
- Attend Workshops: If you prefer hands-on learning, seek out local workshops or online classes. These can provide direct feedback from instructors and fellow crafters, enriching your experience.
Remember, the world of DIY Italian dough is not just about creating beautiful items; it's also about enjoying the process and connecting with others who share your passion. So roll up your sleeves, gather your materials, and let your creativity blossom!
 admin
admin


