If you’re looking to spice up your video projects, adding YouTube videos to iMovie can be a game-changer! Whether it's for personal use, school projects, or content creation, integrating clips from the vast YouTube library can enhance your storytelling. In this guide, we’ll explore how to seamlessly add those videos into your iMovie projects and make them shine.
Understanding iMovie and YouTube Integration
iMovie is a fantastic editing tool for Mac and iOS users, and it provides a user-friendly interface for video editing. But how does it work with YouTube? Let’s break it down!
What is iMovie?
- User-Friendly Interface: iMovie is designed for both beginners and experienced users, featuring drag-and-drop functionality that makes editing a breeze.
- Powerful Features: From transitions and filters to sound effects, iMovie packs a punch with its built-in tools for creating stunning videos.
- Seamless Integration: As part of Apple’s suite, it integrates well with other apps like GarageBand and Photos, enhancing your workflow.
Why Use YouTube Videos?
- Vast Library: YouTube offers millions of videos on virtually any topic, providing a wealth of resources for your projects.
- Inspiration: Seeing how others create and edit can spark your creativity and give you fresh ideas.
- Creative Commons: Many videos are available under Creative Commons licenses, allowing you to use them legally in your projects.
How to Add YouTube Videos to iMovie:
While you can’t directly import YouTube videos into iMovie, you can download them for editing. Here’s a quick rundown of the process:
- Find Your Video: Browse YouTube to find the video you’d like to use.
- Download the Video: Use a reliable YouTube downloader tool to save the video to your computer. Ensure you comply with copyright laws.
- Import to iMovie: Open iMovie and drag the downloaded video file into your project timeline.
Once added, you can trim, edit, and enhance the video just like any other clip! This flexibility allows you to create a unique narrative that fits perfectly with your project.
Final Thoughts: Integrating YouTube videos into your iMovie projects isn’t just about adding content; it’s about enhancing your storytelling. With a little creativity and respect for copyright, you can elevate your videos and engage your audience like never before!
Also Read This: Can You Watch Your YouTube TV Subscription at Another House
3. Step-by-Step Guide to Downloading YouTube Videos
Downloading YouTube videos can feel a bit tricky, but I promise it’s easier than it sounds! Here’s a simple step-by-step guide to help you snag those videos for your iMovie projects:
- Choose a reliable YouTube downloader: There are many tools available, both online and as software. Some popular choices include Y2Mate and 4K Video Downloader. Pick one that suits your needs!
- Copy the video URL: Head over to YouTube, find the video you want, and copy the URL from the address bar. This link is your golden ticket!
- Paste the URL into the downloader: Open your chosen downloader and paste the URL into the designated field. Most tools have a clearly marked area for this.
- Select your desired format: You’ll usually have options like MP4, MP3, or even different resolutions. For iMovie, MP4 is often the best choice because it’s compatible and maintains quality.
- Click the download button: After you’ve made your choices, hit that download button, and watch the magic happen! The video will be saved to your device, ready for the next step.
And just like that, you’ve got your YouTube video downloaded! Make sure to respect copyright laws and only download content that you’re allowed to use in your projects.
Also Read This: How to Check YouTube Subscribers History: Tracking Your Channel Growth
4. Importing YouTube Videos into iMovie
Now that you have your video downloaded, it's time to bring it into iMovie. This part is straightforward, and I’ll guide you through it step by step!
- Open iMovie: Launch the iMovie application on your Mac. If you don’t have it installed, it’s available for free in the Mac App Store!
- Create a new project: Click on “Create New” and then select “Movie” to start fresh. You’ll be taken to a new editing interface.
- Locate your downloaded video: Open Finder on your Mac and navigate to the folder where your downloaded YouTube video is stored. This is usually the “Downloads” folder unless you specified a different location.
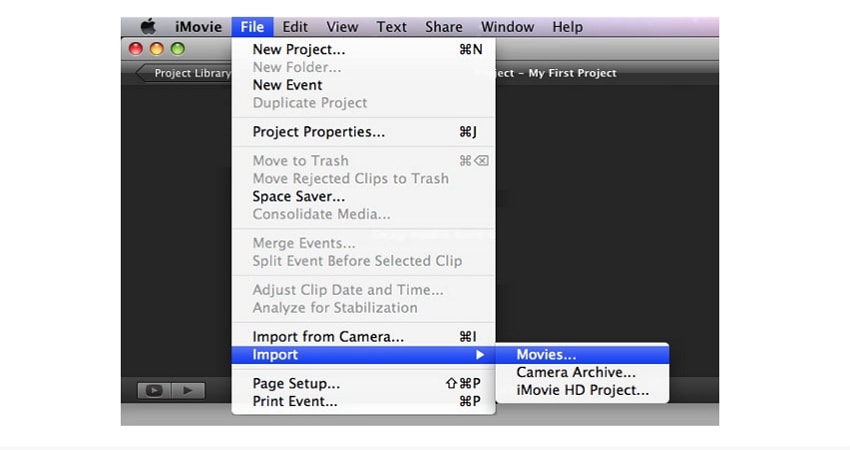
- Drag and drop: Simply drag the video file from Finder and drop it into the iMovie timeline. You can also click on the “Import Media” button in the toolbar and navigate to your video that way.
- Edit your video: Once it's in iMovie, you can trim, split, and add effects as needed! You can also layer audio or add text to make your video pop.
And that’s it! You’ve successfully imported your YouTube video into iMovie, and you’re all set to start editing. Whether you’re creating a fun montage or a serious project, having that YouTube content at your fingertips makes a huge difference!
Also Read This: Does YouTube Have Adult Content? Understanding Content Guidelines
5. Editing Your YouTube Content in iMovie
Now that you've successfully imported your YouTube videos into iMovie, it's time to get creative! Editing in iMovie is straightforward and fun, allowing you to tailor your footage to fit your project's needs. Here’s how to dive into the editing process:
Trimming Clips: First things first, you might want to trim your clips to remove any unnecessary sections. To do this, simply select the clip in the timeline, hover over the edges until you see the yellow trimming handles, and drag them inward to cut out the parts you don’t want.
Adding Transitions: To make your video flow smoothly, consider adding transitions between clips. iMovie offers a variety of transitions like Cross Dissolve or Slide. To add one, go to the Transitions tab, drag your selected transition between two clips, and watch the magic happen!
Incorporating Music and Sound Effects: Adding a soundtrack can elevate your video. Head to the Audio tab in iMovie to browse through the available soundtracks or import your own music. Just drag your chosen audio file into the timeline beneath your video clips. Don’t forget to adjust the volume levels to ensure your dialogue is still clear!
Utilizing Text and Titles: Want to add some context or captions? iMovie makes it super easy to include text. Click on the Titles tab, choose a style that fits your video’s vibe, and drag it to the timeline. You can customize the font, size, and color to match your project's theme.
Applying Filters: Give your video a fresh look by applying filters. Select your clip, click on the Clip Filters button, and experiment with different styles. Whether you want a vintage feel or a vibrant color boost, there’s a filter for every mood!
Lastly, don’t forget to preview your edits regularly. Click the play button to see how everything flows together. It’s always good to step back and watch your project as a whole before finalizing any changes!
Also Read This: How Old Is Audrey from That YouTube Family? The Truth Behind Her Age
6. Exporting Your Final Project
Congratulations on crafting an amazing video! Now, let’s get it ready for the world to see by exporting your final project. Here’s a step-by-step guide to ensure you get the best quality when sharing your masterpiece:
Step 1: Final Review - Before exporting, take a moment to review your entire project. Watch it through to catch any last-minute edits or adjustments. It’s easy to miss something when you’re deep in the editing process!
Step 2: Click on Export - Once you’re satisfied with your video, go to the top menu and click on File. From there, select Share and then File.... This will let you choose how to export your project based on your needs.
Step 3: Choose Export Settings - You’ll be presented with a window to select your export settings:
- Resolution: Choose from options like 720p, 1080p, or 4K depending on your needs.
- Quality: Opt for Best Quality for high-resolution output or Better Quality for smaller file sizes.
- Compress: Decide whether you want to compress the video for faster sharing or maintain the highest quality possible.
Step 4: Save Your Video - Choose a destination folder on your computer where you want to save the exported video. Give it a catchy title that reflects your project, then click Next. Sit back and let iMovie do its magic!
Step 5: Share Your Creation - Once your video is exported, it's time to share it! You can upload it directly to YouTube, share it on social media, or send it to friends and family. Just remember to promote your video using captivating descriptions and tags to reach a wider audience.
That’s it! You’ve successfully added, edited, and exported your YouTube content using iMovie. Now go ahead and let your creativity shine!
Also Read This: How to Capture YouTube Audio on Mac: Tools and Techniques for High-Quality Recording
7. Best Practices for Using YouTube Videos in Your Projects
Using YouTube videos in your iMovie projects can really enhance your content, but there are a few best practices to keep in mind to ensure everything goes smoothly. Let’s dive into some tips that can help you make the most out of your video editing experience!
1. Choose Quality Content
Always select high-quality videos that align with your project’s theme. Look for content that is not only visually appealing but also relevant. For instance, if you’re creating a travel vlog, find videos that showcase stunning landscapes or cultural highlights that complement your own footage.
2. Respect Copyright Laws
One of the most important aspects of using someone else's content is understanding copyright. Always check the video’s licensing. If it’s under Creative Commons, make sure you follow the attribution guidelines. For example, you can find videos that allow modifications, but you must credit the original creator in your project.
3. Keep It Relevant
When you incorporate YouTube videos, make sure they add value to your project. Irrelevant clips can confuse your audience. For instance, if you’re discussing video editing techniques, a short YouTube tutorial on a specific function can be beneficial, providing viewers with a visual example that enhances their understanding.
4. Edit for Flow
Seamlessly integrate the YouTube videos into your project. Pay attention to transitions and pacing. If you’re using a clip in the middle of a scene, make sure it feels natural. You might want to add a voiceover or background music to maintain coherence. Use iMovie's editing tools to trim clips and adjust audio levels to match your project’s vibe.
5. Optimize for Different Platforms
Remember that your audience might view your project on various devices. Test how the videos look on different screen sizes. You might want to create different versions optimized for social media platforms, keeping in mind the aspect ratios and resolutions.
6. Provide Context
If you’re embedding a YouTube video, consider adding a brief introduction or commentary. This gives context to your audience and can help them understand why the video is relevant. For example, if you include a clip about video editing techniques, explain how it relates to your main topic.
7. Credit Creators
Finally, always credit the creators of the YouTube videos you use. Not only is this respectful, but it can also help build a network with other content creators. You can include this credit in the video description or at the end of your project. A simple “Video courtesy of [Creator’s Name]” can go a long way!
8. Conclusion
Incorporating YouTube videos into your iMovie projects can transform your storytelling and engage your audience like never before. By following the best practices outlined above, you can ensure that your projects are not only visually appealing but also respectful of the content creators whose work you’re showcasing.
Remember to choose quality content, respect copyright laws, and keep your videos relevant. By optimizing for different platforms and providing proper context, you’ll enhance the viewer’s experience while ensuring your project flows seamlessly. And most importantly, don’t forget to credit those creators!
So, the next time you sit down to edit your project, consider weaving in some YouTube clips. With the right approach, you can create a compelling narrative that captures your audience’s attention. Happy editing!
 admin
admin


