Uploading videos to YouTube from your iPhone can be a breeze! Whether you're sharing your latest travel vlog, a cooking tutorial, or a fun family gathering, the process is straightforward once you know the steps. In this guide, we’ll walk you through everything you need to do to get your videos online, so you can start engaging with your audience in no time!
Preparing Your Video for Upload
Before hitting that upload button, it’s essential to prepare your video properly. Here’s how to ensure your video is ready for YouTube:
1. Edit Your Video
Editing is key to making your video look professional. Use apps like iMovie or InShot on your iPhone to trim unnecessary clips, add music, and include text overlays. Here’s a quick checklist for editing:
- Cut out any awkward pauses or mistakes.
- Add transitions for smooth scene changes.
- Incorporate background music (make sure it’s royalty-free!).
- Overlay text for emphasis or to provide context.
2. Choose the Right Format and Quality
YouTube supports various video formats, but the most common one is MP4. When saving your video, ensure it’s in this format for compatibility. Additionally, aim for a resolution of at least 1080p for crisp visuals. To check your video quality:
- Go to your editing app’s settings.
- Select the export option and choose 1080p as the resolution.
3. Write a Catchy Title and Description
A compelling title can make a huge difference in attracting viewers. Think about what would grab your attention! Follow these tips:
- Keep it concise and descriptive.
- Incorporate keywords relevant to your content.
- Use numbers or questions to pique interest (e.g., "5 Tips for Perfect Pancakes").
Your description should provide context about the video. Include:
- A brief summary of the content.
- Any products or services mentioned.
- Links to your social media or website.
4. Create Eye-Catching Thumbnails
Thumbnails are the first thing viewers see, so make them pop! You can use apps like Canva or Adobe Spark to design custom thumbnails. Consider these tips:
- Use bright colors and bold text.
- Include a relevant image that represents your video.
- Keep it simple – don’t overcrowd with details.
By taking the time to prepare your video, you’ll set yourself up for success when it comes time to upload. So, grab your iPhone, edit that video, and get ready to share your creativity with the world! Next up, let’s dive into the actual uploading process.
Also Read This: How to Change the Thumbnail Image of Any YouTube Video Easily
3. Steps to Upload Videos on YouTube from Your iPhone

Uploading videos to YouTube from your iPhone is a straightforward process, and I'm here to guide you through it step-by-step. Grab your iPhone, and let’s get started!
- Open the YouTube App: First things first, launch the YouTube app on your iPhone. If you don’t have it yet, head to the App Store, download it, and sign in to your account.
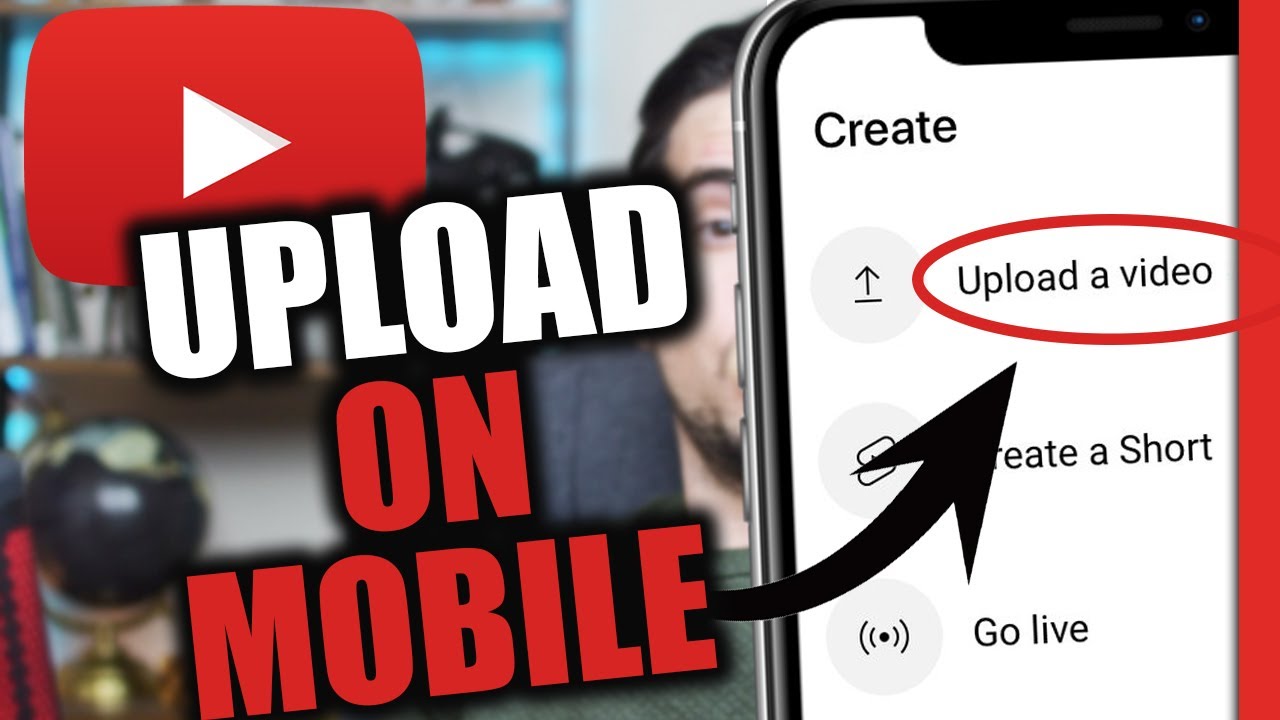
- Tap the Create Button: Once you're in the app, look for the "+" icon at the bottom of the screen. This is your gateway to creating and uploading content!
- Select Your Video: After tapping the "+" icon, you'll see options like "Upload a video" or "Go live." Choose "Upload a video." You’ll be prompted to select a video from your camera roll. Navigate through your albums and pick the video you want to upload.
- Edit Your Video: YouTube allows you to trim your video, add music, or apply filters right from the app. Take a moment to spruce it up! You want it to look its best.
- Add a Title and Description: After editing, it’s time to give your video a catchy title and a brief description. Make sure your title is engaging and relevant—this helps attract viewers!
- Select Your Privacy Settings: You’ll have the option to choose how public or private your video is. Options include Public, Unlisted, or Private. If you're just testing things out, perhaps start with Unlisted.
- Choose a Thumbnail: YouTube will automatically generate a few thumbnail options from your video. Select one that captures the essence of your content, or upload a custom thumbnail if you have a designed one.
- Add Tags: Tags help people find your video. Think about words that are relevant to your content. For example, if your video is about cooking pasta, tags like "cooking," "pasta," and "recipe" would be beneficial.
- Upload: Finally, hit the "Upload" button! Depending on your video length and internet connection, this might take a moment. Be patient; the wait will be worth it!
And just like that, you’ve successfully uploaded your video to YouTube using your iPhone! Now, go ahead and share your link with friends and family.
Also Read This: How Many Shorts Can You Upload on YouTube Per Day? Explained
4. Tips for Optimizing Your Video Upload
Now that you know how to upload videos to YouTube, let’s talk about optimizing your uploads. A few tweaks can significantly enhance visibility and engagement. Here are some essential tips:
- Focus on Your Title: Your title can make or break your video's success. Keep it concise, descriptive, and engaging. For instance, instead of "My Vacation," try "Exploring the Beautiful Beaches of Hawaii!"
- Craft a Detailed Description: The description box is your chance to provide context. Include what viewers can expect from the video, any links to resources, or social media handles. Don’t forget to use keywords!
- Utilize Tags Wisely: Tags are crucial for searchability. Mix broad tags (like "travel") with specific ones (like "Hawaii travel tips"). This strategy helps YouTube understand your video's content better.
- Create Attractive Thumbnails: Thumbnails act as your video’s cover. Use bright colors, bold text, and intriguing images. A well-designed thumbnail can increase your click-through rate significantly!
- Engage with Your Audience: After uploading, respond to comments and encourage viewers to like and subscribe. Engagement can lead to better rankings in search results.
- Promote on Social Media: Share your video link on platforms like Instagram, Twitter, and Facebook. A broader audience can lead to more views and interactions.
- Monitor Your Analytics: After your video is live, keep an eye on its performance through YouTube Analytics. Understanding viewer behavior can guide future content creation.
By following these simple optimization tips, you’ll give your videos the best chance to shine on YouTube. Happy uploading!
Also Read This: How to Save Shorts on YouTube for Offline Viewing
5. Common Issues and Troubleshooting
Uploading videos to YouTube from your iPhone is usually a smooth process, but sometimes hiccups can occur. Here’s a rundown of some common issues you might face and how to tackle them!
1. Poor Internet Connection
If your video fails to upload, the first thing to check is your internet connection. A weak Wi-Fi signal or a spotty cellular connection can interrupt the process. Try these steps:
- Switch from Wi-Fi to cellular data or vice versa.
- Move closer to your router if you're on Wi-Fi.
- Restart your router or your iPhone to refresh the connection.
2. File Size Limitations
YouTube has a file size limit of 256 GB or 12 hours, whichever is less. If your video is too large, you’ll need to compress it. Here’s how:
- Use a video editing app like iMovie to trim unnecessary parts.
- Export your video in a lower resolution.
3. Unsupported Formats
YouTube supports various formats, but if your video is in a less common format, it might not upload. Stick to these popular formats:
- MP4
- AVI
- MOV
If your video format isn’t supported, consider using an app to convert it.
4. App Glitches
Sometimes, the YouTube app itself can be the culprit. If you experience crashing or freezing:
- Ensure your app is updated to the latest version via the App Store.
- Try reinstalling the app. Long press on the icon and select “Remove App,” then download it again.
5. Account Issues
If you can’t upload, it might relate to your YouTube account. Check for:
- Account verification: Make sure your account is verified.
- Content restrictions: Ensure you’re not facing any restrictions or community guidelines strikes.
By keeping these troubleshooting tips in mind, you can navigate most issues seamlessly and keep your video uploads on track!
6. Conclusion
Uploading videos to YouTube using your iPhone is a straightforward and enjoyable experience when you know how to navigate the process. From capturing quality content to optimizing your uploads, each step is crucial in sharing your creativity with the world.
Remember to:
- Ensure your video is well-edited and meets YouTube's guidelines.
- Use engaging titles and descriptions to attract viewers.
- Regularly check for app updates and maintain a stable internet connection.
With these tips and tricks, you’re well on your way to becoming a YouTube sensation! So, grab your iPhone, get creative, and start sharing your unique voice with the world. Happy uploading!
 admin
admin


