Welcome to the exciting world of DIY paper machine guns! If you're looking for a fun and creative project that combines art and engineering, you've come to the right place. Making a paper machine gun isn't just about crafting; it's also a fantastic way to unleash your creativity and have a blast (pun intended!). Whether you're planning to create a display piece or just want to impress your friends with your handiwork, this tutorial will guide you through the process step by step. Let’s dive into the materials you'll need to kickstart your project!
Materials Needed for Your Paper Machine Gun
Before you embark on your paper machine gun journey, it’s crucial to gather all the necessary materials. Don't worry; most of these are commonly found around the house or at your local craft store. Here’s what you’ll need:
- Cardstock or Construction Paper: This will be the main material for your machine gun. Choose sturdy paper for better durability.
- Scissors: A good pair of scissors is essential for cutting out your shapes precisely.
- Glue or Tape: You'll need a strong adhesive to hold your pieces together. Hot glue works wonders!
- Pencil and Ruler: For making precise measurements and marking out where to cut.
- Markers or Paint: To add some personality to your creation! Get creative with colors and designs.
- Template (Optional): You can find printable templates online to simplify the crafting process, especially if you’re looking for a particular design.
Now that you have your materials, it’s time to get started on crafting your paper machine gun. Remember, the key is to be patient and enjoy the process. Crafting can be a wonderfully therapeutic experience, so take your time and make it your own!
Also Read This: Make Delicious Play-Doh Ice Cream with Our Fun Video Guide
3. Step-by-Step Instructions for Building Your Paper Machine Gun
Alright, let's get into the nitty-gritty of creating your very own paper machine gun! Follow these step-by-step instructions, and you’ll have a sturdy, functioning piece in no time. Grab your materials and let’s get started!
Materials Needed:
- Cardstock or thick paper
- Scissors
- Glue stick or tape
- Ruler
- Pencil
- Markers or colored pencils for decoration
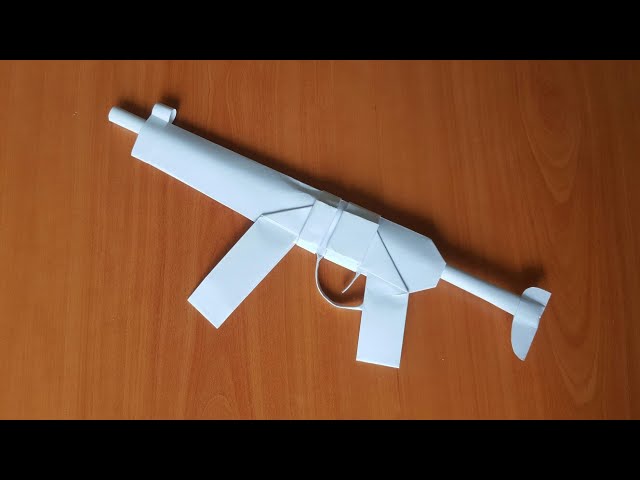
Step 1: Designing the Parts
First, decide the size of your machine gun. A standard length could be around 12-18 inches. Use the ruler and pencil to sketch out the following parts on your cardstock:
- Main body: 12 inches long and 4 inches wide
- Barrel: 6 inches long and 1 inch wide
- Handle: 4 inches long and 1.5 inches wide
- Trigger: 2 inches long and 1 inch wide
Once you’ve sketched these parts, cut them out carefully with your scissors.
Step 2: Assembling the Main Body
Take the main body piece and fold it in half lengthwise. This creates a sturdy base for your machine gun. Apply glue or tape along the edge and press it down firmly. Make sure there are no gaps!
Step 3: Attaching the Barrel
Now, take your barrel piece. Roll it into a tube shape and secure the edge with glue. Attach one end of the barrel to the front of the main body, ensuring it’s centered and straight. You might want to add extra tape on the inside for stability.
Step 4: Adding the Handle and Trigger
For the handle, take the 4-inch piece and glue it to the bottom of the main body towards the back. It should be angled slightly for a comfortable grip. Next, take the trigger and attach it just in front of the handle; this should be positioned so it can be pressed easily.
Step 5: Final Touches
Now it’s time for the fun part! Use markers or colored pencils to decorate your paper machine gun. Add stripes, camouflage patterns, or whatever your imagination suggests. Remember, the more personalized your design, the more fun it’ll be when you’re done!
And there you have it! A fully functional paper machine gun ready for action. Just remember, it's all in good fun, so be nice with it!
Also Read This: How to Make Donuts Recipe in Urdu: Step-by-Step Guide on Dailymotion
4. Creative Designs and Customizations
Once you’ve built your basic paper machine gun, the next step is to let your creativity shine with some designs and customizations. This is where you can make your piece unique and truly your own!
Adding Color and Patterns
Start with the basics: color! Grab your markers or paints and think outside the box. Here are a few ideas:
- Camouflage: Use greens, browns, and blacks to create a rugged, military look.
- Neon: Bright colors can make your machine gun stand out even more!
- Graffiti Style: Use a mix of colors and shapes for a bold, street-art vibe.
Adding Accessories
Want to take it up a notch? Consider adding some accessories:
- Sights: Create a simple sight using extra paper. Cut a small rectangle, fold it, and glue it on top of the barrel.
- Magazine: Cut a small rectangle and attach it to the side of the machine gun for an added touch.
- Stickers: Personalize with stickers or printed images of your favorite characters or logos.
Fun Themed Variations
Why not design your paper machine gun for different themes? Here are a few ideas to spark your imagination:
- Zombie Apocalypse: Go for an old, rusty look with browns and grays.
- Space Adventure: Use metallic colors and stickers of stars and planets.
- Classic Movie Props: Research iconic movies and try to replicate famous designs.
Remember, the sky’s the limit! Customizing your paper machine gun is not just about aesthetics; it’s about expressing yourself and having a blast while doing it. So gather your materials, unleash your creativity, and enjoy the process!
Also Read This: How Dinosaurs Died – Scientific Explanations on Dailymotion
5. Safety Tips While Making and Using Paper Machine Guns
Creating your very own paper machine gun can be a thrilling project, but it’s essential to prioritize safety throughout the process. Here are some practical safety tips to ensure you and those around you have a fun and safe experience:
- Choose the Right Environment: Always work in a well-lit and spacious area. Avoid cramped spaces where you could accidentally bump into something or someone.
- Use Safe Materials: Stick to paper and safe adhesives. Avoid sharp objects like scissors unless absolutely necessary, and if you must use them, do so with caution.
- Mind Your Surroundings: Make sure your workspace is clear of any obstacles or items that could be damaged during your crafting. This includes pets and curious children!
- Supervision for Kids: If you're crafting with kids, ensure an adult is present to supervise. This not only keeps everyone safe but also adds to the fun!
- Respect the Imagination: While it's exciting to create a paper machine gun, be aware of the perceptions of others. Don't aim your creation at people or pets, and be mindful of how it might be perceived in public spaces.
- Practice Responsible Use: When using your paper machine gun for play, set clear boundaries on where and when it can be used. Always treat it like a real firearm in terms of respect and safety.
Following these safety tips will ensure that your paper machine gun project remains a fun and enjoyable experience for everyone involved. Remember, crafting is all about creativity and having a good time, so prioritize safety to keep the fun rolling!
6. Where to Share Your Creation: Social Media and Dailymotion
Once you’ve perfected your paper machine gun, it’s time to show it off! Sharing your creation not only celebrates your hard work but also inspires others to dive into their own DIY projects. Here are some fantastic platforms where you can share your craft:
- Instagram: Snap some eye-catching photos of your paper machine gun from different angles. Use popular hashtags like #DIY, #Crafts, and #PaperArt to reach a larger audience. Don’t forget to share your crafting process in your Stories!
- Facebook: Join crafting groups or DIY communities where members share their projects. Post your creation on your timeline or in these groups to get feedback and tips from fellow crafters.
- YouTube: If you're feeling adventurous, create a short video tutorial showcasing your building process. This can be a fun way to engage with your audience and help others learn how to create their own paper machine guns!
- Dailymotion: Similar to YouTube, you can upload your video content here. Dailymotion has a smaller community, which can sometimes lead to more personalized interactions. Share your video alongside a detailed description of the materials and methods used.
- Pinterest: Create a pin that links back to your tutorial or photo. Many DIY enthusiasts browse Pinterest for inspiration, and your project could be just what someone is looking for!
When sharing your creations, remember to engage with your audience. Respond to comments, ask for tips, and encourage others to share their own projects too! Who knows? You might just spark a new crafting trend!
 admin
admin


