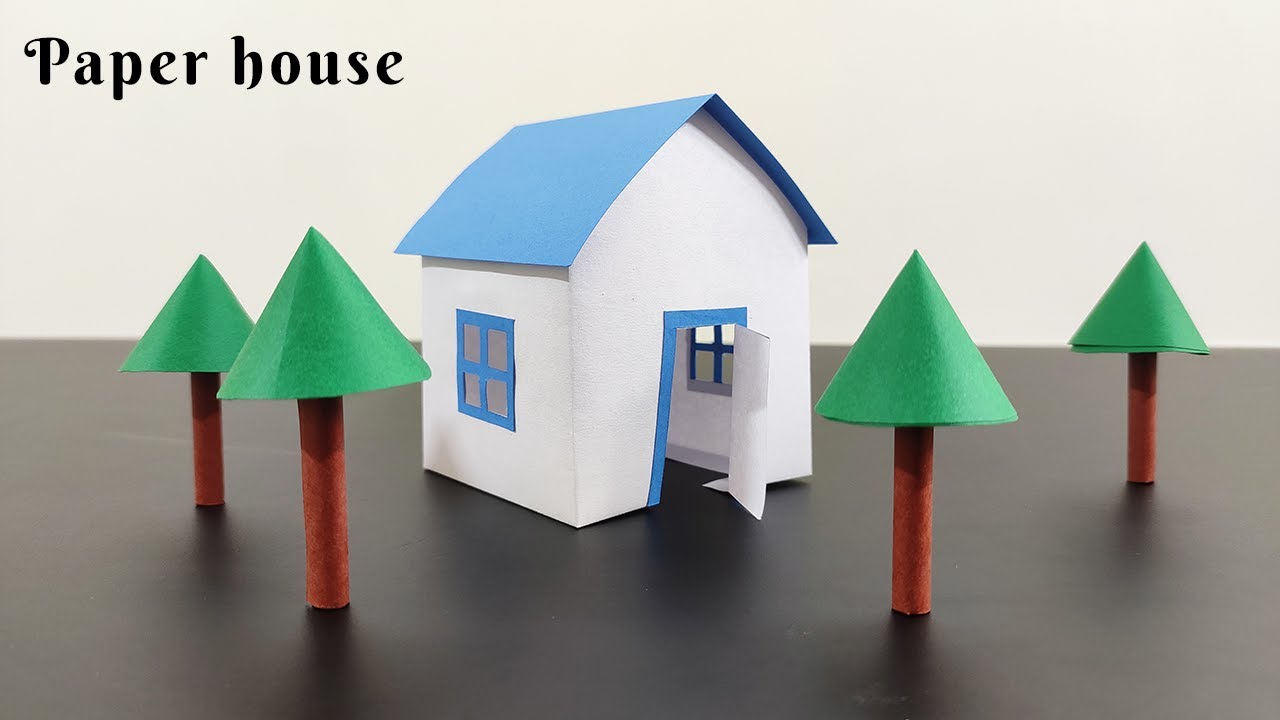
Creating a paper house is a fun and engaging activity that sparks creativity and imagination! Whether you're a parent looking for a crafty project to do with your kids or an adult seeking a relaxing hobby, this simple DIY guide will walk you through the process step-by-step. With just a few materials and a little bit of time, you can bring your paper house to life and decorate it to reflect your unique style. Let’s dive into the materials you’ll need to get started!
Materials Needed for Your Paper House
Before you embark on your paper house adventure, gather the following materials:
- Paper: Choose a sturdy paper, like cardstock or construction paper. White paper is great for painting, while colored paper adds vibrancy.
- Scissors: A good pair of scissors will help you cut out shapes and details with precision.
- Glue or Tape: Use a reliable adhesive to hold your structure together. Hot glue works well for quick bonding, while tape is great for easy adjustments.
- Ruler: Measure your paper accurately to create even walls and a symmetrical roof.
- Pencil: A pencil is perfect for sketching out your designs before cutting.
- Markers, Crayons, or Paint: These are optional but can add personal touches. Use them to decorate your house with colors, patterns, or even characters!
- Embellishments: Think buttons, fabric scraps, or stickers to give your paper house some character.
With these materials in hand, you're well on your way to creating a delightful paper house. Don't forget to unleash your creativity—feel free to experiment with different designs and decorations. The only limit is your imagination!
Also Read This: Easy Steps to Stream Dailymotion on Roku
3. Step-by-Step Instructions for Building the Paper House
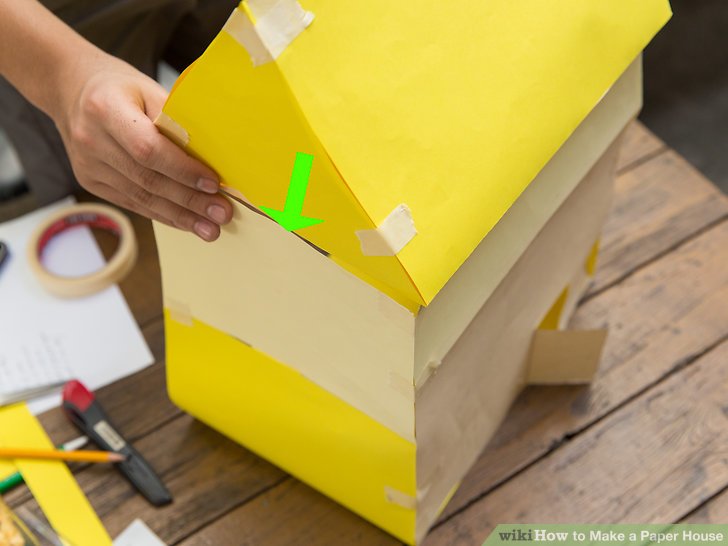
Alright, let’s get our hands a little messy and dive into the fun part—building your paper house! Grab your supplies, and let’s get started with these simple steps:
- Gather Your Materials: You will need:
- Cardstock or thick paper (varied colors for creativity)
- Scissors
- Craft glue or a glue stick
- Pencil
- Ruler
- Markers or colored pencils for decoration
- The size of the house (a small cottage or a big mansion?)
- The shape of the roof (flat, triangular, or something funky?)
- Windows and doors (where will they go?)
And there you have it! Your very own paper house is taking shape. Feel free to adjust any steps as you see fit. The key is to have fun and let your creativity shine!
Also Read This: Flying a Kite Without Wind: Practical Tips for Beginners
4. Creative Ideas to Customize Your Paper House

Now that you’ve successfully built your paper house, let’s jazz it up! Personalizing your creation is where the real fun begins. Here are some creative ideas to customize your paper house:
- Color Themes: Choose a theme for your house. Go for vibrant colors for a whimsical fairy tale look, or soft pastels for a cozy cottage vibe. You can even match it to your favorite flower or season!
- Textured Paper: Use textured paper for certain parts of your house. For instance, you can use a patterned paper for the roof to create a tiled effect, or use a crinkled paper for a rustic look on the walls.
- Furniture and Decor: Create mini furniture out of paper, like a paper table, chairs, or even a tiny bed! You can draw or print out pictures of decorations and glue them inside the house.
- Seasonal Decor: Change the decorations based on the season. Add paper pumpkins for Halloween, snowflakes for winter, or flowers for spring. This keeps your paper house fresh and fun throughout the year!
- Landscaping: Create a mini garden with paper flowers, trees, or even a little pond. Simply cut out shapes and glue them around your house to make it a charming little scene.
- Lighting Effects: If you want to add an extra touch, consider using LED tea lights inside your paper house. Just ensure there’s a small opening for the light to shine through safely.
- Personal Touches: Add your name or family name above the door. You can even draw little stick figures of your family members to make it feel like a true home!
Remember, this is your paper house, and there are no limits to how creative you can get. Enjoy the process, and let your imagination run wild!
Also Read This: How to Shape Your Eyebrows with Thread on Dailymotion
5. Tips and Tricks for a Successful Paper House Project
Creating a paper house can be a fun and rewarding project, but like any craft, it comes with its own set of challenges. Here are some essential tips and tricks to ensure your paper house turns out beautifully!
- Choose the Right Paper: Not all paper is created equal! For a sturdy house, opt for heavier cardstock rather than regular printer paper. It will hold its shape better and withstand handling.
- Use a Cutting Mat: If you’re using a craft knife, always cut on a cutting mat. This protects your work surface and helps you make cleaner cuts.
- Plan Your Design: Before diving in, sketch your design on paper. Consider how many floors, windows, and doors you want. A rough layout will guide you during the building process.
- Score Your Folds: For neat, crisp edges, use a bone folder or the back of a craft knife to score along fold lines. This makes folding easier and gives a professional finish.
- Be Patient: Rushing through the project can lead to mistakes. Take your time with each step, especially when aligning pieces or applying glue.
- Experiment with Textures: To add character, consider using textured paper or even fabric scraps for roofs and walls. This will give your house a unique flair!
- Involve Others: This can be a great family activity! Invite friends or kids to help; they might have creative ideas that can elevate the project.
By keeping these tips in mind, you’ll not only enhance your crafting experience but also create a paper house that you’ll be proud to display. Remember, the journey of making it is just as enjoyable as the final product!
6. Conclusion and Final Thoughts
Building a paper house is more than just a craft; it’s a delightful way to express creativity and relax. Whether you’re making it for yourself, as a gift, or as a charming decoration for your home, the joy lies in the process of creation.
As you wrap up your project, here are some final thoughts to keep in mind:
- Display Your Work: Once completed, find a special place for your paper house. It could be on a shelf, a coffee table, or even as part of a seasonal decoration setup.
- Share Your Creation: Don’t hesitate to share photos of your work on social media or with friends. You might inspire someone else to pick up this delightful hobby!
- Keep Learning: Each project teaches you something new. Consider trying different styles or even larger structures as you build your skills.
In the end, your paper house is a reflection of your imagination. So, gather your materials, unleash your creativity, and enjoy the fantastic journey of crafting something special. Happy building!
 admin
admin


