Have you ever dreamed of building your own robot? It might sound like a task reserved for tech wizards, but with a bit of guidance, anyone can dive into the exciting world of DIY robotics! This blog post will walk you through the simple steps of creating a small robot at home. Not only is this a fantastic way to unleash your creativity, but it’s also an opportunity to learn about electronics, programming, and mechanics in a fun, hands-on way. Let’s get started!
Essential Materials and Tools Needed
Before we roll up our sleeves, let’s gather everything we need. Here’s a handy list of materials and tools that will set you on the path to robot-building glory!
Materials:
- Microcontroller: A brain for your robot! Popular choices include Arduino or Raspberry Pi.
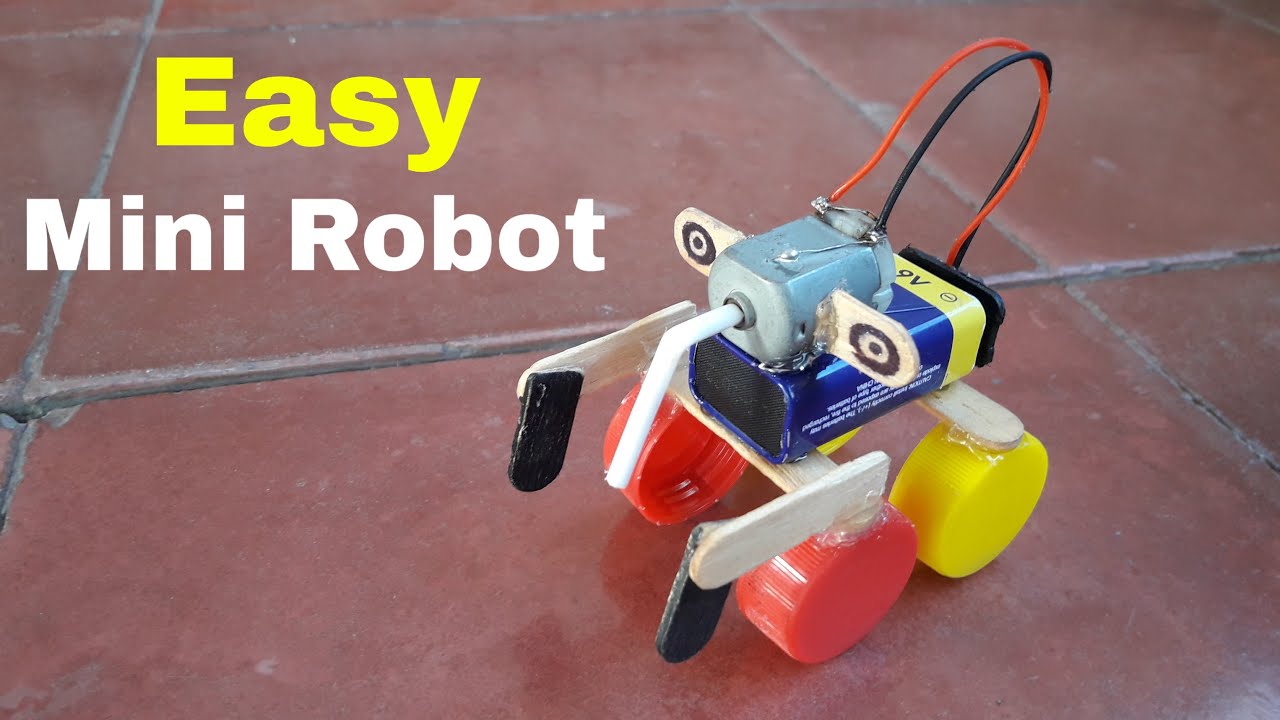
- Chassis: This is the body of your robot. You can use materials like plastic, cardboard, or even repurpose an old toy car.
- Wheels: Four wheels will keep your robot mobile. You can buy them or use LEGO wheels for a fun twist.
- Motors: DC motors or servo motors will provide movement. Servo motors are great for precise movements if that’s what you need.
- Battery: A rechargeable lithium-ion battery or AA batteries will keep your robot powered up.
- Wires: Jumper wires are perfect for connecting different components.
- LEDs: Light up your robot with some LEDs for added flair!
Tools:
- Soldering Iron: For those who want to make strong, permanent connections.
- Wire Strippers: Handy for preparing your wires for connections.
- Hot Glue Gun: This is perfect for securing components together.
- Multimeter: A useful tool to measure voltage and check connections.
- Computer: You’ll need a computer to write the code that will run your robot!
Once you have all these materials and tools ready, you’re on your way to building a fantastic little robot. Don’t worry if you’re not sure how to use everything yet; that’s part of the learning process! Embrace the journey, and let’s get building!
Also Read This: Guide to Downloading Dailymotion Videos Using Reddit
3. Step-by-Step Guide to Building Your Small Robot
Alright, let’s dive into the fun part—building your small robot! Don’t worry; you don’t need a PhD in robotics for this. With a bit of patience and creativity, you’ll have your little mechanical friend up and running in no time. Here’s a simple step-by-step guide to follow:
- Gather Your Materials: Before you start, make sure you have everything you need. Here’s a quick checklist:
- Microcontroller (like Arduino or Raspberry Pi)
- Chassis (you can use a small plastic container or buy a kit)
- Wheels and motors (DC motors work great)
- Batteries (choose rechargeable ones for sustainability)
- Wires and connectors
- Sensors (like ultrasonic for obstacle detection)
- Tools (screwdriver, soldering iron, etc.)
Congratulations! You’ve just built the physical structure of your small robot. It’s time to move on to the exciting part—programming it to perform basic functions!
Also Read This: How to Straighten Hair Naturally Without Heat Through Dailymotion Videos
4. Programming Your Small Robot for Basic Functions
Now that your robot is all set up physically, it’s time to bring it to life with some programming! If you’re new to coding, don’t fret. I’ll guide you through some simple functions that will get your robot moving around.
- Install the Necessary Software: First, download and install the Arduino IDE (if you’re using Arduino). This software will allow you to write and upload your code to the microcontroller.
- Write Your First Program: Let’s start with a basic program to make your robot move forward. Here’s a simple code snippet to get you started:
- Upload the Code: Connect your Arduino to your computer using a USB cable. In the Arduino IDE, select the correct board and port, and click the upload button. Watch as the code transfers to your microcontroller!
- Test Your Robot: Once the upload is complete, disconnect the USB cable and power your robot on. It should move forward for two seconds and then stop. If it doesn’t, check your code and wiring.
- Expand the Functionality: Now that you have the basics down, you can add more functions. Consider programming your robot to turn or avoid obstacles. Here’s a snippet for turning left:
- Experiment and Have Fun: Don’t be afraid to tweak the code! Change the delay times, add more sensors, or even introduce Bluetooth control if you’re feeling adventurous.
        void setup() {
            pinMode(9, OUTPUT); // Right motor
            pinMode(10, OUTPUT); // Left motor
               void loop() {
            digitalWrite(9, HIGH); // Move right motor forward
            digitalWrite(10, HIGH); // Move left motor forward
            delay(2000); // Move forward for 2 seconds
            digitalWrite(9, LOW); // Stop right motor
            digitalWrite(10, LOW); // Stop left motor
            delay(1000); // Pause for 1 second
        void turnLeft() {
            digitalWrite(9, LOW); // Stop right motor
            digitalWrite(10, HIGH); // Move left motor forward
            delay(1000); // Turn for 1 second
And there you have it! Your small robot is not only built but also programmed to perform basic functions. Keep exploring and refining your robot; the possibilities are endless. Happy building!
Also Read This: How to Eliminate the YouTube Ad Blocker Pop-Up
5. Testing and Troubleshooting Your Robot
Once you’ve assembled your small robot, it’s time for the most exciting part: testing it out! This is where all your hard work pays off, but it can also come with a few bumps along the way. Don’t worry; troubleshooting is just part of the DIY journey!
Testing Your Robot
Start by powering up your robot. Ensure all your connections are secure and that the battery is charged. Observe how the robot behaves. Does it move smoothly? Does it respond to commands? Here are some steps to guide your testing:
- Check the power supply: Make sure your batteries are fully charged and connected properly.
- Observe movement: Place your robot on a flat surface and watch its navigation. If it veers off course, you might need to adjust the wheels or sensors.
- Test sensors: If your robot has sensors, test each one to ensure it reacts correctly to obstacles or light.
- Use remote control (if applicable): If you’ve added a remote control feature, test the responsiveness of controls. Does it stop or change direction promptly?
Troubleshooting Common Issues
If your robot isn’t functioning as expected, don’t panic! Here are some common issues and how to solve them:
- Robot won’t move: Check the battery connections. If they’re good, look for any loose wires or broken connections.
- Uneven movement: Inspect the wheels and motors. Ensure they’re aligned correctly and both are receiving power.
- Sensors not responding: Verify that the sensors are correctly wired and positioned. Sometimes, a simple repositioning can make a big difference!
- Remote control not working: Check the batteries in the remote and ensure it's paired correctly with the robot.
Remember, troubleshooting is all about patience and a little bit of creativity. Keep tweaking until you achieve the results you want!
6. Fun Variations and Customizations for Your Robot
Now that you’ve got your basic robot up and running, let’s dive into the fun part: customization! There are countless ways to personalize your creation, making it truly yours. Here are some cool ideas to inspire you:
1. Change the Appearance
Give your robot a unique look by adding decorative elements. You can use:
- Paint: A splash of color can bring your robot to life! Use non-toxic spray paint or markers.
- Stickers: Add fun stickers to give your robot personality.
- 3D printed parts: If you have access to a 3D printer, consider creating custom parts for a distinctive design.
2. Enhance Its Functionality
Why not give your robot some additional skills? Here are a few suggestions:
- Obstacle avoidance: Add ultrasonic sensors so it can navigate around obstacles without crashing.
- Light following: Equip it with a light sensor that allows it to follow a flashlight beam.
- Sound recognition: Incorporate a microphone for voice commands, making it a more interactive experience.
3. Create a Theme
Turn your robot into a character! For example, you could:
- Make it a mini “superhero” robot with a cape and emblem.
- Design a “pet” robot that responds to touch and sound.
- Create a “worker” robot that can carry small items around the house.
The sky's the limit when it comes to customization! Get creative and experiment with different ideas to see what works best for you. Enjoy the process, and most importantly, have fun with your DIY robot project!
 admin
admin


