Managing your YouTube content can be essential, especially if you're using an iPad or any iOS device. Whether you're looking to clean up your channel, remove outdated content, or simply tidy up your digital footprint, knowing how to delete videos is crucial. In this guide, we'll walk you through the steps to delete YouTube videos on your iPad, and we'll also explore some reasons why you might want to take this step. Let's dive in!
Why You Might Want to Delete Videos on YouTube
There are several reasons why you might consider deleting videos from your YouTube channel. Some of these reasons include:
- Content Quality: Sometimes, the quality of your earlier videos might not meet your current standards. Perhaps you’ve improved your editing skills or upgraded your equipment. Deleting those older, less polished videos can help maintain a high-quality channel.
- Relevance: If your videos are tied to topics that have become outdated or irrelevant, they may not align with what your audience is looking for anymore. Removing these can help keep your channel focused on current trends.
- Personal Reasons: There may be personal reasons for wanting to delete a video, like privacy concerns or changes in your life that make certain content no longer appropriate.
- Engagement Strategies: Sometimes, you might want to refine your content strategy. If a video isn’t performing well or doesn’t resonate with your audience, it might be time to cut it loose and focus on what works.
Additionally, deleting videos can positively impact your channel's overall performance. Here are a few benefits:
- Improved Channel Aesthetic: A well-curated channel looks more professional and inviting to new viewers.
- Better Analytics: By removing underperforming videos, you can enhance your channel's statistics, making it easier to attract advertisers or sponsorships.
- Fresh Start: If you're planning to rebrand or change your content direction, clearing out old videos can pave the way for your new vision.
Ultimately, the decision to delete videos should align with your goals as a content creator. Whether it’s enhancing your channel’s image or making way for more relevant content, understanding your motivations can help streamline the process.
Also Read This: How Much Do Podcasters Earn on YouTube? Revenue Breakdown
3. Preparing Your iPad for Deleting YouTube Videos
Before you dive into deleting videos from your YouTube account on your iPad, it’s important to make sure your device is ready for the task. Here’s a quick checklist to help you prepare:
- Update Your YouTube App: Make sure you have the latest version of the YouTube app installed. This ensures you have the latest features and bug fixes. You can update it by going to the App Store, tapping on your profile icon, and checking for updates.
- Check Your Internet Connection: A stable internet connection is key! If you’re on Wi-Fi, ensure the signal is strong. If you’re using cellular data, confirm you have a good connection to avoid interruptions.
- Log Into Your Account: Ensure you’re logged into the correct YouTube account from which you want to delete videos. Double-check by tapping on your profile picture in the app.
- Backup Important Videos: Before you permanently delete anything, consider backing up videos you might want to keep. You could save them to a cloud service or download them to your device.
By following these steps, you’ll set yourself up for a smooth process when you start deleting your videos. It’s all about being prepared!
Also Read This: Which YouTubers Live in California? Exploring Popular Creators’ Homes
4. Step-by-Step Guide to Deleting YouTube Videos on iPad
Now that your iPad is prepped and ready, let’s get into the nitty-gritty of actually deleting those videos. Follow this step-by-step guide for a hassle-free experience:
- Open the YouTube App: Tap on the YouTube app icon on your iPad to open it. You should see your feed populated with videos.
- Access Your Channel: Tap on your profile picture in the top right corner. A menu will pop up; select “Your Channel.”
- Go to Your Videos: On your channel page, tap on the “Videos” tab. This will display all the videos you’ve uploaded.
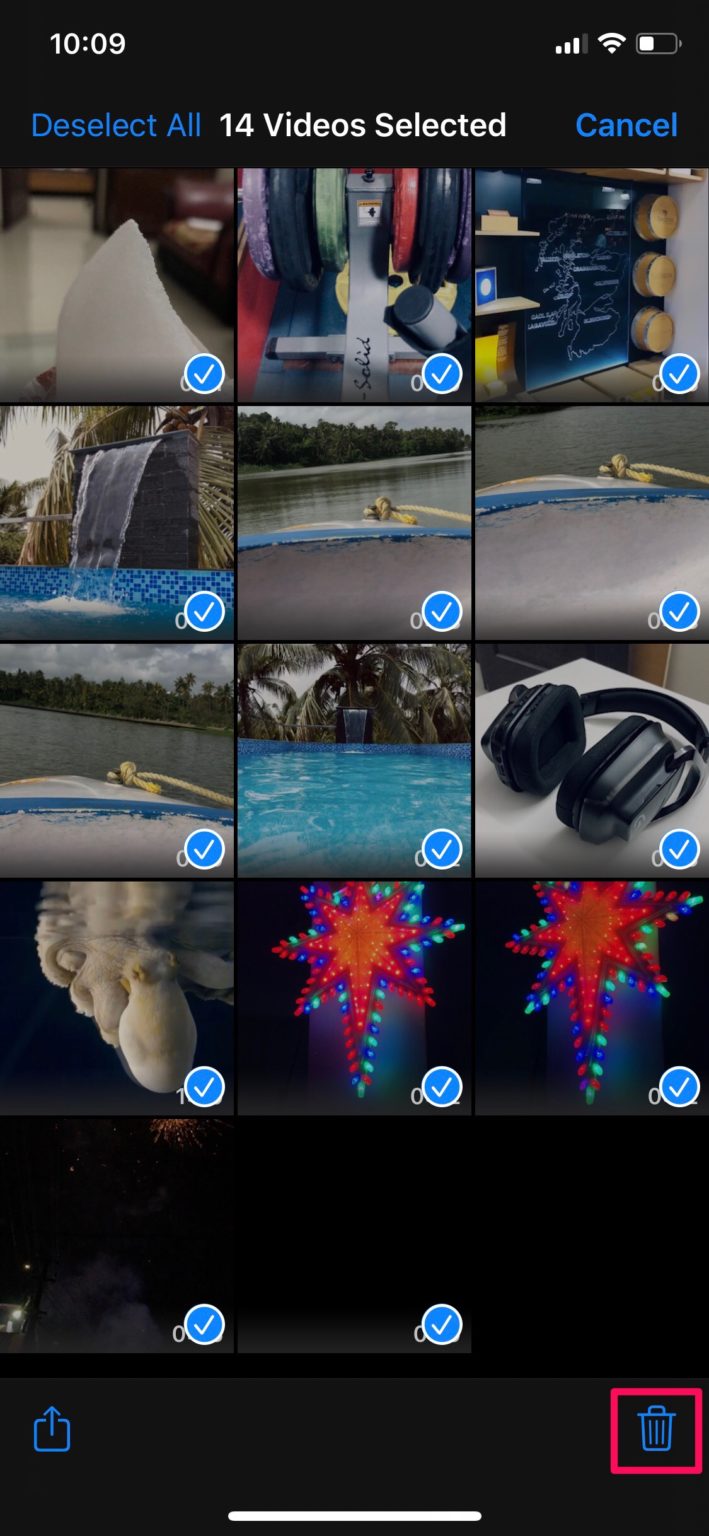
- Select the Video to Delete: Scroll through your videos and find the one you want to delete. Tap on the video to open it.
- Tap the Options Menu: Once the video is open, look for three dots (⋮) or a settings gear icon, usually located at the top right corner. Tap it to open options.
- Choose Delete: You’ll see a list of options, including “Delete”. Tap this option. A confirmation message will pop up.
- Confirm Deletion: Confirm that you want to delete the video. This is a critical step, as once you confirm, the video will be permanently removed from your channel.
And there you go! Your video is now deleted. If you have multiple videos to delete, simply repeat these steps for each one.
Deleting videos can be a great way to curate your content and keep your channel fresh. Remember, it’s always worth balancing quality with quantity!
Also Read This: What is the Sophie Rain Spider-Man Video? A Viral YouTube Mystery
5. Managing Your YouTube Content After Deletion
So, you've decided to delete some of your YouTube videos. Whether they didn't perform well, or maybe you just want to refresh your channel's vibe, the next step is managing your remaining content effectively. Here’s how to navigate this process smoothly:
Keep Track of What You’ve Deleted
Once you delete a video, it's gone for good. You won't be able to retrieve it, so it's smart to maintain a list of what you've deleted. Consider using a simple notes app on your iPad to jot down the titles and reasons for deletion. This will help you avoid duplicating efforts or creating similar content in the future.
Analyze Your Remaining Videos
Take a moment to review what’s left on your channel:
- Check the analytics for each video. Look for viewing patterns, engagement rates, and audience retention. This information is gold for refining your content strategy.
- Identify which videos resonate most with your audience. Use this data to inspire new video ideas or update existing content.
Update Thumbnails and Descriptions
Now that you've trimmed the fat, it’s time to spruce up your channel:
- Thumbnails: Make sure your thumbnails are eye-catching and relevant. A good thumbnail can significantly increase your click-through rates!
- Descriptions: Revise your video descriptions to include keywords that can improve searchability and provide value to your viewers.
Engage with Your Community
After deleting videos, don’t forget to engage with your audience. Respond to comments on your remaining videos and consider asking for feedback on what they want to see next. This not only builds community but can also guide your future content planning.
6. Tips for Organizing and Managing Your YouTube Channel on iOS
Managing a YouTube channel from your iPad can be a breeze if you know how to stay organized. Here are some tips to help you keep everything orderly and efficient:
Utilize Playlists
Playlists are your best friends! They help categorize your videos and make it easier for viewers to find related content. Here’s how to make the most of them:
- Create themed playlists. For instance, if you have travel vlogs, group them by location or trip.
- Regularly update your playlists as you add new content. This keeps them relevant and engaging.
Regular Content Planning
Establish a content calendar to plan your uploads. Here’s how to set it up:
- Choose a consistent upload schedule. Whether it’s weekly or bi-weekly, consistency is key!
- Use a note-taking or calendar app to jot down ideas and deadlines. This visual cue will help you stay on track.
Keep Your Channel Branding Consistent
Consistency in branding helps with recognition. Make sure your channel art, video style, and tone align:
- Update your channel banner and logo periodically but keep them in line with your theme.
- Maintain a consistent color scheme and font style for your thumbnails.
Leverage YouTube Studio
The YouTube Studio app available on iOS is a powerful tool for managing your channel:
- Monitor analytics on the go. Keep an eye on engagement metrics, and adjust your strategy as needed.
- Respond to comments quickly. Engaging with your viewers helps build a loyal audience!
By implementing these strategies, you’ll not only keep your YouTube channel organized but also create a space where your creativity can flourish. Happy managing!
 admin
admin


