Changing your LinkedIn email address might seem like a small task, but it can significantly impact your networking and job search. Keeping your contact information up-to-date ensures you don’t miss important notifications about job opportunities, messages from connections, or updates from groups you’re part of. In this post, we’ll walk you through the steps to update your email address and discuss why it might be necessary to make this change in the first place.
Why You Might Need to Change Your LinkedIn Email Address
There are several valid reasons to change your LinkedIn email address. Here are some key scenarios where an update is essential:
- Changing Jobs: If you’ve recently left a job and used your work email for LinkedIn, it’s crucial to switch to a personal email. This ensures you maintain access to your account and don’t lose valuable connections.
- Email Security: If your email account has been compromised or you suspect phishing attempts, it’s wise to change your LinkedIn email for added security.
- Consolidation: Many users have multiple email addresses. If you’re consolidating your communications, updating your LinkedIn to your primary email can streamline your notifications and messages.
- Professionalism: Using a professional email address (like one with your domain name) instead of a casual one can enhance your professional image.
Let’s delve deeper into these reasons:
Changing Jobs
When you leave a job, it’s common to use a work email address for professional platforms like LinkedIn. However, once you’re no longer with that company, you may lose access to that email. It’s essential to switch to a personal email to avoid missing out on opportunities. For example, if you applied for jobs using your work email, you might not receive interview notifications. A personal email keeps you in control of your professional network.
Email Security
In today’s digital age, email security is paramount. If you ever feel your email has been compromised, take immediate action. Changing your LinkedIn email helps protect your account from unauthorized access. You wouldn’t want someone else to change your profile information or message your connections, right? Always prioritize security.
Consolidation
Many professionals juggle multiple email accounts for various purposes. If you’ve recently decided to streamline your communication under one email, it’s wise to update your LinkedIn profile accordingly. This way, you won’t miss notifications that could lead to exciting opportunities. For instance, if you’re looking for freelance gigs, you want all inquiries sent to one dedicated email address.
Professionalism
First impressions matter, especially in a professional setting. Using a personal email that reflects your brand or contains your name can make you more memorable and credible. If you’re a graphic designer, for example, an email like [email protected] looks far more professional than something like [email protected]. It’s a subtle yet effective way to enhance your professional persona.
In conclusion, changing your LinkedIn email address can be a straightforward process with significant benefits. Whether for job transitions, security concerns, consolidation, or professionalism, ensuring your email is current is vital to maintaining a robust professional network.
Also Read This: How to Turn On Private Mode on LinkedIn for Discreet Browsing
3. Step-by-Step Guide to Changing Your LinkedIn Email Address
Changing your LinkedIn email address is a straightforward process, and it can be done in just a few clicks. Whether you’ve switched jobs or simply want a fresh start with your contact information, here’s how to do it:
- Log Into Your LinkedIn Account: Start by visiting the LinkedIn website and logging into your account. Enter your username and password to gain access to your profile.
- Navigate to Your Settings: Once you’re logged in, look for the Me icon at the top of your LinkedIn homepage. Click on it, and in the dropdown menu, select Settings & Privacy.
- Access the Email Addresses Section: In the Settings menu, find the Account preferences tab. Under this section, you’ll see Email addresses. Click on it to view your current email addresses linked to your account.
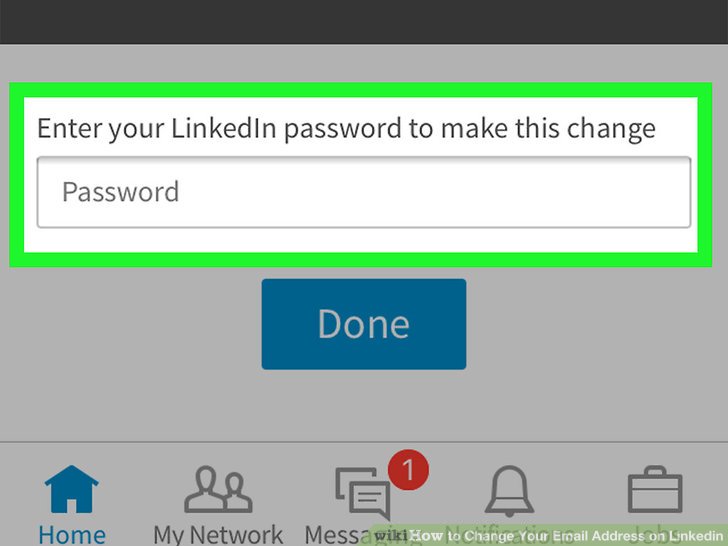
- Add a New Email Address: Click on the Add email address button. Enter your new email address in the provided field and click Send verification. This step is crucial because LinkedIn needs to ensure that this new address is yours.
- Verify Your New Email: Check your inbox for a verification email from LinkedIn. Open it and follow the instructions provided in the email to confirm your new address. This usually involves clicking a link that takes you back to LinkedIn.
- Set the New Email as Primary: Once your new email is verified, return to the Email addresses section in your account settings. You can now choose to set this as your primary email, which means it will be the main address LinkedIn uses to contact you.
- Remove Old Email Addresses: If you want to clean up your contact information, you can also remove any old email addresses by clicking the Remove option next to them. Just be sure that the one you’re removing isn’t set as your primary email.
- Save Your Changes: After making all your changes, don’t forget to save them. LinkedIn usually does this automatically, but it’s good to double-check.
And that’s it! You’ve successfully changed your LinkedIn email address. It’s a good practice to keep your contact information updated, so your network can always reach you.
Also Read This: How to Remove LinkedIn Connections: Managing Your Professional Network
4. Tips for Choosing a New Email Address

Choosing a new email address isn’t just about picking something that sounds good. It plays a significant role in how you're perceived professionally, especially on platforms like LinkedIn. Here are some tips to consider when selecting your new email address:
- Keep It Professional: Aim for an email address that reflects your professional identity. Using your full name or a variation, like [email protected] or [email protected], can make a great impression.
- Avoid Nicknames: While your friends might call you “Johnny,” it’s best to stick with something more formal for professional use. Save the nicknames for personal accounts!
- Consider Your Industry: If you’re in a creative field, a more unique address might be acceptable, but it should still be easy to read. For example, [email protected] works well for artists but might not suit someone in finance.
- Check Availability: Before getting too attached to a particular email address, check its availability. You might have to try variations if your first choice is taken. Don’t hesitate to add numbers or initials if necessary.
- Avoid Special Characters: While underscores or dots are acceptable, it’s usually best to keep your email address as simple as possible. Complex characters can lead to typos when sharing your address.
- Be Mindful of Privacy: If you’re using a personal email, consider if any part of it reveals too much personal information. For instance, using your birth year might not be wise.
In summary, your email address is a key part of your online identity. By choosing one that is professional, memorable, and easy to use, you can ensure that you make a great impression on LinkedIn and beyond!
Also Read This: How to Add Recommendations on LinkedIn to Build Trust and Credibility
5. How to Verify Your New Email Address
Changing your email address on LinkedIn is a big step, but it’s just as important to make sure that email is verified. Verification helps secure your account and ensures you can receive important updates. Here’s how to do it:
- Check Your Inbox: After you update your email, LinkedIn will send a verification email to your new address. Open your email client and look for an email from LinkedIn. It might take a few minutes to arrive, so don’t worry if it’s not instant.
- Open the Email: Once you find the email, click on it. You should see a message that says something like, “Please verify your email address.”
- Click the Verification Link: Inside the email, there will be a button or a link that says, “Verify your email address.” Click on that link to confirm your new email. This action redirects you to LinkedIn, confirming that your email change was successful.
- Confirmation Message: If everything went well, you’ll land on a confirmation page on LinkedIn. It usually says something like, “Your email address has been verified.”
And there you go! Your new email address is now verified, making your LinkedIn account even more secure. If you don’t see the verification email, check your spam or junk folder. If it’s still missing, you might want to request another verification email through LinkedIn’s settings.
Also Read This: How Do I Tag Someone on LinkedIn: A Simple Guide to Tagging Contacts
6. Updating Other Contact Information on LinkedIn
While changing your email address is crucial, LinkedIn allows you to keep your profile updated with other contact information as well. Here’s a quick guide to updating your phone number and other details:
- Access Your Profile Settings: Start by logging into LinkedIn and clicking on the “Me” icon at the top of your homepage. Then select “Settings & Privacy” from the dropdown menu.
- Go to the “Account Preferences” Section: Within the settings, look for the “Account preferences” tab on the left. This area contains various options for your account, including contact information.
- Update Your Phone Number: Find the option that says “Phone numbers.” You can add a new number or edit an existing one. Just click “Add phone number,” then enter your number and select whether it’s a mobile or a home number.
- Set Primary Contact: You can also select which contact method you want to set as your primary communication channel. Just click on the “Make primary” button next to your preferred email or phone number.
- Save Your Changes: Don’t forget to click the “Save” button after making your updates. This step ensures that all your changes are stored.
Remember, keeping your contact information up to date is essential for networking. It ensures that potential employers, colleagues, or connections can reach you easily. Whether it’s a new phone number or an updated email, make it a habit to check and refresh your details regularly. Happy networking!
Also Read This: How to Endorse People on LinkedIn to Strengthen Professional Relationships
7. Common Issues and Troubleshooting
Changing your LinkedIn email address should be a smooth process, but sometimes you might run into a few bumps along the way. Here are some common issues users face and how to resolve them:
- Email Not Recognized: If LinkedIn doesn’t recognize your new email address, double-check that you’ve entered it correctly. Ensure there are no typos and that you’re using the right domain (like @gmail.com or @yahoo.com).
- Verification Email Not Received: Sometimes, the verification email doesn’t land in your inbox. Be sure to check your spam or junk folder. If it’s not there, try resending the verification email. Make sure your LinkedIn account settings allow email notifications!
- Old Email Still Displays: After changing your email, if you still see the old address, it may take a few moments to refresh. Log out and log back in to see if the changes have taken effect.
- Account Locked: If you change your email too frequently, LinkedIn might temporarily lock your account for security reasons. If this happens, you’ll need to follow LinkedIn's recovery process, which typically involves verifying your identity.
If you encounter any issues not covered here, don't hesitate to reach out to LinkedIn's customer support. They can provide assistance tailored to your specific situation.
8. Conclusion
Updating your LinkedIn email address and contact information is a straightforward yet essential step in maintaining your professional network. Keeping your details current ensures you don’t miss out on important messages or job opportunities. Plus, it reflects your commitment to staying connected in your career.
To recap, here are the key steps you should follow:
- Log into your LinkedIn account.
- Navigate to the "Settings & Privacy" section.
- Select "Account" and update your email address.
- Verify the new email address.
- Update any additional contact information as needed.
Remember, technology can sometimes throw unexpected challenges your way, but with the right approach and troubleshooting tips, you can tackle them head-on. So go ahead—keep your LinkedIn profile polished and professional. Happy networking!
 admin
admin


