In today's digital age, making connections matters more than ever, and your email signature is a powerful tool to showcase your professional presence. Adding a LinkedIn profile link to your Outlook email signature not only enhances your credibility but also makes it easy for recipients to connect with you online. Let’s dive into why this simple addition can make a huge impact on your networking efforts.
Why You Should Include LinkedIn in Your Email Signature
Including your LinkedIn profile in your email signature is more than just a trendy move—it's a smart one! Here are some compelling reasons to consider:
- Boosts Professionalism: A well-crafted email signature signals that you take your professional image seriously. Linking to your LinkedIn profile adds an extra layer of credibility.
- Promotes Networking: Every email you send is an opportunity to expand your network. By making it easy for others to connect with you on LinkedIn, you increase your chances of building valuable professional relationships.
- Showcases Your Expertise: Your LinkedIn profile tells your professional story. By including it in your email signature, you provide recipients with a direct link to your accomplishments, skills, and experiences.
- Encourages Engagement: Adding your LinkedIn link encourages recipients to engage with you beyond email. They may follow your updates, comment on your posts, or even reach out for collaborations.
- Easy Access: Including your LinkedIn link makes it effortless for busy professionals to find you. A simple click can lead to meaningful connections and opportunities.
Incorporating your LinkedIn profile into your email signature is a strategic move that can facilitate professional growth. Whether you’re reaching out to potential clients, collaborators, or even friends, this small addition can help you stand out in a crowded inbox and open doors to new opportunities.
Also Read This: How to Change Your LinkedIn Profile to Not Looking for Work: Privacy Settings Explained
3. Step-by-Step Guide to Adding LinkedIn to Your Outlook Email Signature
Adding your LinkedIn profile to your Outlook email signature is a fantastic way to enhance your professional presence. It’s simple and can make a big difference in how you connect with colleagues and potential employers. Let’s walk through the process step by step.
Step 1: Open Outlook
Launch the Outlook application on your device. You can do this on your desktop or online; the steps are quite similar.
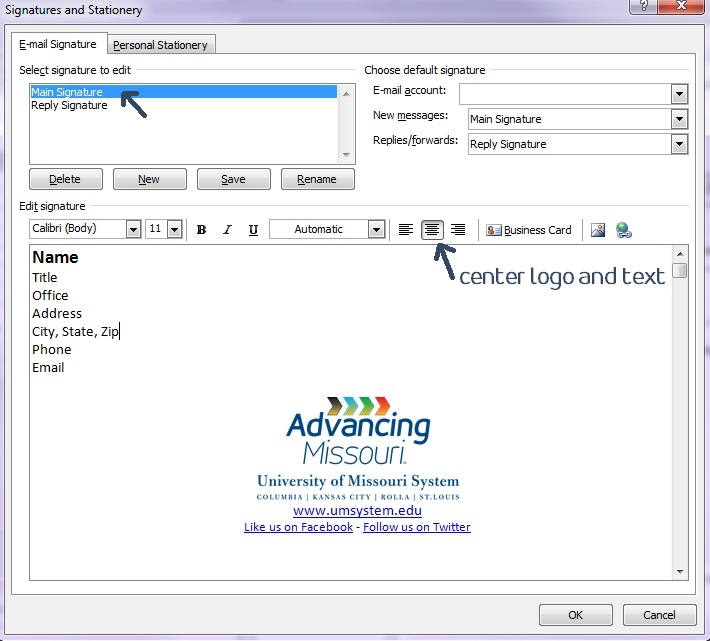
Step 2: Access Signature Settings
- For desktop: Click on the File tab in the top left corner, then select Options. In the dialog box, choose Mail from the left sidebar, and then click on the Signatures... button.
- For Outlook on the web: Click on the Settings gear icon in the upper right corner, then select View all Outlook settings. Go to Mail, then Compose and reply.
Step 3: Create a New Signature
In the Signatures and Stationery dialog (for desktop) or the Compose and reply section (for web), click on New to create a new signature. Name it something recognizable, like "Professional Signature."
Step 4: Format Your Signature
In the signature editing box, you can type your name, job title, and any other information you want. Now, to add your LinkedIn link:
- Type "Connect with me on LinkedIn!" or something similar to draw attention.
- Select the text you just typed.
- Click on the Insert Hyperlink button (often represented by a chain link icon).
- Enter your LinkedIn profile URL in the address field (e.g., https://www.linkedin.com/in/yourprofile).
- Click OK to save the hyperlink.
Step 5: Set Signature Defaults
If you want this signature to appear automatically in your emails, select it as the default for new messages and replies/forwards in the settings.
Step 6: Save Your Changes
Once you’re satisfied with your signature, click OK to save your changes. Now, every time you send an email, your LinkedIn link will be part of your signature, making it easy for recipients to connect with you.
Also Read This: Does Mark Zuckerberg Have a LinkedIn Profile? Insights into Social Media Giants
4. Customizing Your LinkedIn Link in the Signature
Now that your LinkedIn profile is linked in your email signature, it's time to customize that link for a more professional touch. A well-crafted link can enhance your signature's appearance and make it more appealing.
Step 1: Use a URL Shortener
If your LinkedIn profile URL is long and cumbersome, consider using a URL shortener like Bitly or TinyURL. This not only makes your link cleaner but can also provide insights into how often it gets clicked. Here’s how:
- Copy your LinkedIn profile URL.
- Visit a URL shortener website.
- Paste your URL and click on Shorten.
- Copy the shortened URL.
Step 2: Update Your Outlook Signature
Go back to your signature settings in Outlook and replace the old LinkedIn link with the new, shortened URL. This keeps your signature looking neat and professional.
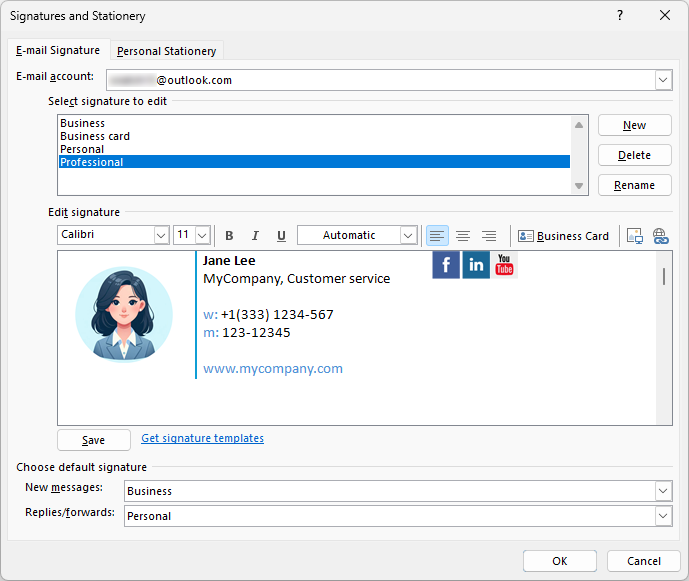
Step 3: Add an Icon (Optional)
For an extra touch, consider adding a LinkedIn icon next to your link. You can find free LinkedIn icons online. Just download it and:
- In the signature editor, click to place your cursor where you want the icon.
- Select Insert Picture and upload the LinkedIn icon.
- Once added, you can click on the icon and hyperlink it to your LinkedIn profile using the same method as before.
Step 4: Keep It Professional
Make sure the way you present your LinkedIn link matches your overall email signature style. Avoid using bright colors or overly fancy fonts; simplicity and professionalism are key. This makes a great impression on anyone reading your emails.
By taking these steps, not only have you added your LinkedIn profile to your email signature, but you’ve also customized it to stand out. So go ahead, start sharing your professional journey with every email you send!
Also Read This: How to Upload a PDF to LinkedIn for Sharing Documents with Your Network
5. Testing Your New Email Signature
So, you’ve crafted the perfect email signature that includes your LinkedIn profile. Now, it’s time to make sure it works flawlessly! Testing your new email signature is an essential step before you start sending emails to clients and colleagues.
Here’s how you can effectively test your new signature:
- Send Test Emails: Start by sending test emails to yourself or a trusted colleague. Make sure to check how the signature looks on both desktop and mobile versions of your email. Different devices and email clients might display your signature differently, so this step is crucial.
- Check Links: Click on the LinkedIn link in your signature. Is it directing you to the right profile? Ensure there are no typos in the URL. A broken link can be a frustrating experience for the recipient.
- Image Display: If you’ve included any images, like a company logo, make sure they display correctly. Some email clients block images by default, so check the settings to see if they need to be enabled.
- Consistency Across Platforms: Send emails from different platforms, like Outlook, Gmail, or Apple Mail, to see how your signature appears. Each platform may render it differently, so make adjustments as needed.
Once you’ve done these tests, you’ll have a clear picture of how your new signature looks and functions. Remember, first impressions matter, and your email signature is often the final touchpoint for potential connections!
6. Best Practices for Professional Email Signatures
Now that you’ve added LinkedIn to your email signature, let’s talk about how to make it as effective as possible. A professional email signature is more than just your name and contact information; it's also a branding tool. Here are some best practices to keep in mind:
- Keep It Simple: Your email signature should be easy to read. Stick to a clean layout and avoid unnecessary clutter. Limit the number of colors and fonts. A good rule of thumb is to use a maximum of two different fonts and three colors.
- Include Essential Information: Your name, job title, company name, and contact information are must-haves. You may also include your LinkedIn link, but avoid overcrowding your signature with too many links.
- Use a Professional Font: Stick to standard fonts like Arial, Calibri, or Times New Roman. These fonts are easy to read on any device and maintain a professional look.
- Be Mindful of Legal Disclaimers: If your company requires legal disclaimers in emails, make sure to include them in your signature. This could protect your company and inform recipients about confidentiality.
- Update Regularly: If you change your job title, company, or any other significant details, make sure to update your email signature promptly. An outdated signature can confuse or mislead recipients.
By following these best practices, you can create a polished and professional email signature that enhances your brand and leaves a lasting impression every time you hit send!
 admin
admin


