Welcome to the colorful world of Canva! If you’ve ever wanted to transform your images to fit a specific design or artistic vision, you’re in the right place. Image warping is a fantastic feature that allows you to bend, stretch, and manipulate images in creative ways. Whether you're designing for social media, creating a marketing campaign, or just having fun, mastering image warping can elevate your designs to a whole new level. Let’s dive into how you can achieve this easily!
Step-by-Step Guide to Warping Images
Ready to start warping? Follow these simple steps to create stunning, warped images in Canva!
- Open Canva and Select Your Project: Log into your Canva account and choose the type of design you want to work on—be it a poster, social media post, or flyer. If you’re starting fresh, select the dimensions that suit your needs.
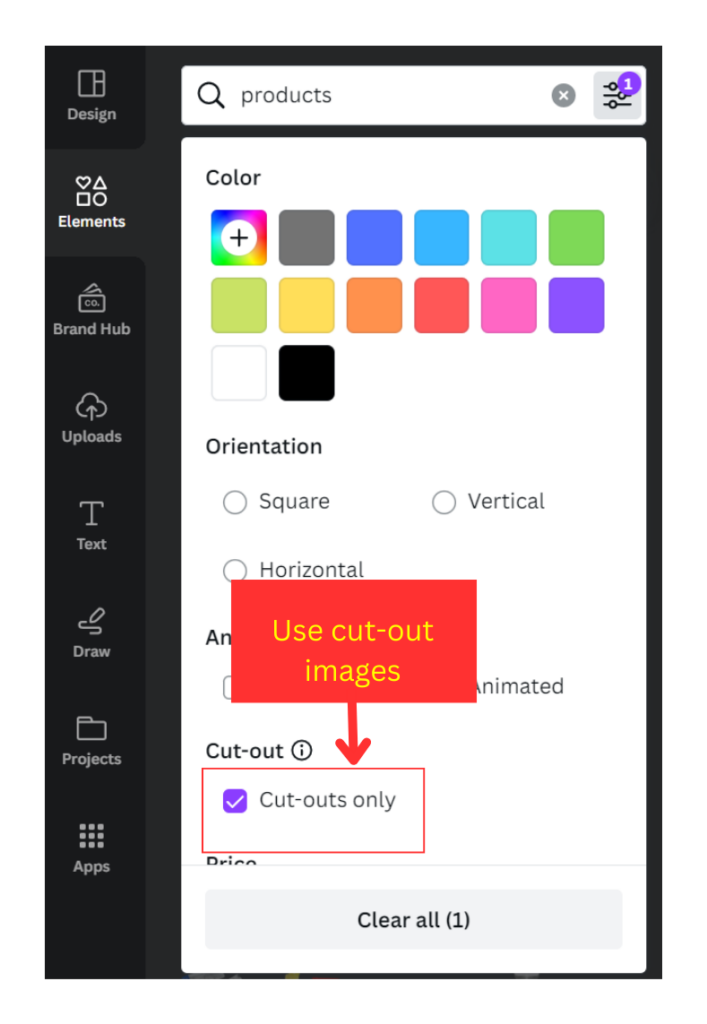
- Upload Your Image: Click on the “Uploads” tab on the left sidebar. Here, you can upload your own images or choose from Canva’s extensive library. Just drag and drop your image into the workspace.
- Apply Image Effects: Click on the image to activate the toolbar above. Next, navigate to the “Effects” option. Here, you’ll find various effects, but look for the "Warp" feature.
- Choose Your Warp Style: Canva offers several styles of warping. You can opt for classic styles like 'Curve,' 'Twist,' or even 'Wave.' Click on your choice to apply it to the image.
- Adjust the Warp Settings: After applying the warp, you’ll see sliders that allow you to tweak the intensity, direction, and other attributes of the warp effect. Play around with these until you achieve the desired look. Don't be afraid to experiment!
- Finalize Your Design: Once you’re happy with the warping, you can further enhance your design with text, shapes, or other elements. Canva makes it easy to layer these components, so get creative!
- Download or Share: When your masterpiece is complete, click the “Download” button at the top right to save your design. You can choose the format you need, whether it’s PNG, JPG, or even PDF. Alternatively, share it directly on social media!
And there you have it! With just a few clicks, you can warp images in Canva and bring a unique touch to your designs. Remember, the key to great design is practice and experimentation. So don’t hesitate to try out different effects and styles. Happy designing!
Also Read This: Does Shutterstock Accept iPhone Photos? Guidelines for Mobile Photography Submissions
3. Exploring Different Warping Techniques
The beauty of image warping lies in its versatility. When you're using Canva, you'll discover several techniques to manipulate images creatively. Let’s dive into a few popular warping methods that you can easily apply.
1. Bending and Twisting: One of the most common techniques is bending or twisting your images to give them a sense of movement. Imagine a photo of a tree that you want to give a whimsical spiral effect. By using the warp tool, you can pull the edges of the image outward or inward, creating that engaging twist.
2. Distortion: This technique is perfect for creating a surreal or abstract effect. You might want to distort the edges of a landscape photo to make it look dreamlike. In Canva, you can achieve this by selecting the image and adjusting the distortion sliders to manipulate the corners and edges.
3. Perspective Warping: If you want to give your images depth, perspective warping is the way to go. This technique allows you to alter the angle and view of the image. For instance, if you have a flat image of a building, you can warp it to appear as though it's receding into the background. It’s fantastic for creating dynamic visuals that draw the viewer’s eye.
To experiment with these techniques in Canva:
- Choose your image and navigate to the effects panel.
- Select the warp options available.
- Play around with the sliders until you achieve the desired effect.
Remember, the key to effective warping is subtlety—too much distortion can make your images look unrealistic. So, take your time to explore and find the perfect balance!
Also Read This: Finding the Pixel Size of an Image
4. Using Canva's Tools for Customization
Canva is packed with tools that allow you to customize your images beyond just warping. Once you’ve manipulated your image, you can take it a step further with these handy features:
1. Filters and Effects: After warping your image, applying filters can enhance its look. Canva provides various filters that adjust colors, brightness, and contrast. Simply click on your image, go to the filter section, and experiment until you find the vibe that complements your warped design.
2. Adjusting Transparency: This is a fantastic tool for layering images. If your warped photo is too bold, consider lowering the transparency. This allows you to overlay text or other images seamlessly. Just go to the transparency setting and slide it until you achieve the desired effect.
3. Adding Text or Graphics: Don’t forget to spruce up your warped image with text or additional graphics! Canva’s extensive library of fonts and icons makes it easy to add personal touches. Choose a font that resonates with the mood of your image—whether it’s playful, elegant, or bold.
4. Using Grids and Frames: If you're aiming for a structured look, utilize Canva's grids and frames. They can help you position your warped images neatly and create a cohesive design. Just drag and drop your image into a grid, and Canva will do the rest!
With all these tools at your disposal, customization is at your fingertips. The more you play around with these features, the more unique and eye-catching your designs will become. So, roll up your sleeves and get creative!
Also Read This: Tracing Images in Canva: A Step-by-Step Tutorial
5. Common Mistakes to Avoid When Warping Images
When it comes to warping images in Canva, even seasoned designers can stumble into a few pitfalls. Here are some common mistakes to be aware of:
- Over-Warping: It’s easy to get carried away with the warp tool. While it’s tempting to create dramatic effects, too much distortion can make your image look unprofessional or unrecognizable. Aim for a balance that enhances without overwhelming.
- Ignoring Image Quality: Warping can sometimes lead to pixelation or blurriness, especially if you start with a low-resolution image. Always choose high-quality images as your base to ensure crisp results.
- Forgetting About Composition: Warping can change the overall composition of your design. Before applying any distortions, think about how the warp will affect the placement and flow of other design elements.
- Neglecting Consistency: If you’re working on a multi-image project, ensure your warping style is consistent across the design. This helps maintain a cohesive look that feels intentional rather than random.
- Skipping the Preview: Always use the preview feature before finalizing your design. This helps catch any unintended distortions or effects that might not look good on the final product.
By steering clear of these common mistakes, you'll not only enhance your warping skills but also create designs that are polished and visually appealing.
6. Enhancing Your Design with Warped Images
Warping images in Canva can truly elevate your designs, adding a unique flair that captures attention. Here are some creative ways to enhance your design using warped images:
- Creating Depth: Warping images can give a sense of depth to your design. For instance, if you’re designing a poster, you can warp a background image to wrap around the text, bringing it to life and creating a three-dimensional feel.
- Integrating Textures: Use warped images as textures to fill shapes or backgrounds. This can add an interesting layer to your design. For example, warp a wood texture to fit around a circular logo, giving it a rustic touch.
- Highlighting Key Elements: By warping certain images, you can draw attention to specific parts of your design. For instance, if you have a product image, warping it slightly can make it pop against other elements, highlighting it as the focal point.
- Creating Motion: Warped images can convey motion and energy. If you’re designing for an event, warping images of people in action (like dancers or athletes) can evoke excitement and movement, aligning with the theme of your project.
- Customizing Shapes: Use warped images to create custom shapes for your layouts. If you're working on a social media post, you can warp an image into a heart shape for a Valentine's Day campaign, making it visually catchy and theme-appropriate.
Experimenting with warped images can unlock endless possibilities for creativity. The key is to have fun and not be afraid to explore different effects until you find a style that resonates with your vision!
 admin
admin


