If you’re looking to add a splash of creativity to your crafting repertoire, ribbon flowers are a fantastic place to start! These charming embellishments can elevate your DIY projects, from gift wrapping to home decor. With just a bit of ribbon and some basic techniques, you can create stunning flowers that are perfect for any occasion. Ready to dive in? Let’s explore what you need to get started and how you can make your very own ribbon flowers!
Materials Needed for Ribbon Flower Making
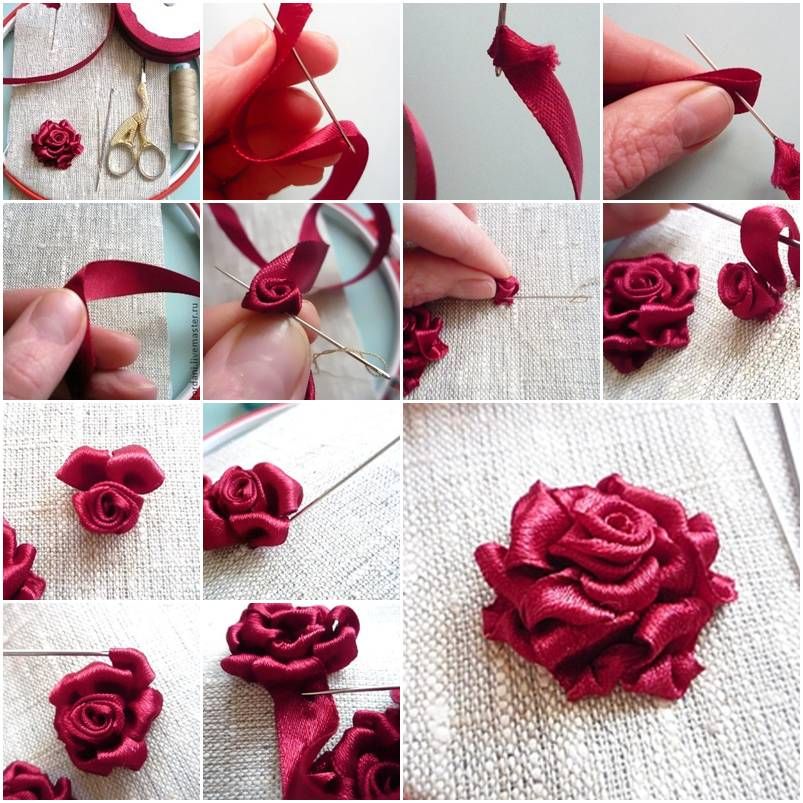
Creating ribbon flowers doesn’t require a lot of fancy tools, but a few essential materials will make the process smooth and enjoyable. Here’s a handy list of what you’ll need:
- Ribbons: Choose various widths and colors to suit your style. A good starting point is 1-inch and 1.5-inch wide ribbons.
- Scissors: A sharp pair is crucial for clean cuts. You may also want pinking shears for decorative edges.
- Hot Glue Gun: This is your best friend for securing petals together. Make sure you have plenty of glue sticks on hand!
- Needle and Thread: For added stability, especially if you’re making larger flowers.
- Floral Wire (optional): Useful if you want to create stems for your flowers.
- Beads or Buttons: These can serve as beautiful centers for your flowers, adding a unique touch.
- Felt or Fabric Squares: Ideal for creating a base to attach your flower, providing extra support.
Once you gather your materials, you’ll be well on your way to crafting lovely ribbon flowers! The beauty of these flowers lies in your creativity—don’t hesitate to mix and match colors and textures. Now that you have everything ready, let’s get to the fun part: making your flowers!
Also Read This: Is Dailymotion Popular? Analyzing Its User Base and Reach
3. Step 1: Choosing the Right Ribbon
When it comes to making beautiful ribbon flowers, the first crucial step is selecting the right ribbon. The variety of ribbons available can be overwhelming, but don't worry! Here are some tips to help you make the best choice:
- Material Matters: Consider the type of material. Satin ribbons have a lovely sheen and drape beautifully, while organza ribbons are sheer and can add a delicate touch. For a more rustic look, you might opt for burlap or cotton ribbons.
- Width is Key: The width of the ribbon affects the size of your flower. Thicker ribbons (like 1.5 inches) are great for larger, more dramatic blooms, while narrower ribbons (like 0.5 inches) work well for smaller flowers.
- Color Choices: Choose colors that complement your project. Bold, bright colors can create vibrant, eye-catching flowers, while pastel shades offer a softer, more subtle aesthetic. Don't be afraid to mix and match colors!
- Texture Tells a Story: Ribbons come in various textures, from smooth and glossy to rough and woven. The texture can add depth and interest to your flowers. Think about the overall look you want to achieve!
Once you’ve narrowed down your options, it's always a good idea to test the ribbon. Take a small piece and fold it into a flower shape to see how it holds up. Does it bend easily? Does it hold its shape? These little tests can help you find the perfect ribbon for your floral masterpiece!
Also Read This: How to Hide Folders on Windows 7 for Privacy
4. Step 2: Cutting the Ribbon to Size
Now that you've selected the perfect ribbon, it’s time to cut it to size! This step is essential because the length and shape of your ribbon pieces will directly affect the final look of your flowers. Let's break it down:
- Measure Twice, Cut Once: Before cutting, decide on the size of your flower. A good rule of thumb is to cut ribbon pieces that are between 12 to 36 inches long, depending on how full you want your flower to be. If you’re unsure, start with longer lengths; you can always trim them later!
- Shape Your Petals: Depending on the flower type you want to create, you'll need to cut your ribbon into specific shapes. For example, if you're making a rose, cut your ribbon into petal shapes—think rounded or oval. For daisies, simpler shapes work best.
- Use Sharp Scissors: Ensure you have a good pair of sharp scissors for clean cuts. This makes a significant difference in your flower’s appearance. Dull scissors can lead to fraying, which you want to avoid!
- Sealing the Edges: After cutting, especially if you're using synthetic ribbons that fray easily, consider sealing the edges. You can use a lighter to carefully singe the edges or apply Fray Check to keep them neat and tidy.
Taking the time to accurately measure and cut your ribbon will pay off immensely in the final product. It’s all about those details! Once your ribbon is cut and prepped, you’re ready to move on to the fun part—assembling your beautiful ribbon flowers!
Also Read This: Highest Followers On The Likee In USA 2022
5. Step 3: Creating the Flower Petals
Now that you have your materials ready, it’s time to dive into making the flower petals! This step is where your creativity really starts to shine. The beauty of ribbon flowers lies in the variety of petal shapes and styles you can create. Here’s how to get started:
Choosing Your Ribbon: Select a ribbon that fits the theme of your project. Satin ribbons work wonderfully for a smooth finish, while organza adds a delicate touch. Aim for a width of about 1 inch, which gives you enough area to manipulate and shape.
Cutting the Ribbon: Cut several lengths of ribbon for each petal. A good starting point is about 6 inches long. You can adjust this size based on the scale of the flower you want to create. Remember, the more petals you have, the fuller your flower will look!
Creating Petal Shapes: There are several petal shapes you can try:
- Simple Loop: Fold the ribbon in half and stitch the ends together to create a simple loop.
- Pointed Petal: Cut the ends of the ribbon at an angle before folding to form a point.
- Curved Petal: Use a heat source, like a lighter, to gently curve the edges of the ribbon for a softer look.
Each shape adds a unique flair to your flower, so feel free to experiment with different styles. Once you have your petals cut and shaped, you can start to layer them, but we’ll get to that in the next step!
Also Read This: Complete Guide to Skipping Ads on Dailymotion for a Better Viewing Experience
6. Step 4: Assembling the Ribbon Flower
Congratulations! You’ve made it to the assembly stage, which is where all your hard work pays off. Here’s how to bring your flower to life:
Gather Your Petals: Collect all the petals you created in the previous step. Depending on the size of your flower, you might want to use anywhere from 5 to 12 petals. Lay them out in a circular pattern to visualize how they will fit together.
Starting with the Base: Take your first petal and secure it to a small circle of felt or fabric using a hot glue gun. This will be the base of your flower. Make sure to apply enough glue to hold the petal in place.
Layering the Petals: Begin attaching the rest of the petals around the base, overlapping them slightly to create a natural bloom effect. Use a gentle touch—too much pressure can squish the petals. Aim for a staggered look, which adds depth and dimension.
Securing the Center: Once all petals are glued down, it’s time to add the center of your flower. You can use a bead, button, or even a puff of small ribbon loops to create a focal point. Secure it in place with hot glue. This detail can make your flower pop!
Final Touches: After everything is glued and secure, give your flower a gentle fluff and adjust the petals if needed. You can also add leaves by cutting out leaf shapes from green ribbon and gluing them around the base.
And just like that, you have a beautiful ribbon flower! Use it to embellish hair accessories, gifts, or as part of a bouquet. The possibilities are endless, and with a little practice, you’ll be creating stunning ribbon flowers in no time!
Also Read This: How Low Can You Go Ludacris Performance Insights on Dailymotion
7. Step 5: Adding Finishing Touches
Now that you’ve crafted your beautiful ribbon flowers, it’s time to give them that extra flair with some finishing touches. This step is where your flowers will go from lovely to absolutely stunning! Here are a few ideas to elevate your ribbon flowers:
- Add Centers: Use beads, buttons, or even small fabric circles to create the center of your flowers. This not only adds visual interest but also gives your flowers a professional look. Choose colors that complement your ribbon.
- Use Hot Glue: Secure any loose ends or overlapping areas with hot glue. This will ensure your flower holds its shape and looks neat. Remember to be careful with the hot glue to avoid burns!
- Layered Flowers: Consider making smaller flowers and layering them on top of larger ones. This technique adds depth and dimension, making your arrangement more dynamic.
Once you have your centers in place, think about how you want to display your flowers. Here are a couple of ideas:
- Hair Accessories: Attach your ribbon flowers to hair clips, headbands, or even pins. They make for adorable accessories for any occasion!
- Home Decor: Use them to embellish wreaths, picture frames, or gift packages. This gives a personal touch to your home or gifts, making them extra special.
Finally, don’t forget to fluff and arrange your flowers for maximum effect. Take a step back and admire your handiwork—you deserve it!
Also Read This: Don’t Give Up the Sheep on Dailymotion: Watch and Enjoy
8. Tips for Perfecting Your Ribbon Flowers
Mastering the art of ribbon flowers can take some practice, but with these handy tips, you’ll be well on your way to creating stunning blooms in no time!
- Choose Quality Ribbon: Invest in high-quality ribbon. Satin or silk ribbons often hold their shape better and provide a gorgeous sheen. Plus, they’re easier to work with!
- Practice Different Techniques: Experiment with various folding and looping techniques. Watch tutorials or read guides online to discover new styles that can enhance your flowers.
- Color Combinations: Don’t be afraid to play with color! Using contrasting or complementary colors can make your flowers pop. Try pairing a vibrant ribbon with a more muted shade for a striking effect.
Another great tip is to keep your workspace organized. Having all your materials at hand and neatly arranged can significantly improve your crafting experience. Here’s a quick checklist to keep handy:
| Item | Status |
|---|---|
| Ribbons | ✔️ |
| Hot glue gun | ✔️ |
| Scissors | ✔️ |
| Beads/Buttons | ✔️ |
Lastly, remember that practice makes perfect. Don’t be discouraged by initial attempts that don’t turn out as expected. Each flower you create is a step forward in your crafting journey, and with patience and creativity, you’ll soon be making ribbon flowers that will impress everyone around you!
Also Read This: Dailymotion Legality Is It Illegal or Safe to Use
9. Inspiration and Ideas for Using Ribbon Flowers
Ribbon flowers are not just a beautiful craft; they can be incredibly versatile! Whether you're creating them for a special occasion or just for fun, there are countless ways to incorporate these lovely embellishments into your life. Here are some creative ideas that might spark your imagination:
- Hair Accessories: Use ribbon flowers to create stunning hair clips, headbands, or barrettes. Imagine a lovely pastel ribbon flower adorning a simple hairpin—perfect for a wedding or a garden party!
- Gift Wrapping: Dress up your presents with handmade ribbon flowers. Attach them to the top of your wrapped gifts for an elegant touch that shows you care.
- Home Decor: Create beautiful arrangements of ribbon flowers in vases, or use them to decorate picture frames. They can brighten up any room and add a personal touch to your decor.
- Clothing Embellishments: Sew or glue ribbon flowers onto jackets, shirts, or bags to give them a unique flair. A small ribbon flower can transform a plain T-shirt into a chic statement piece.
- Weddings and Events: Use ribbon flowers in bouquets, centerpieces, or as decorative elements on tables. They’re a great way to add color and elegance to your special day without the hassle of wilting real flowers.
- Cards and Scrapbooking: Add a lovely touch to handmade cards or scrapbook pages. A few carefully placed ribbon flowers can enhance your designs and make them stand out.
Feeling inspired? Don’t hesitate to mix and match different ribbon styles, colors, and sizes to create your unique ribbon flowers. The possibilities are endless, and the only limit is your imagination!
10. Conclusion and Final Thoughts
Creating ribbon flowers is not just a delightful craft; it’s an opportunity to explore your creativity and produce beautiful items that can be used in so many ways. From enhancing your personal style to adding a touch of charm to gifts and home decor, these flowers can truly brighten up your surroundings.
Remember, the best part about making ribbon flowers is that there are no strict rules. Feel free to experiment with different techniques, colors, and materials. As you practice, you’ll develop your style and might even discover new applications for your creations!
As you embark on your ribbon flower journey, keep this in mind:
- Be Patient: Crafting takes time, and that's part of the fun. Don’t rush through the process; enjoy each step!
- Stay Inspired: Look for inspiration everywhere—nature, art, or even fashion magazines can provide great ideas.
- Share Your Creations: Don’t forget to share your beautiful ribbon flowers with friends or on social media. You might just inspire someone else to start their crafting journey!
So grab your ribbons, unleash your creativity, and have fun making ribbon flowers that reflect your unique style. Happy crafting!
 admin
admin


