Ever found yourself with amazing videos on your iPhone, just waiting to be shared with the world? Uploading videos to YouTube from your iPhone is super easy and can transform your personal moments into shared experiences. Whether it’s a family vacation, a cooking tutorial, or a funny pet video, YouTube is the perfect platform to showcase your creativity. In this guide, we’ll walk you through the simple steps to get your videos online and ready for your audience. Let’s dive in!
Preparing Your Video for Upload
Before hitting that upload button, it’s important to ensure your video is polished and ready for the world to see. Here are some key steps to prepare your video:
- Edit Your Video: Use a video editing app like iMovie or InShot. Trim unnecessary clips, add music, or include text overlays to enhance your video.
- Check Video Quality: Make sure your video is shot in at least 1080p. The better the quality, the more appealing it will be to viewers.
- Add a Thumbnail: A catchy thumbnail can make a huge difference in attracting viewers. Use a screenshot from your video or create a custom image that represents your content.
- Consider the Format: YouTube supports various formats, but MP4 is a safe bet. Ensure your video is saved in a compatible format before uploading.
Once your video is edited and saved, it’s time to think about the details of your upload:
- Title: Choose a descriptive and engaging title that captures the essence of your video. This helps with searchability!
- Description: Write a brief description that outlines what your video is about. Include keywords for better visibility.
- Tags: Use relevant tags that relate to your video content. This helps YouTube understand your video and recommend it to viewers.
Finally, ensure you have a stable internet connection for a smooth upload experience. With everything set and ready, you’re just a few taps away from sharing your masterpiece with the world. Happy uploading!
Also Read This: Understanding YouTube Impressions: What They Are and How They Work
3. Step-by-Step Guide to Uploading Videos on YouTube from iPhone
So, you’ve captured some amazing videos on your iPhone and can’t wait to share them on YouTube? You’re in luck! Uploading your videos is easier than you might think. Follow this simple step-by-step guide to get your content out there:
- Open the YouTube App: Start by launching the YouTube app on your iPhone. If you don’t have it installed yet, you can download it from the App Store.
- Sign In: Make sure you’re signed in to your YouTube account. If you don’t have an account, you can create one through the app. Just tap on your profile picture at the top right corner, and select “Sign in.”
- Tap the Create Icon: Look for a little camera icon (or a plus sign) at the bottom center of the screen. This is your gateway to uploading content. Tap on it!
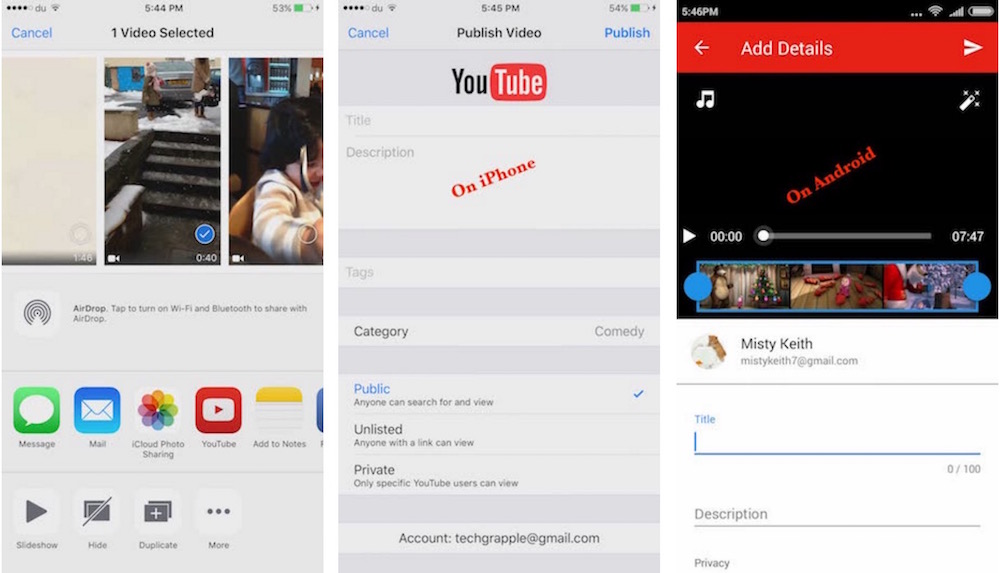
- Select Your Video: You’ll see options to either record a new video or select an existing one. To upload an existing video, tap on “Upload a video.” Your camera roll will open, allowing you to choose the desired video.
- Edit Your Video: Once you’ve selected a video, you can trim it, add music, or apply filters right within the app. Take a moment to make any quick edits that enhance your video.
- Add Details: Now it’s time to fill in your video’s details! Add a catchy title, a detailed description, and relevant tags. Make sure to use keywords that will help viewers find your content. You can also choose a thumbnail that represents your video well.
- Adjust Privacy Settings: Decide who can see your video. You can choose from public, unlisted, or private. For beginners, starting with ‘public’ might be the best way to go to reach a wider audience.
- Publish Your Video: Once everything looks good, hit the “Upload” or “Publish” button. YouTube will start processing your video, which may take a little time depending on the size and length.
- Share and Promote: After your video is live, don’t forget to share the link on social media or with friends. Encourage people to like, comment, and subscribe to your channel for future updates!
And that’s it! You’ve successfully uploaded your video from your iPhone to YouTube. Celebrate your accomplishment, and get ready for your viewers to enjoy your content!
Also Read This: What Is an End Screen on YouTube? How to Use Them to Enhance Your Channel
4. Troubleshooting Common Upload Issues
While uploading videos to YouTube from your iPhone is usually a smooth process, you might encounter a few hiccups along the way. Don’t worry; we’ve got you covered! Here are some common issues and how to troubleshoot them:
- Slow Upload Speeds: If your upload is taking forever, check your internet connection. A weak Wi-Fi signal can slow things down. Try moving closer to your router or switching to a different network. If you have mobile data, make sure it’s enabled and you have a strong signal.
- Video Size Limit: YouTube has a file size limit for uploads, which is currently 256 GB or 12 hours, whichever is less. If your video exceeds this, try trimming it using the editing tools available in the YouTube app or another video editing app before uploading.
- Unsupported Formats: Ensure your video is in a format that YouTube accepts, such as MP4, AVI, or MOV. If your video is in an unsupported format, use a video converter app to change it before uploading.
- App Crashing: If the YouTube app crashes while uploading, try restarting your iPhone and then re-opening the app. Updating the app to the latest version can also help fix bugs that may cause crashes.
- Login Issues: If you can’t log in to your YouTube account, double-check your credentials. If you’ve forgotten your password, use the “Forgot Password?” option to reset it.
By keeping these troubleshooting tips in mind, you’ll be well-prepared to tackle any issues that arise during your video uploads. Happy uploading!
Also Read This: How Many Hours of Video Are Uploaded to YouTube Every Minute?
5. Tips for Optimizing Your Video for YouTube
When it comes to uploading videos to YouTube, simply hitting that upload button isn't enough. To truly stand out in the vast sea of content, you need to optimize your video effectively. Here are some practical tips to help you get the most out of your uploads:
- Use a Catchy Title: Your title should be eye-catching and relevant. Consider using keywords that your audience might search for. For example, instead of just “Beach Day,” try “Epic Beach Day: Fun Activities and Tips!”
- Create an Engaging Thumbnail: Thumbnails are the first thing viewers see, so make them count! Use bright colors, readable text, and engaging images to attract clicks. Tools like Canva can help you design stunning thumbnails easily.
- Write a Compelling Description: In your video description, summarize what viewers can expect. Include relevant keywords and links to your social media or related videos. A well-crafted description can boost your video's visibility in search results.
- Use Tags Wisely: Tags help YouTube understand your content and categorize it appropriately. Use a mix of broad and specific tags. For instance, if your video is about baking, include tags like “baking,” “desserts,” and “easy recipes.”
- Engage with Your Audience: Ask viewers to like, comment, and subscribe! Engaging with your audience in the comments section can foster community and encourage more interaction with your videos.
Finally, don’t forget to promote your video on social media platforms, blogs, or websites. The more eyes on your content, the better chance you have of growing your audience. Experiment with different strategies and see what works best for your channel!
6. Conclusion and Final Thoughts
Uploading videos from your iPhone to YouTube can open up a world of creative expression and sharing with others. Whether you're showcasing your travel adventures, sharing tutorials, or documenting everyday life, the potential is limitless. But remember, it's not just about uploading; optimizing your content is key to reaching a larger audience.
As we’ve discussed, taking the extra time to enhance your video titles, descriptions, and thumbnails can make a significant difference. Don’t underestimate the power of a well-optimized video! It can mean the difference between a few views and going viral.
In conclusion, embrace the journey of creating and sharing videos. Be authentic, have fun, and don't hesitate to experiment with different styles and formats. Every upload is an opportunity to learn and grow. Happy filming, and may your YouTube channel flourish!
 admin
admin


