Changing your LinkedIn email address might seem like a small task, but it's essential for keeping your professional profile up-to-date. Whether you’ve switched jobs, updated your personal email, or just want to enhance your privacy, this guide will walk you through the steps to make the switch effortlessly. Let’s dive into the reasons you might consider changing your email and how to do it smoothly!
Why You Might Need to Change Your LinkedIn Email Address

There are several reasons why you might find yourself needing to change your LinkedIn email address. Understanding these reasons can help you maintain a professional online presence. Here are some common scenarios:
- Job Change: If you’ve transitioned to a new job, it’s a good idea to switch to your new work email to ensure your LinkedIn profile reflects your current position.
- Personal Email Updates: Maybe you’ve decided to move away from an old email account. This is especially common if you’re using a less professional-sounding address.
- Privacy Concerns: In today’s digital world, protecting your personal information is crucial. Switching to a more secure or less publicly visible email can enhance your privacy.
- Professional Networking: If you’re focused on building a personal brand, using a designated professional email can help keep your networking efforts organized.
- Access Issues: Sometimes, you may lose access to your previous email or it becomes compromised. In such cases, updating your email is necessary to regain control over your LinkedIn account.
Each of these reasons highlights the importance of keeping your LinkedIn account information current. Not only does it ensure that your connections can reach you, but it also maintains the integrity of your professional online presence. So, if you find yourself in any of these situations, it’s time to make that change!
Also Read This: How to Write Engaging LinkedIn Posts: Tips for Creating Impactful Content
3. Preparing to Change Your Email Address
Before diving into the actual process of changing your LinkedIn email address, it’s essential to prepare a bit. This ensures that you don’t run into any hiccups along the way. Here are some steps to consider:
- Verify Your Current Email: Make sure you can access the email address currently linked to your LinkedIn account. You'll need this for verification.
- Choose a New Email: Have a new email address ready! Whether it’s a professional address or a personal one, make sure it’s one you check regularly.
- Security First: Consider enabling two-factor authentication on your LinkedIn account if you haven’t already. This adds an extra layer of security when making changes.
- Update Your Contacts: Inform your network about your new email address, especially if it’s a significant change. This helps maintain clear communication.
- Check for Linked Accounts: If you use LinkedIn to sign in to other services, check how the email change might affect those integrations.
Once you’ve wrapped your head around these preparations, you’re ready to proceed. Preparation is key, and it can save you from potential issues later. Now, let’s get into the nitty-gritty of changing that email!
Also Read This: Creating a CV from LinkedIn: A Quick and Easy Guide
4. How to Change Your Email Address on LinkedIn
Changing your LinkedIn email address isn’t as daunting as it sounds! Just follow these simple steps, and you’ll be all set:
- Log In to Your Account: Start by logging into your LinkedIn account using your current email address. If you’re using a public or shared device, it’s wise to log out afterward for security.
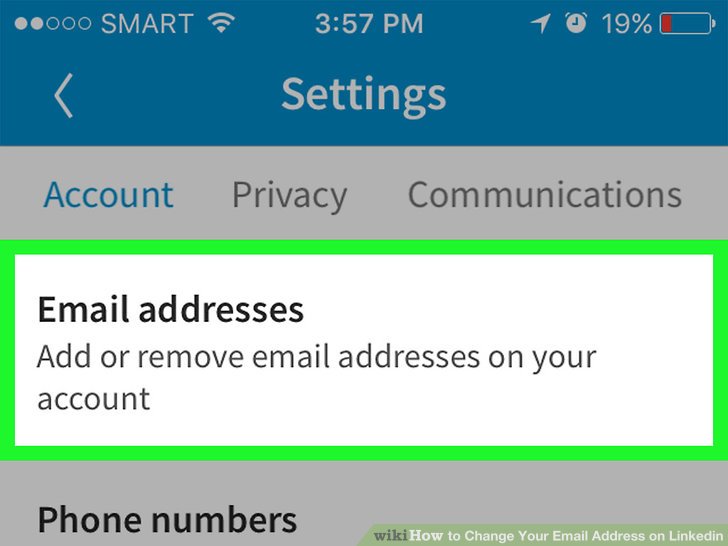
- Go to Settings & Privacy: Once you’re logged in, click on your profile picture located in the top right corner. From the dropdown menu, select “Settings & Privacy.”
- Access Account Settings: In the settings menu, look for “Account preferences” on the left sidebar. Click on it to reveal more options.
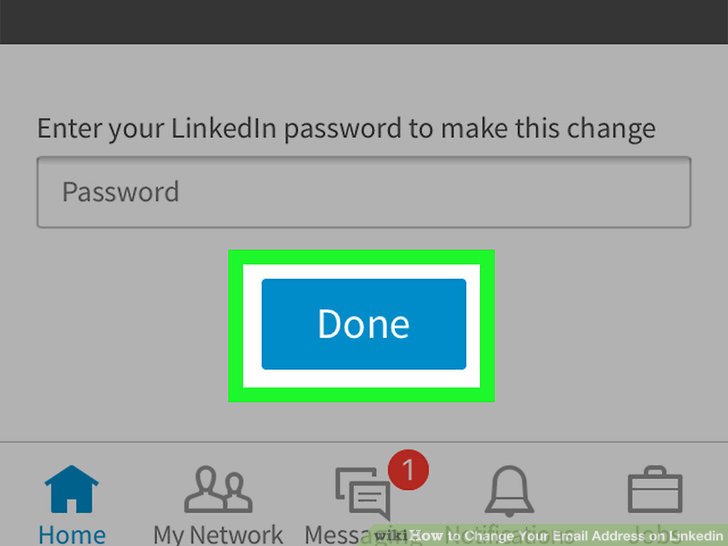
- Manage Your Email Addresses: Under the “Email addresses” section, you’ll see your current email address. Click on “Add email address” to input your new one.
- Verify Your New Email: After adding the new email address, LinkedIn will send a verification link to it. Check your inbox, find the email, and click the link to confirm the change.
- Make It Your Primary Email: Once verified, you can set your new email as the primary address. Simply return to the “Email addresses” section, select the new email, and look for the option to make it primary.
- Remove Old Email (Optional): If you wish, you can remove your old email address from your account. Make sure you’re comfortable with this change before proceeding.
And voilà! You've successfully changed your LinkedIn email address. It’s a straightforward process, but it’s good to take your time and ensure everything is done correctly. Keeping your contact information up to date is an easy way to maintain your professional network.
Also Read This: What Does 'Endorse' Mean on LinkedIn?
5. Verifying Your New Email Address
Alright, you've successfully changed your email address on LinkedIn! But hold on—there's one crucial step left: verifying your new email. This step ensures that you own the new email address and that all communications from LinkedIn will reach you without a hitch.
So, how do you verify your new email? It's super simple! Here’s what you need to do:
- Check your inbox: After you update your email, LinkedIn will send a verification email to your new address. If you don’t see it right away, make sure to check your spam or junk folder just in case it ends up there.
- Open the verification email: Look for an email from LinkedIn with a subject line like “Verify your new email address.”
- Click the verification link: Inside the email, you’ll find a big, friendly button or link that says something like “Verify Email” or “Confirm Your Email Address.” Click that, and you’re golden!
Once you click the link, you should receive a confirmation message on your LinkedIn account, letting you know that your new email address is now verified. Easy peasy, right?
If for some reason you don’t receive the verification email, don’t panic! Here are a couple of troubleshooting tips:
- Double-check the email address you entered. A small typo can send your emails to the wrong place!
- Resend the verification email. You can often find an option to resend the verification email in your LinkedIn settings.
- Consider using another email provider, just in case there are issues with the current one.
Once you verify your new email, you’re all set! Now you can receive LinkedIn notifications and messages directly to your new inbox. Let’s move on to the next step!
Also Read This: How to Hide Contact Information on LinkedIn: Privacy Tips
6. Updating Your Email Preferences and Notifications
Now that your new email address is verified, it’s time to customize your email preferences and notifications. This is your chance to control what emails you receive from LinkedIn, ensuring that your inbox stays organized and relevant!
Here’s how to update your email preferences:
- Log in to your LinkedIn account and click on your profile picture in the top right corner.
- Select “Settings & Privacy” from the dropdown menu. This is where all your account settings live.
- Navigate to the “Communications” tab. Here, you’ll find all the options related to email notifications and communication preferences.
Now, let’s break down some of the key options you can customize:
- Message Notifications: Choose whether you want to receive email notifications for messages, connection requests, and comments.
- Activity Notifications: Decide if you’d like to be informed about who’s viewed your profile, your posts’ interactions, and more.
- Job Alerts: If you’re on the job hunt, you can set preferences for job alert emails based on your interests. This can save you a ton of time!
After customizing your preferences, don’t forget to hit the “Save” button at the bottom of the page! This ensures all your chosen preferences are applied.
Lastly, consider the frequency of emails. If you prefer less clutter in your inbox, you can opt for a weekly summary instead of daily updates. It’s all about finding a balance that works for you!
And there you have it! You’ve successfully changed your LinkedIn email address, verified it, and tailored your email preferences to suit your needs. Now you’re ready to network like a pro!
Also Read This: How to Change the Banner on LinkedIn and Improve Your Profile’s Visual Appeal
7. Troubleshooting Common Issues
Changing your LinkedIn email address should ideally be a smooth process, but sometimes, things can go awry! Here are some common issues users face and how to troubleshoot them:
- Email Not Recognized: If LinkedIn does not recognize your new email address, ensure that you’ve typed it correctly. Double-check for any typos or extra spaces!
- Verification Email Not Received: Sometimes, the verification email ends up in your spam or junk folder. Check there first! If it’s not there, try resending the verification email from your LinkedIn settings.
- Old Email Still Active: If your old email address is still active, make sure you have confirmed the new email. LinkedIn requires verification before making the change permanent.
- Login Problems: If you're having trouble logging in after changing your email, use the old email to log in first. Once logged in, you can update the email again or reset your password if needed.
If you encounter any error messages during the process, take note of them. A quick search of the specific error can often lead you to solutions that other users have found helpful. Additionally, LinkedIn's Help Center is a fantastic resource for troubleshooting specific problems.
Lastly, if you’re still stuck, don’t hesitate to contact LinkedIn support. They can provide assistance tailored to your situation. Remember, it's okay to ask for help when you're navigating online platforms!
8. Conclusion
Changing your LinkedIn email address is an essential task that helps keep your professional profile up-to-date and secure. Whether you're switching to a new email for better access or simply to consolidate your accounts, following the steps outlined in this guide can help you achieve this with minimal hassle.
Here’s a quick recap of the process:
- Log into your LinkedIn account.
- Navigate to your settings and find the email section.
- Add your new email and confirm it.
- Verify the change through the email sent to your new address.
By taking the time to properly manage your email settings, you ensure that you receive all important notifications and stay connected with your network. Remember, a well-maintained LinkedIn profile reflects professionalism and attention to detail!
So, what are you waiting for? Go ahead and make that change! And if you ever run into any hurdles, just refer back to this guide. Happy networking!
 admin
admin