TIFF, or Tagged Image File Format, is a popular choice for photographers and graphic designers alike. Known for its high quality and flexibility, TIFF files can store multiple layers, making them ideal for editing. Unlike compressed formats like JPEG, TIFF maintains image integrity, ensuring that every detail remains sharp and vibrant. Whether you’re working on a high-resolution photograph or a complex graphic, understanding TIFF images is the first step in maximizing your workflow. Let’s dive deeper into what makes TIFF so special!
Why Edit TIFF Images?
Editing TIFF images offers numerous advantages, particularly for professionals in the visual arts. Here are some compelling reasons to consider:
- Lossless Compression: TIFF files utilize lossless compression, meaning your images retain their original quality even after multiple edits. This is crucial for photographers who want to preserve the integrity of their work.
- Layer Support: TIFF can store layers, much like PSD files in Photoshop. This feature allows for non-destructive editing, letting you tweak adjustments without losing your original image.
- Wide Color Depth: TIFF files can store images in various color depths, from 8-bit to 32-bit. This allows for vibrant colors and smooth gradients, making your images come alive.
- Compatibility: Most editing software, including Adobe Photoshop, GIMP, and CorelDRAW, support TIFF files. This wide compatibility ensures you can work across different platforms without a hitch.
- Archiving: If you’re looking to archive your work, TIFF is an excellent choice. Its ability to handle large amounts of data while preserving quality makes it perfect for long-term storage.
Moreover, editing TIFF images can enhance your creative process. With the right tools, you can:
- Adjust Exposure and Contrast: Fine-tune your images to achieve the perfect lighting, bringing out textures and details.
- Apply Filters and Effects: Experiment with various artistic effects to give your images a unique flair.
- Combine Multiple Images: Create stunning composites by layering different TIFF files for a truly original piece.
Ultimately, editing TIFF images not only helps in producing high-quality results but also liberates your creativity. The flexibility and robustness of TIFF files empower you to create stunning visuals that stand out, whether for professional projects or personal enjoyment. So, if you haven't explored TIFF editing yet, now's the perfect time to dive in!
Also Read This: How to Remove About Section in LinkedIn Profile Customizing Your Summary
3. Tools You Can Use for Editing TIFF Images
When it comes to editing TIFF images, having the right tools can make all the difference. Fortunately, there are plenty of options available, catering to everyone from casual users to professional photographers. Here are some of the top tools you can use:
- Adobe Photoshop: This is the gold standard for image editing. With its powerful features, you can easily edit TIFF files, apply filters, and manipulate layers to create stunning visuals.
- GIMP: A free and open-source alternative to Photoshop, GIMP offers a robust set of features for editing TIFF images. It might take a little time to learn, but it’s a fantastic option for those on a budget.
- Corel PaintShop Pro: This user-friendly software provides a comprehensive toolkit for editing TIFF images. It includes features like photo correction, creative effects, and an easy-to-navigate interface.
- Affinity Photo: Known for its affordability and professional capabilities, Affinity Photo is a great choice for serious photographers. It supports TIFF editing and boasts an array of advanced features.
- Paint.NET: While more basic than some of the others on this list, Paint.NET is a solid choice for quick edits. It’s lightweight and ideal for beginners who want to make simple adjustments to their TIFF files.
- Online Editors: Websites like Pixlr and Fotor allow you to edit TIFF images directly in your browser. These can be handy for quick edits when you don’t want to install software.
Choosing the right tool depends on your specific needs, budget, and level of expertise. If you’re just starting out, online editors or programs like GIMP might be your best bet. But if you’re looking to dive deep into image editing, investing in software like Photoshop or Affinity Photo could be worthwhile.
Also Read This: How to Change Image Aspect Ratio
4. Step-by-Step Guide to Editing TIFF Images
Editing TIFF images might seem daunting at first, but with the right approach, it can be a breeze! Here’s a step-by-step guide to help you navigate the process:
- Open Your TIFF Image: Start by launching your chosen editing software. Navigate to the "File" menu and select "Open." Locate your TIFF file and click "Open" to import it into the editor.
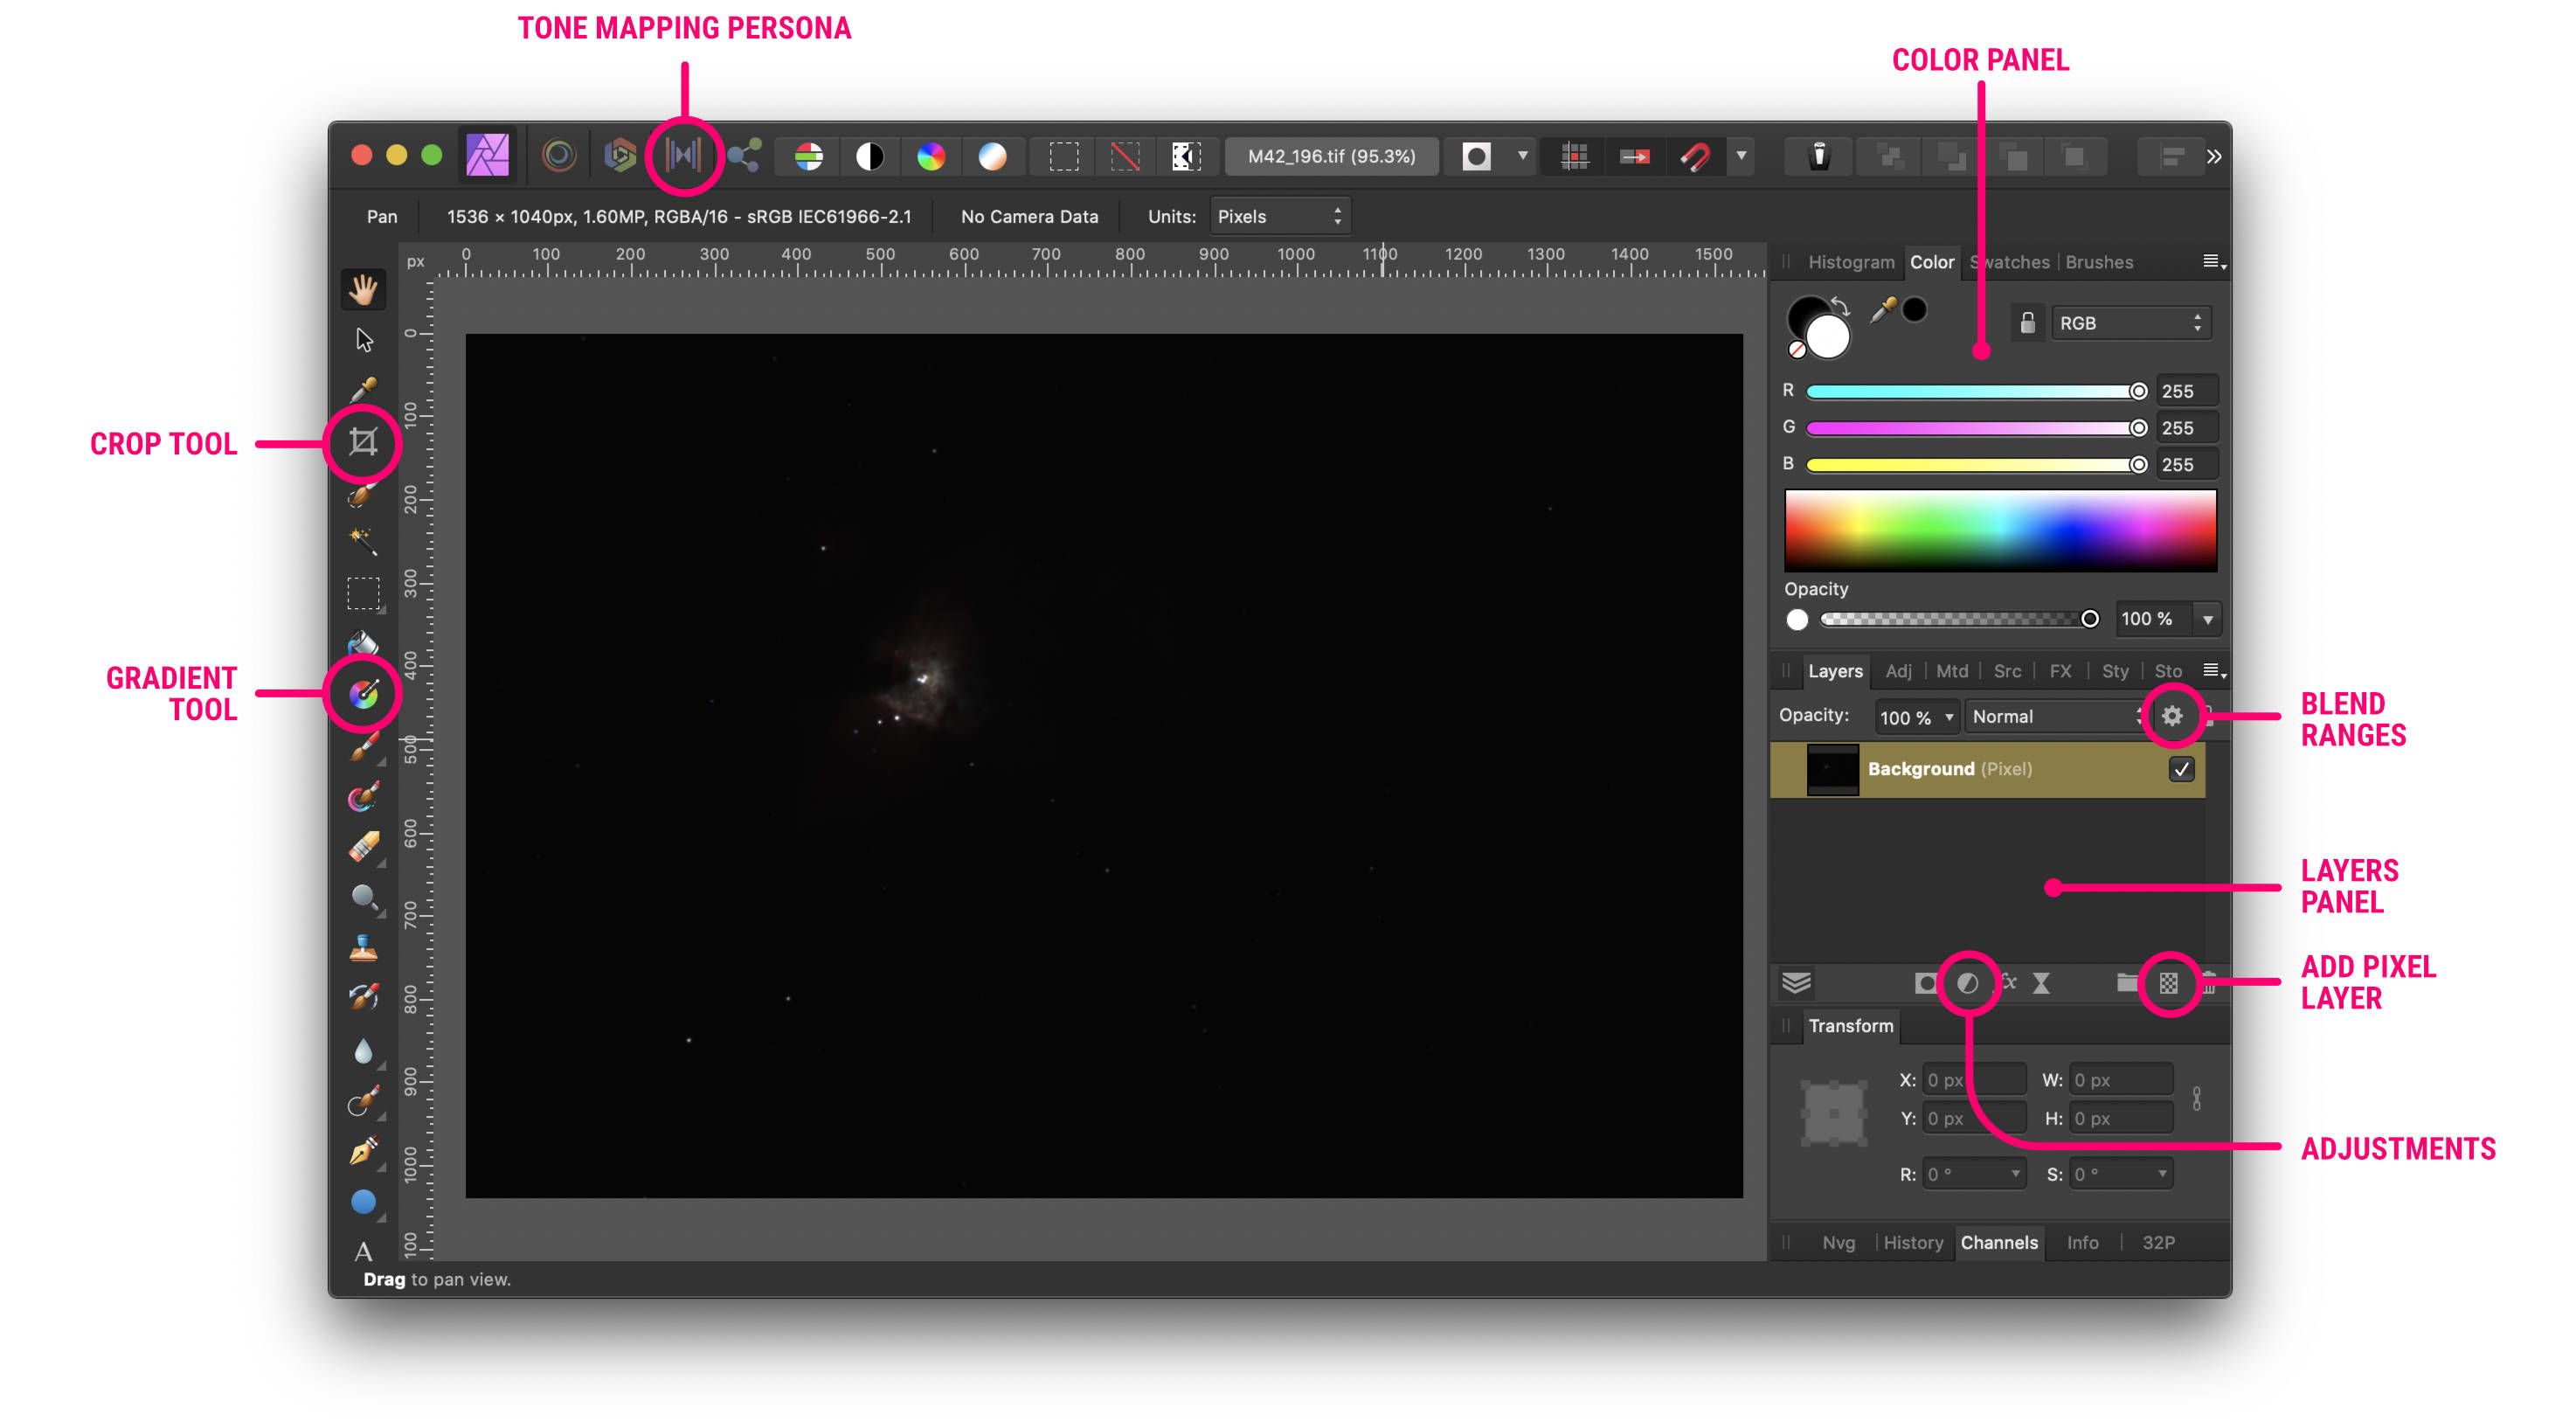
- Familiarize Yourself with the Interface: Take a moment to explore the tools available. Most editors will have panels for layers, adjustments, and tools. Understanding where everything is will speed up the editing process.
- Adjust the Image Size: If necessary, resize your image by going to the "Image" menu and selecting "Image Size" or "Resize." Input your desired dimensions while maintaining the aspect ratio to avoid distortion.
- Make Color Adjustments: Use the "Adjustments" menu to modify brightness, contrast, saturation, and other color settings. For example, increasing saturation can make colors pop, while adjusting brightness can enhance details.
- Crop and Rotate: If you want to focus on a specific part of the image, use the crop tool. Select the area you want to keep and apply the crop. Don't forget to rotate if the image needs alignment!
- Apply Filters and Effects: Experiment with filters to add creative touches. Look for options like sharpening, blurring, or artistic effects that complement your image.
- Save Your Edits: Once you’re satisfied with your changes, save the file. Go to "File" and choose "Save As." Make sure to keep it in TIFF format if you want to maintain high quality. You can also save a copy in a different format like JPEG if needed.
And that’s it! You’ve successfully edited a TIFF image. Remember, practice makes perfect, so don’t hesitate to experiment with different tools and settings. Happy editing!
Also Read This: How to Remove Colors from an Image
5. Common Issues When Editing TIFF Images
Editing TIFF images can be a fantastic experience, but like anything, it comes with its set of challenges. Here are some common issues you might encounter:
- File Size Woes: TIFF files are known for their high quality, but this often translates to large file sizes. This can slow down your editing software or even fill up your hard drive quickly. If you're working with multiple TIFF files, consider using a more powerful computer or external storage solutions.
- Software Compatibility: Not all image editors support TIFF files equally. Some might not handle layers as well as others or may have trouble with color profiles. It's crucial to choose software that is well-suited for TIFF editing, like Adobe Photoshop or GIMP.
- Color Management Problems: TIFF files support multiple color spaces, which can lead to confusion during editing. If you're not careful, you might end up with color shifts when you save your images. Always check your color settings and make sure your software is set to the right color profile.
- Layer Issues: If you're working with layered TIFF files, you might run into issues if your editing software doesn’t support all the layers correctly. When saving, make sure to preserve the layers if you plan to edit them later, or flatten them if you want a final image that’s ready to go.
- Loss of Quality: While TIFF is a lossless format, certain actions can inadvertently reduce image quality. For instance, repeatedly saving a TIFF file without preserving its original quality can lead to pixelation or artifacts. Be mindful of how you save your work!
By being aware of these common issues, you can navigate the world of TIFF editing with greater ease. Knowing what pitfalls to look out for will save you time and frustration. Now, let's move on to how to save your edited TIFF images properly!
6. Best Practices for Saving Edited TIFF Images
Saving your edited TIFF images correctly is just as important as the editing process itself. Here are some best practices to ensure your images remain high quality and ready for use:
- Use Proper Compression: While TIFF is primarily a lossless format, you have options for compression. Consider using LZW (Lempel-Ziv-Welch) or ZIP compression. These methods will reduce file size without sacrificing quality, making it easier to store and share your images.
- Maintain Original Files: Always save a copy of the original TIFF file before making edits. This way, you have a fallback if you need to revert to the original state or if your edits don’t turn out as expected.
- Flatten Layers When Necessary: If you’re sure you won’t need to edit the layers again, flattening your image can significantly reduce file size and simplify the saving process. Just remember that this makes it impossible to go back and edit those individual layers later!
- Choose the Right Color Profile: When saving, pay attention to the color profile. If you're printing, use CMYK; for web use, RGB is usually best. This helps ensure your images look the way you expect them to across different mediums.
- Consider File Naming Conventions: Use clear and descriptive file names that indicate the version or specific edits made. This practice can save you time when searching for files later, especially if you’re working on multiple projects.
By implementing these best practices, you can ensure that your edited TIFF images are stored safely and maintain their quality for future use. Happy editing!
 admin
admin


