YouTube is a treasure trove of videos, but have you ever wondered how it manages to deliver such smooth playback across countless devices? One key player in this process is audio compression. Understanding YouTube audio compression helps us appreciate the balance between file size and sound quality. In this post, we'll dive into how this compression works and why it matters for your listening experience. So, grab your headphones, and let’s explore!
How YouTube Compresses Audio Files
YouTube employs a variety of techniques to compress audio files efficiently. This allows it to serve millions of users simultaneously without compromising too much on sound quality. Here’s how it works:
- Audio Formats: YouTube primarily uses AAC (Advanced Audio Codec) because it's efficient at compressing audio while retaining quality. AAC is widely supported and works well across different devices.
- Bitrate Adjustment: YouTube adjusts the bitrate depending on the user's internet connection and device. This means that if you're on a slower connection, you might get a lower bitrate, which reduces the data transmitted but can slightly affect audio quality.
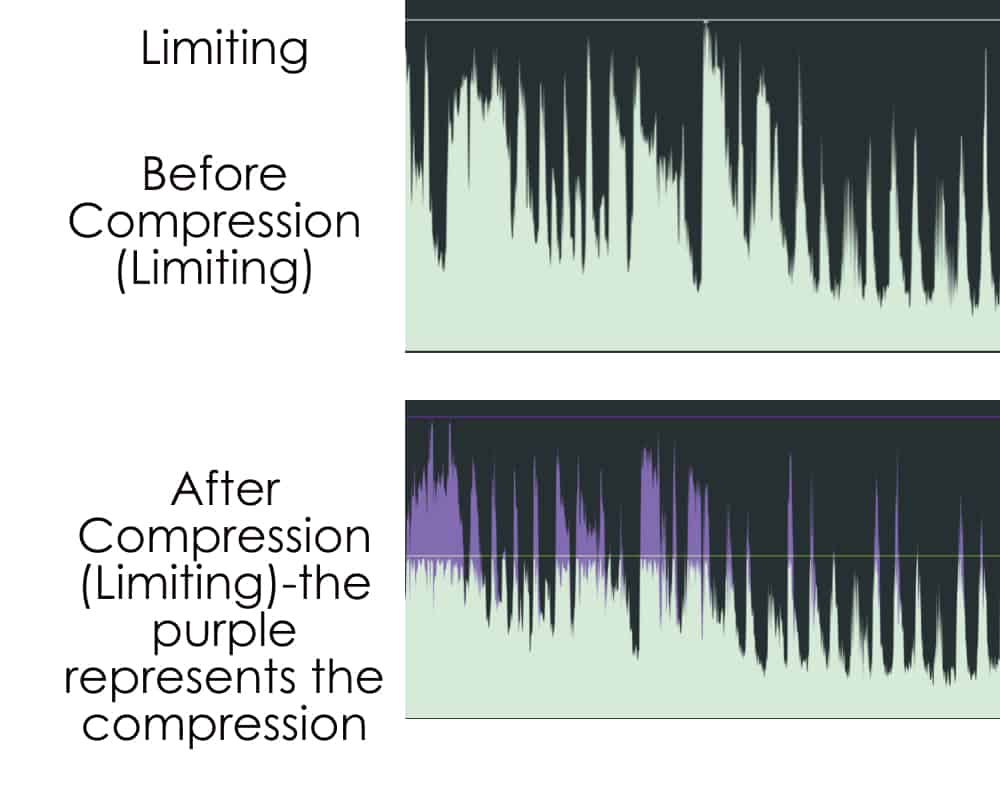
- Dynamic Range Compression: This technique reduces the volume of the loudest parts of the audio and raises the quieter ones. It makes the overall sound more consistent, ensuring that soft and loud sounds are easier to hear without distorting the audio.
- Transcoding: When you upload a video, YouTube transcodes the audio into various formats and bitrates. This allows the platform to serve the best possible version to each user based on their playback device and connection speed.
Now, let's break down these techniques a bit more:
Audio Formats
YouTube's choice of AAC over MP3 or other formats is significant. While MP3 is still popular, AAC provides better sound quality at similar bitrates. This means that even with compression, your music or dialogue retains clarity, making it ideal for an array of content—from music videos to podcasts.
Bitrate Adjustment
Bitrate plays a crucial role in audio quality. High bitrate usually means better sound, but it also means larger file sizes. YouTube cleverly balances this by dynamically adjusting the bitrate. For instance:
| Connection Speed | Bitrate Example (kbps) |
|---|---|
| Slow (e.g., 1 Mbps) | 64 kbps |
| Moderate (e.g., 3 Mbps) | 128 kbps |
| Fast (e.g., 10 Mbps) | 192 kbps |
This adjustment ensures that users can still enjoy their content even if their internet connection fluctuates.
Dynamic Range Compression
This method is particularly useful for music. Imagine listening to a song where the chorus blasts at full volume, and the verses are barely audible. Dynamic range compression smooths out these peaks and troughs, giving you a more enjoyable listening experience without startling volume changes.
Transcoding
Finally, transcoding is like preparing a meal in different styles. When you upload a video, YouTube prepares multiple audio versions, allowing for optimal playback across various devices. Whether you’re on your phone, tablet, or desktop, you’ll get the best possible sound tailored to your situation.
In summary, YouTube's audio compression strategies are designed to make the most of your listening experience while managing massive amounts of data. By understanding how these processes work, we can appreciate the quality of sound we often take for granted! Stay tuned for more insights into the magical world of audio and video technology.
Also Read This: How Big Should YouTube Banners Be? A Complete Guide to Banner Dimensions
3. The Impact of Compression on Sound Quality
When we talk about audio compression, we're diving into a balance between sound quality and file size. You might wonder, "How does compressing audio affect what I hear?" Well, let's break it down!
In the world of digital audio, compression refers to the process of reducing the size of audio files. While this is essential for streaming platforms like YouTube to ensure smooth playback, it comes at a cost—sound quality. Here are a few key points to consider:
- Lossy vs. Lossless Compression: Most platforms, including YouTube, utilize lossy compression methods like AAC (Advanced Audio Codec). This means some audio data is permanently removed to decrease file size, which can lead to noticeable changes in quality. In contrast, lossless compression retains all audio data, providing a clearer sound at the expense of larger file sizes.
- Frequency Range: Compression often affects the frequency range of audio. High frequencies may get cut off, which can dull the crispness of vocals or the brightness of instruments. If you're an audiophile, you might notice that your favorite track sounds less vibrant than on a high-fidelity system.
- Dynamics and Detail: Compression can flatten dynamic range. This means the difference between loud and soft sounds becomes less pronounced. You might lose some of the emotional impact of a song, especially in genres like classical or jazz where dynamics are crucial.
So, what does this mean for you as a listener? If you're using earbuds or standard headphones, you might not notice the compression much. However, high-end audio systems or studio monitors will reveal those missing details and dynamics. It’s a trade-off that many viewers are willing to make for the convenience of streaming.
Ultimately, understanding the impact of compression helps you appreciate the music more. If you’re serious about sound quality, consider exploring lossless formats or higher-quality streaming options when possible. Your ears will thank you!
Also Read This: What Do Likes on YouTube Do for Your Channel and Videos?
4. Comparing YouTube Audio Quality to Other Platforms
With so many streaming platforms available today, it’s natural to wonder how YouTube stacks up against the competition when it comes to audio quality. From Spotify to Apple Music, each service has its strengths and weaknesses. Let’s take a closer look!
| Platform | Audio Quality | Compression Type | Bitrate |
|---|---|---|---|
| YouTube | Good (but compressed) | Lossy (AAC) | up to 256 kbps |
| Spotify | Very Good | Lossy (Ogg Vorbis) | up to 320 kbps (Premium) |
| Apple Music | Excellent | Lossless (ALAC) | up to 24-bit/192 kHz |
| Tidal | Exceptional | Lossless (FLAC) | up to 24-bit/192 kHz |
As you can see from the table, YouTube offers decent audio quality, but it's not the best out there. Platforms like Tidal and Apple Music lead the pack with lossless formats that provide superior audio fidelity. Here’s a quick rundown of what you can expect:
- YouTube: Great for casual listening and accessibility, but compression can lead to a loss in audio detail, especially in complex tracks.
- Spotify: Offers a good balance with its high bitrate for premium users. Many listeners find it sufficient for most genres.
- Apple Music: If you're an Apple user and value audio clarity, their lossless offerings are hard to beat.
- Tidal: For audiophiles, Tidal's HiFi plan is a game-changer, providing studio-quality sound.
Ultimately, the choice comes down to what you value in your listening experience. If sound quality is your top priority, exploring other platforms might be worth your while. However, if you enjoy the vast content and convenience of YouTube, you still get a solid auditory experience!
Also Read This: Where to Watch the Opening Ceremony of the Olympics on YouTube
5. Factors Influencing Audio Quality on YouTube
When it comes to uploading audio content to YouTube, several factors play a crucial role in determining the final audio quality. Understanding these elements can help creators make informed decisions and enhance the listening experience for their audience.
- Bitrate: The bitrate of your audio file significantly impacts quality. Higher bitrates generally result in better sound fidelity. YouTube recommends using a bitrate of at least 128 kbps for standard audio, but for high-quality music, consider going higher.
- File Format: The format you choose to upload can also affect audio quality. Formats like WAV or FLAC are uncompressed and offer superior quality compared to compressed formats like MP3. However, YouTube re-encodes uploaded files, so starting with a high-quality format is beneficial.
- Encoding Settings: The settings used during encoding, such as sample rate and depth, can influence quality. A sample rate of 44.1 kHz and a bit depth of 16 bits is standard for music, but opting for 24 bits can enhance dynamic range.
- Environment and Recording Quality: The initial recording conditions matter. A quiet, controlled environment with top-notch recording equipment will yield better results. Consider investing in a quality microphone and soundproofing your space.
- Compression Techniques: While audio compression can help manage file sizes, excessive compression can lead to loss of detail and dynamic range. Striking the right balance is key to maintaining audio integrity.
By paying attention to these factors, content creators can ensure that their audio stands out on YouTube, providing a richer experience for their viewers. Remember, quality matters, especially in a platform crowded with content!
6. Tips for Maximizing Audio Quality on YouTube
Maximizing audio quality on YouTube is essential for keeping your audience engaged. Here are some practical tips to help you achieve the best sound possible:
- Start with a High-Quality Source: Always use the highest quality audio files as your starting point. If you're uploading music, consider using lossless formats like WAV or FLAC to maintain sound integrity.
- Optimize Your Recording Setup: Invest in a good microphone and soundproof your space. A quality mic can make a world of difference, allowing your voice or instrument to shine through clearly.
- Use Proper Mixing Techniques: Before uploading, mix your audio properly. Balance levels, adjust EQ settings, and apply compression carefully to ensure that all elements of your audio are clear and well-defined.
- Check YouTube's Audio Standards: Familiarize yourself with YouTube's recommended audio specifications. This includes adhering to the recommended bitrates and file formats, which can prevent quality loss during the upload process.
- Test Before You Upload: Always listen to your audio on different devices (headphones, speakers, etc.) before uploading. This helps you catch any issues that may not be apparent on your primary setup.
- Utilize Audio Editing Software: Tools like Audacity or Adobe Audition can help refine your audio. Use them to enhance clarity, remove background noise, and apply effects judiciously.
Implementing these tips will not only improve the audio quality of your content but also enhance the overall viewer experience. Remember, sound is a powerful tool—don’t underestimate its impact!
 admin
admin


