Curling your hair with a straightener might sound a bit unconventional, but it's a fantastic technique that can give you beautiful, bouncy curls without the need for a curling iron. Whether you're getting ready for a special occasion or just want to switch up your everyday look, mastering this method can be a game-changer. In this guide, we'll walk you through everything you need to know to achieve stunning curls using a straightener. Let’s dive in and get those locks looking fabulous!
What You Need
Before you start curling, it's essential to gather all the necessary tools and products. Here's a comprehensive list to ensure you're fully prepared:
- Hair Straightener: A good-quality straightener with rounded edges works best. Look for one that heats up quickly and has adjustable temperature settings.
- Heat Protectant Spray: Protect your hair from heat damage by applying a heat protectant spray before you begin styling. This step is crucial for maintaining healthy hair.
- Brush or Comb: To detangle your hair before styling, use a brush or comb. Smooth hair is easier to curl.
- Hair Clips: These are handy for sectioning your hair. Working with smaller sections makes curling easier and more effective.
- Hair Spray: A light hold hair spray can help set your curls once you're done. It keeps your curls looking fresh throughout the day.
- Optional Accessories: A curling wand or pin curl clips can be used as alternatives if you want to experiment with different styles.
Once you have everything ready, you’ll be all set to start curling your hair like a pro!
Also Read This: Master the Art of Swinging a Cricket Ball with Dailymotion Guides
Preparing Your Hair
Before diving into the world of curling hair with a straightener, it's essential to prepare your hair properly. This step is crucial for achieving those beautiful, bouncy curls while also protecting your hair from heat damage. Here’s how to set your hair up for success:
- Wash and Condition: Start with clean, freshly washed hair. Use a moisturizing shampoo and a good conditioner to hydrate your locks. This helps in achieving a smooth finish.
- Dry Your Hair: Towel-dry your hair gently to remove excess water. Avoid rubbing too hard, as this can cause frizz. You can let it air dry or use a blow dryer. If using heat, make sure it’s on a low setting.
- Apply Heat Protectant: This is a non-negotiable step! Spritz a heat protectant spray evenly over your hair. This will shield your strands from the heat of the straightener, reducing the risk of damage.
- Detangle: Use a wide-tooth comb or a brush to remove any knots. Starting with smooth hair makes curling easier and ensures a polished look.
- Section Your Hair: Divide your hair into manageable sections. Typically, working with three to four sections is ideal. Use clips to hold them in place, allowing you to focus on one section at a time.
Also Read This: Creative Elsa Cake Tutorial on Dailymotion
Choosing the Right Straightener
When it comes to curling your hair with a straightener, selecting the right tool can make all the difference. Not all straighteners are created equal, so here’s what to look for:
| Feature | Why It Matters |
|---|---|
| Plate Material | Ceramic plates heat evenly and prevent hot spots, while titanium plates heat up quickly and provide more durability. |
| Plate Width | A 1-inch width is versatile and great for curls; wider plates are better for straightening. |
| Temperature Control | Having adjustable heat settings allows you to tailor the temperature to your hair type, reducing potential damage. |
| Weight and Design | Choosing a lightweight and ergonomic design can make the curling process more comfortable. |
By focusing on these features, you can ensure you have the right straightener to create stunning curls while keeping your hair healthy and vibrant!
Also Read This: How to Do Facial at Home Step by Step on Dailymotion: A Complete Guide to Skin Care
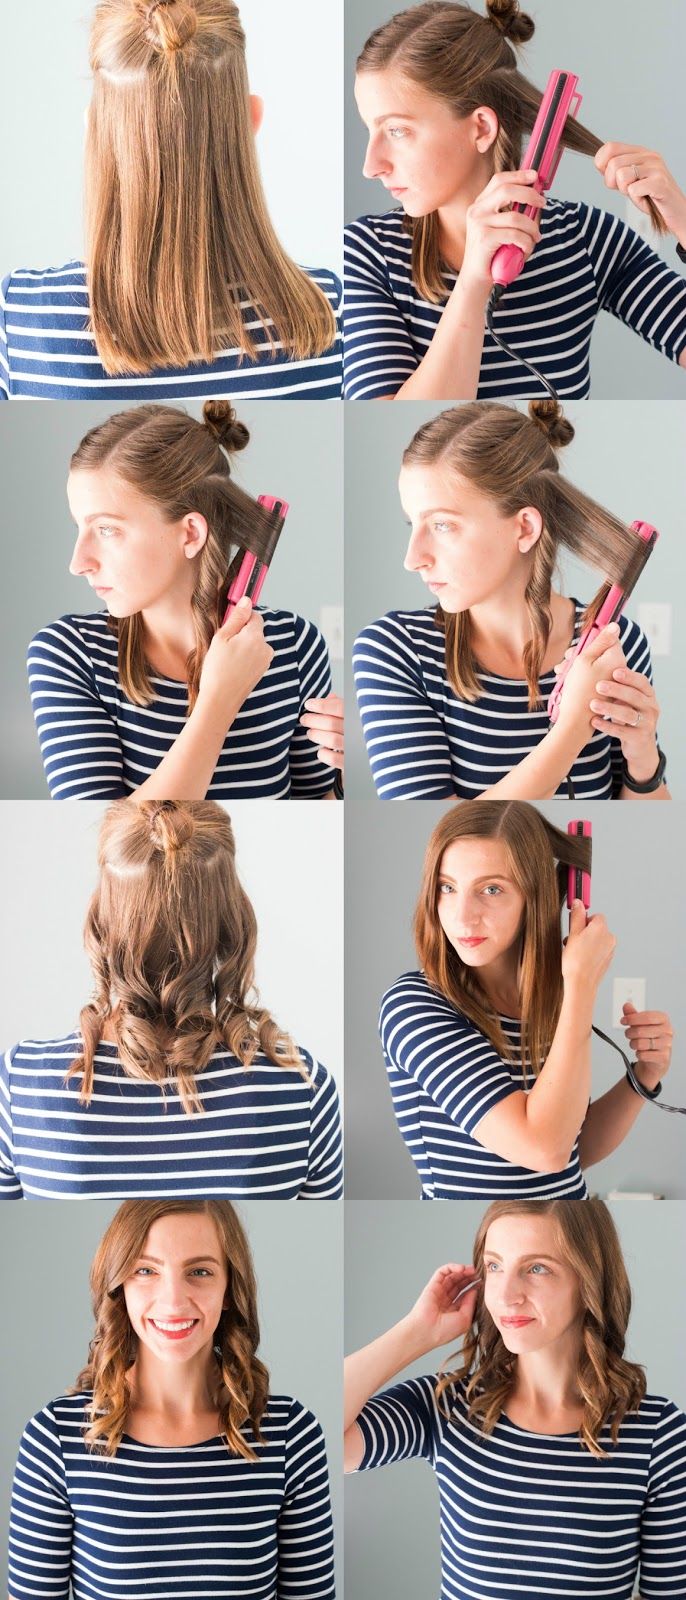
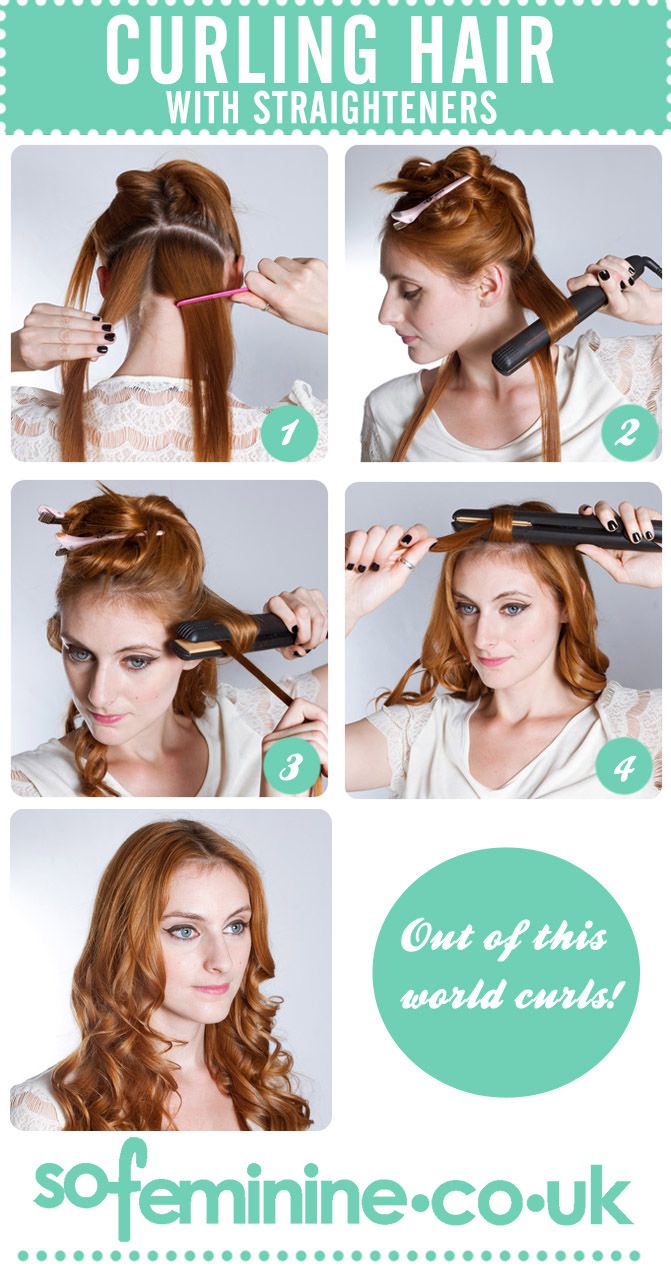
5. Step-by-Step Curling Technique
Ready to transform your straight locks into gorgeous curls? Let’s dive into the step-by-step technique of curling your hair with a straightener! Follow these simple instructions for beautiful, bouncy curls.
- Prep Your Hair: Start with clean, dry hair. Apply a heat protectant spray to shield your strands from heat damage. This step is crucial for maintaining hair health.
- Section Your Hair: Divide your hair into manageable sections. Use clips to hold back the upper layers, working with the bottom layers first. This will make curling easier and more efficient.
- Heat Up Your Straightener: Set your straightener to the right temperature. For fine hair, aim for around 300°F, while thicker hair can handle up to 400°F. Always remember, less is more; you can adjust if needed!
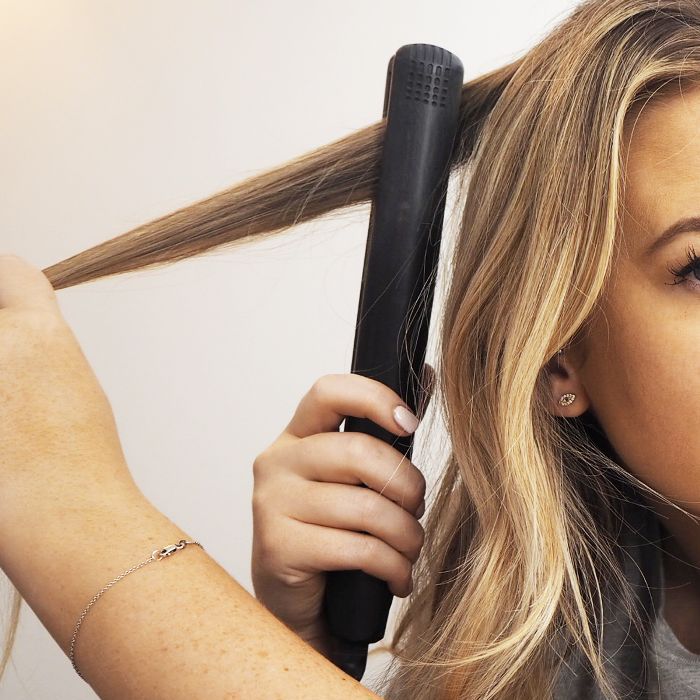
- Start Curling: Take a small section of hair (about 1 inch). Clamp the straightener around the hair about halfway down. Twist the straightener away from your face while pulling it down, creating a spiral effect.
- Hold and Release: Keep the hair wrapped around the straightener for a few seconds (3-5 seconds is usually good). Slowly release the hair and let the curl fall into your palm, holding it for a moment to set the shape.
- Repeat: Continue this process for all sections of your hair. Alternate the direction of curls for a more natural look.
And voila! You have beautiful curls using a straightener. Don't forget to finish off with a light hairspray to keep them intact!
Also Read This: Easy Newspaper Basket Craft with Detailed Steps
6. Tips for Long-Lasting Curls
Now that you've mastered the curling technique, let’s talk about how to make those curls last all day. Here are some tried-and-true tips to ensure your curls don’t fall flat!
- Use the Right Products: Start with a good heat protectant. After styling, apply a light hairspray or curl-enhancing spray to hold the curls without making them stiff.
- Cool Down Your Curls: Allow your curls to cool completely before touching them. This helps set the curl shape better and makes them last longer.
- Avoid Touching: Try not to run your fingers through your curls too much. The more you touch them, the more they’ll loosen up.
- Don’t Overlook Your Hair Type: Different hair types require different techniques. For example, fine hair benefits from lighter products, while thicker hair may need more hold. Experiment to find what works best for you!
- Sleep on It: If you want to prolong your curls, consider sleeping in a loose bun or braids. Use a silk or satin pillowcase to reduce friction.
By following these tips, you can enjoy beautiful curls that last from morning until night!
Step-by-Step Guide to Curling Hair with a Straightener on Dailymotion
Curling hair with a straightener might seem challenging, but it's a quick and versatile method that can give you beautiful curls and waves. Here’s a detailed guide to help you master this technique, along with tips on achieving salon-worthy results.
Before getting started, ensure you have the following tools:
- Hair Straightener: A quality straightener with rounded edges is ideal.
- Heat Protectant Spray: Protects your hair from heat damage.
- Hair Clips: For sectioning your hair.
- Comb or Brush: To detangle your hair.
Follow these simple steps:
- Prep Your Hair: Start with clean, dry hair. Apply heat protectant evenly.
- Section Your Hair: Divide your hair into manageable sections using clips. Typically, working with 1-inch sections is effective.
- Heat the Straightener: Set your straightener to a suitable temperature (around 300°F to 350°F for most hair types).
- Curling Technique:
Technique Instructions Classic Curl Clamp the hair, twist the straightener 180 degrees, and glide down the hair shaft. Beachy Wave Alternate twisting the straightener in different directions as you move down the hair. - Finish with Hairspray: Lightly mist your curls with hairspray to hold the shape.
With practice, you'll find that curling your hair with a straightener can be a fun and rewarding experience. The technique allows for multiple styles, from tight curls to loose waves, catering to any occasion.
Conclusion: Curling your hair with a straightener is not only easy but incredibly versatile, allowing you to achieve various styles with just one tool. By following this step-by-step guide, you can create stunning curls and waves that enhance your look and boost your confidence.
 admin
admin