Creating a paper car is not just an enjoyable craft; it’s a great way to unleash your creativity while honing your crafting skills. Whether you’re a child, a parent looking for fun activities, or a DIY enthusiast, making a paper car can be a delightful experience. In this guide, we’ll walk you through each step, making it easy for anyone to follow along. Grab your supplies, and let’s get started on this fun paper project!
Materials Needed
Before we dive into the crafting process, let’s gather all the materials you’ll need. Having everything on hand will ensure a smooth and enjoyable experience. Here’s a simple list to help you prepare:
- Colored Paper: Choose your favorite colors! Cardstock works best for durability.
- Scissors: A sharp pair will help you cut out shapes easily.
- Glue Stick or Tape: Use glue for a neater finish or tape for quick assembly.
- Pencil: For sketching out your car design before cutting.
- Markers or Crayons: To add designs, details, and colors to your car.
- Ruler: Handy for measuring and ensuring straight lines.
- Templates (optional): You can find printable templates online to guide your cuts.
With these materials at your disposal, you’re ready to embark on your paper car-making journey. Don’t hesitate to get creative with your designs—after all, the best part of crafting is making it your own!
Also Read This: Top Tips for Finding What to Watch on Dailymotion
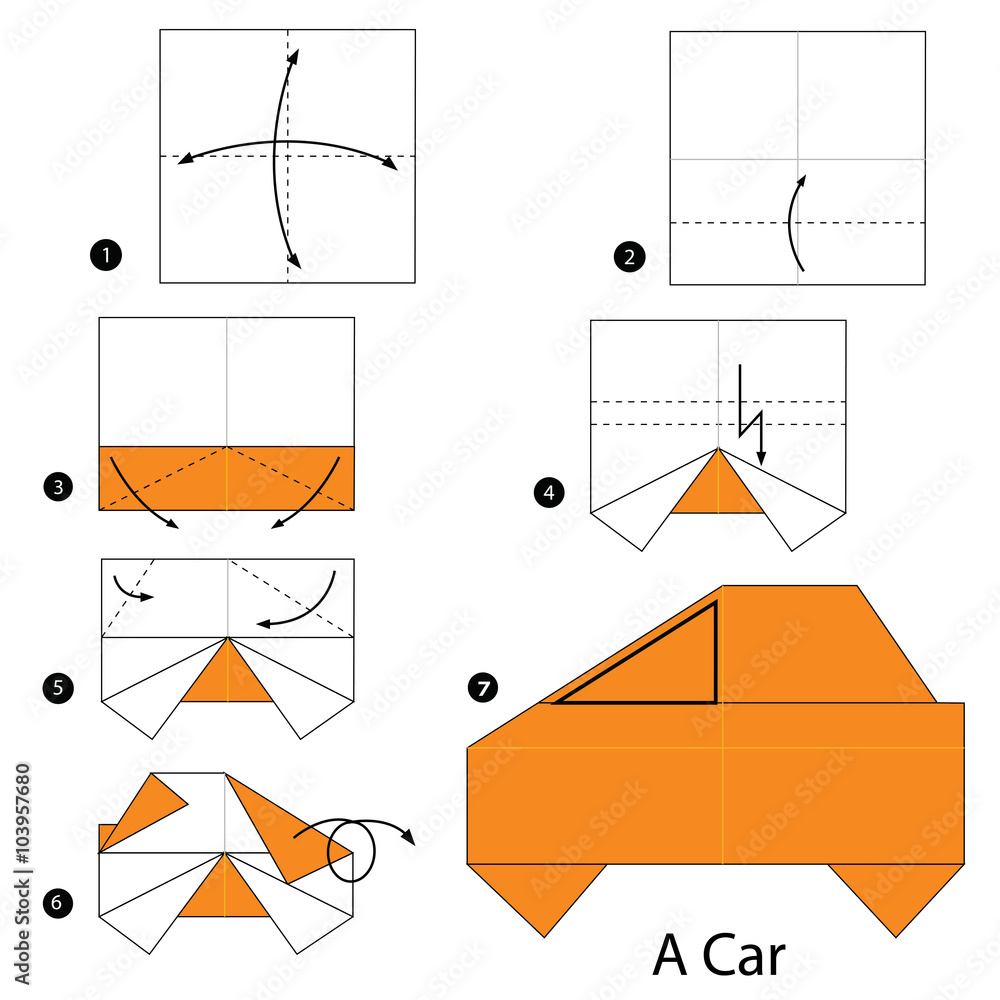
3. Step-by-Step Instructions
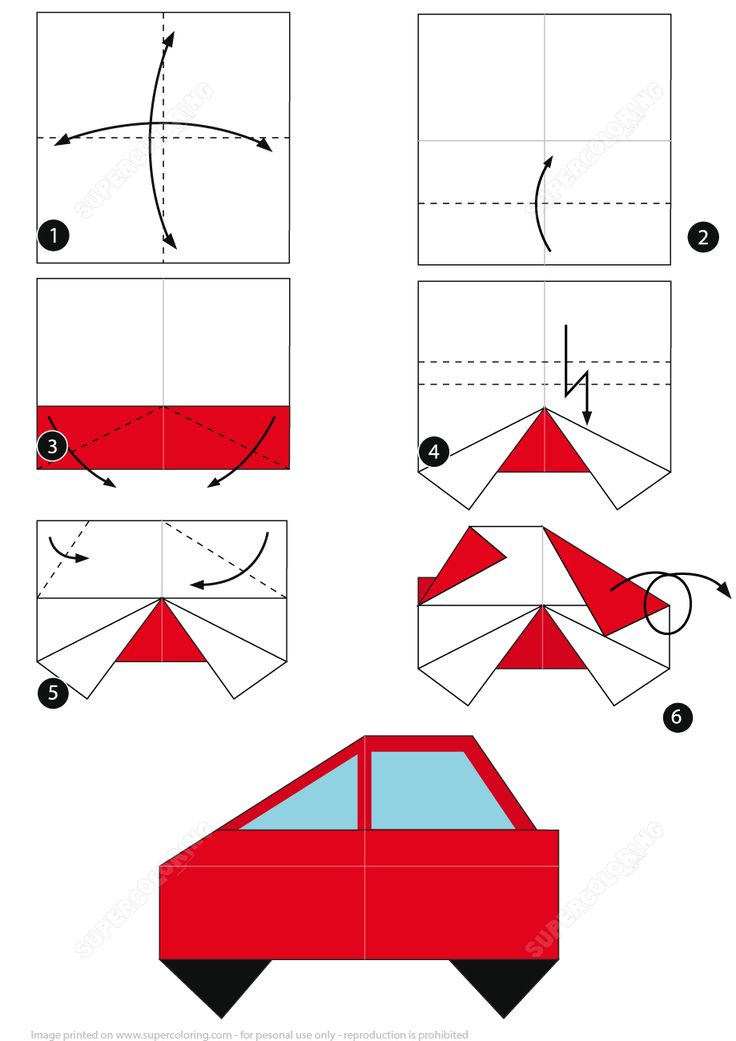
Making a paper car is a fun and creative project that anyone can enjoy. Let’s dive into the step-by-step instructions that will guide you through the process. Grab your materials, and let’s get started!
- Gather Your Materials: You’ll need colored paper, scissors, a ruler, a pencil, and glue. Optional items include markers for decoration and stickers for added flair.
- Draw the Car Body: Using the ruler, draw a rectangle on a piece of paper. A good size is about 10 inches long and 4 inches wide. This will be the main body of your car. Cut it out carefully.
- Create the Wheels: Draw four circles on another piece of paper. Each circle should be about 2 inches in diameter. Cut them out. These will be the wheels of your car.
- Attach the Wheels: Take your car body and fold the sides slightly upward to create a base for the wheels. Use glue to attach each wheel to the bottom corners of the car body. Make sure they are evenly spaced!
- Add Windows: Cut out two rectangles from a different colored paper for the car windows. Glue them onto the body where you want the windows to be. You can be creative with the shapes!
- Decorate Your Car: Use markers or stickers to add designs, numbers, or anything that reflects your personality. This is the fun part where you can really make the car unique!
And there you have it! Your very own paper car is ready to roll. Just remember to let the glue dry completely before playing with it.
Also Read This: How to Download Locked Videos from Dailymotion
4. Tips for Decoration
Now that you’ve built your paper car, it’s time to bring it to life with some decorations! Here are some tips to help you create a stunning masterpiece:
- Use Bright Colors: Choose vibrant colors for your car to make it stand out. Think about your favorite car colors—red, blue, or even neon shades!
- Add Racing Stripes: Use washi tape or cut strips of colored paper to create racing stripes on the body of the car. This adds a sporty look.
- Customize the License Plate: Create a small rectangle for the license plate. Write a funny or cool phrase on it, like “VROOOM” or your initials.
- Incorporate Stickers: Stickers can add fun elements like flames, stars, or cartoon characters. Pick ones that match the theme of your car!
- Draw the Details: Use markers to draw headlights, taillights, and other details. Adding shadows or highlights can also give your car a three-dimensional feel.
Remember, the goal is to express yourself and have fun with the decoration process. Let your creativity run wild, and don’t hesitate to try new ideas!
Also Read This: How to Watch a Private Video on Dailymotion: Access Restricted Content
5. Common Mistakes to Avoid
When making a paper car, even the smallest oversight can lead to a less-than-desirable end product. Here are some common mistakes that beginners often make—and how to avoid them.
- Skipping Measurements: It’s tempting to eyeball your cuts and folds, but this can lead to uneven parts. Always measure twice and cut once!
- Using the Wrong Type of Paper: Not all paper is created equal. Thin paper can tear easily, while very thick paper can be hard to fold. Use medium-weight paper, like cardstock, for durability and ease of handling.
- Poor Glue Application: Over-gluing can create a mess, while under-gluing can lead to parts falling off. Apply glue sparingly and ensure it covers the edges well.
- Not Allowing Enough Drying Time: Rushing to the next step before everything has dried can ruin your car’s structure. Give each glued part time to set before continuing.
- Ignoring Reinforcement: If you want your car to withstand the rigors of play, don’t forget to reinforce joints and corners with additional paper or tape.
By being mindful of these common pitfalls, you can ensure that your paper car turns out just as you envisioned!
6. Conclusion
Creating a paper car is not just a fun craft; it's an opportunity to unleash your creativity and enjoy some quality time, whether alone or with family. As we've seen, the process is straightforward, but attention to detail is key to achieving the best results.
In summary, here’s what you need to remember:
- Choose the right materials to ensure durability.
- Follow the steps carefully, and don’t rush through the process.
- Have fun and don’t be afraid to experiment with designs and colors!
By avoiding common mistakes and incorporating your personal flair, you'll not only build an impressive paper car but also create a delightful experience that fosters creativity. So gather your supplies, let your imagination run wild, and start crafting!
 admin
admin


