Tying a tie might seem daunting at first, but with a little practice, it can become second nature. Whether you're dressing up for a formal event, a job interview, or just trying to add a touch of class to your everyday outfit, knowing how to tie a tie is an essential skill. In this guide, we'll walk you through various tie knots, each with its unique flair and purpose. Get ready to impress everyone with your new tying skills!
Types of Tie Knots

There are several types of tie knots you can choose from, and each serves a different purpose or style. Here’s a rundown of some popular tie knots you might consider:
- Four-in-Hand Knot
This is one of the most popular and easiest knots to tie. It's slightly asymmetrical, giving it a relaxed look that works well for both casual and formal occasions.
- Windsor Knot
The Windsor knot is a classic choice for formal events. It's larger and creates a symmetrical triangle, making it ideal for spread collar shirts.
- Half-Windsor Knot
A variation of the Windsor, this knot is smaller and easier to tie. It strikes a balance between elegance and simplicity, making it versatile for different situations.
- Bow Tie
A bow tie is a stylish alternative for a formal look. It's a bit trickier to tie but can add a unique touch to your outfit.
- Nicky Knot
This knot is less common but creates a beautiful, polished finish. It’s perfect for those looking to stand out at special events.
Each of these knots has its charm and can enhance your overall appearance. Experiment with them to find out which one suits your style the best!
Also Read This: How to Download Getty Images Without Watermark 2019 Version Updated Methods to Remove Watermark from Getty Images
3. Step-by-Step Guide to Tying a Basic Knot
Tying a tie might seem daunting, but once you get the hang of it, it’s a breeze! Let’s break it down into simple steps for the basic knot, which is perfect for everyday wear and classic occasions.
- Start with the Tie Around Your Neck: Drape the tie around your neck with the wide end on your right side, hanging longer than the narrow end on your left. This will give you enough material to work with.
- Cross the Wide End Over the Narrow End: Bring the wide end across the narrow end. This is where your knot begins.
- Wrap the Wide End Behind: Now, pull the wide end behind the narrow end and bring it back to the front.
- Make a Loop: Take the wide end and bring it up through the loop that’s around your neck. This is the pivotal moment where the magic happens!
- Thread it Through the Knot: Pull the wide end down through the knot you just created in front. This is what forms the actual knot.
- Adjust for Fit: Hold the narrow end while sliding the knot up to tighten it. Make it snug but comfortable against your collar.
- Final Touch: Adjust the tie as needed to ensure the wide end is hanging straight and even with the narrow end.
And there you have it! A perfectly tied basic knot that’s ready for any occasion, from business meetings to weddings. With a little practice, you’ll be tying your tie like a pro!
Also Read This: Benefits of Affordable Plans on Imago Images for Small Businesses
4. Visual Instructions with Images
Sometimes, seeing is believing! To complement our step-by-step guide, let’s dive into some visual instructions that will make tying a tie even easier. Below are images that correspond to each step of the process:
| Step | Image | Description |
|---|---|---|
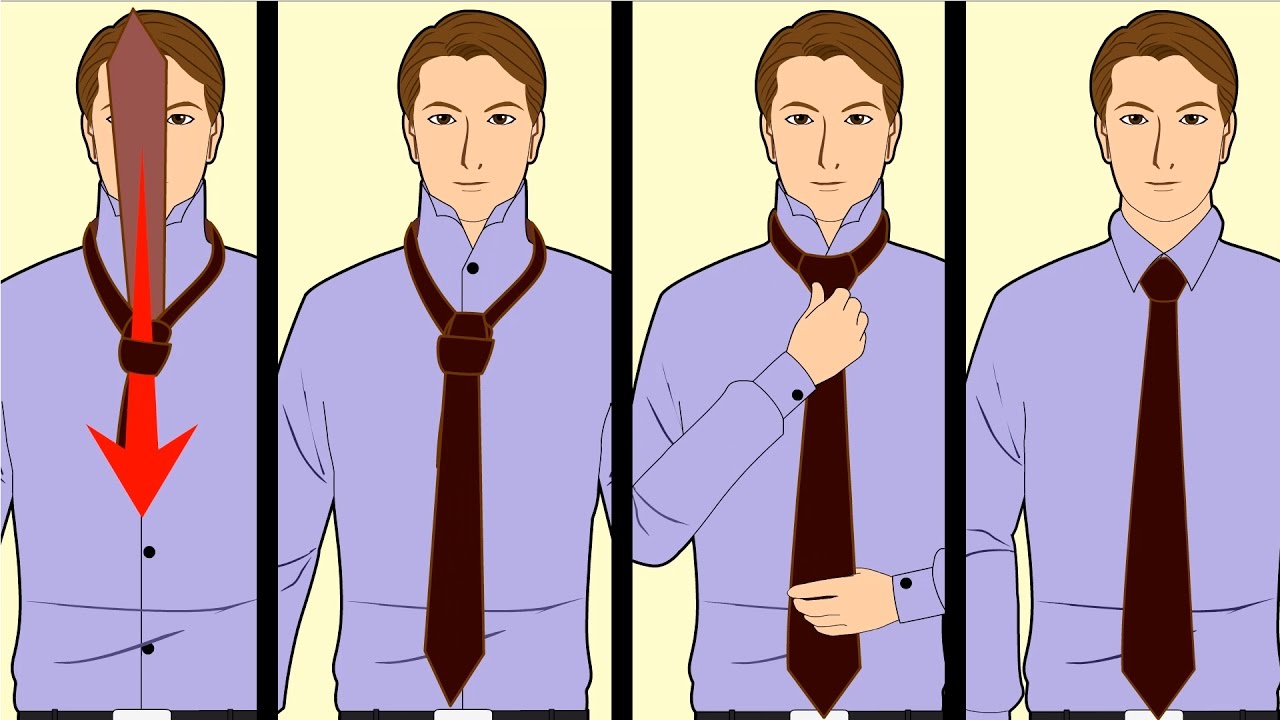
| 1 |  |
Drape the tie around your neck, with the wide end on the right. |
| 2 |  |
Cross the wide end over the narrow end. |
| 3 |  |
Wrap the wide end behind the narrow end. |
| 4 |  |
Make a loop by bringing the wide end up through the neck loop. |
| 5 |  |
Thread the wide end down through the knot in front. |
| 6 |  |
Adjust the knot by holding the narrow end and sliding. |
These images should help reinforce the steps and ensure you have a clear visual guide. Happy tying!
Also Read This: How to Download a Specific Portion of a Dailymotion Video
Common Mistakes to Avoid
Tying a tie can seem straightforward, but many people make common mistakes that can lead to an unkempt look or uncomfortable fit. Here are some pitfalls to watch out for:
- Using the Wrong Knot: Different occasions call for different knots. For example, the Windsor knot is great for formal events, while the Four-in-Hand is more casual. Make sure to choose appropriately!
- Not Adjusting the Length: A common mistake is not adjusting the tie length correctly. The tip of the tie should ideally rest just above your belt buckle. If it’s too long or too short, it can look sloppy.
- Ignoring the Collar Type: The width and type of your shirt collar can affect how your tie looks. A narrow tie may not suit a wide collar, and vice versa. Always match your tie to your shirt!
- Forgetting to Check the Mirror: After tying your tie, always check in the mirror. Look for any unevenness, twists, or misalignments before heading out.
- Overtightening or Undercutting: Finding the right balance is key. An overly tight tie can cause discomfort, while a loose one can look unprofessional. Adjust it to fit snugly but comfortably around your neck.
Conclusion and Additional Resources
Congratulations on mastering the art of tying a tie! With practice, it will become second nature, adding a touch of sophistication to your outfit. Remember, the right knot can elevate your style and confidence. As you continue your journey, here are some additional resources to help:
| Resource | Description |
|---|---|
| Tie-a-Tie.net | A comprehensive guide with step-by-step instructions and videos for various knots. |
| YouTube Tutorials | Visual demonstrations for those who learn best through watching. |
| Gentleman's Gazette | Style tips and advice on how to choose ties and other accessories. |
Keep practicing, and soon you'll be a pro at tying ties for any occasion! Whether it’s for a job interview, a wedding, or just a night out, you'll always be ready to look your best.
 admin
admin


