When you're creating a presentation in Keynote, visuals play a crucial role in capturing your audience's attention. One of the simplest yet most effective ways to enhance your images is through cropping. Cropping isn’t just about cutting away parts of an image; it’s about focusing on what matters most, whether that’s highlighting important details or simply improving the overall composition. In this section, we’ll explore why image cropping is essential and how you can effectively use it in your Keynote presentations.
By mastering the art of cropping, you can:
- Improve Focus: Direct your audience’s attention to key elements.
- Enhance Aesthetics: Create a more balanced and visually appealing layout.
- Eliminate Clutter: Remove distractions that might detract from your message.
With just a few clicks, you can transform your images and make a lasting impression. Let’s dive into how you can easily access the image tool in Keynote to get started!
Accessing the Image Tool in Keynote
Getting started with image cropping in Keynote is a breeze! Here’s a step-by-step guide to help you access the image tool and begin your cropping journey.
- Open Your Presentation: Launch Keynote and open the presentation where you want to crop images.
- Select the Image: Click on the image you wish to crop. This action will activate the formatting options.
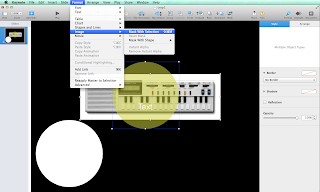
- Find the Image Tool: Look for the Format button on the top right corner. It resembles a paintbrush. Click it to reveal the formatting sidebar.
- Access the Image Options: In the sidebar, find the Image tab. Here, you’ll see various options related to the image.
Once you’ve accessed the image tool, you’ll notice a Crop button within the options. Clicking this will allow you to start cropping your image. Keynote makes it easy to adjust the cropping area with draggable handles. You can also maintain the aspect ratio by holding the Shift key while dragging.
So, whether you’re trimming down an image to focus on a specific subject or adjusting its size to fit your slide perfectly, Keynote's image tool has got you covered!
Also Read This: Here’s The Seamless Transfer Method to Copy Photos from Flickr to Computer
3. Steps to Crop an Image
Cropping an image in Keynote is a straightforward process that can enhance your presentation significantly. Here’s a step-by-step guide to get you started:
- Open Your Presentation: Launch Keynote and open the presentation containing the image you want to crop.
- Select the Image: Click on the image you wish to crop. A blue border will appear around it, indicating it’s selected.
- Access the Format Panel: On the right side of your screen, you’ll see the Format panel. If it’s not visible, go to the top menu and click on Format.
- Choose the Image Tab: In the Format panel, select the Image tab. This reveals various image editing options.
- Click on Crop: Look for the Crop option. Clicking it will display a cropping rectangle over your image.
- Adjust the Cropping Rectangle: Drag the corners or edges of the rectangle to crop the image to your desired size. You can also move the entire rectangle around to focus on different parts of the image.
- Apply the Crop: Once you’re happy with the adjustment, click Done in the Format panel to apply the crop.
And voila! Your image is now cropped. If you ever need to adjust it again, just select the image and repeat these steps!
Also Read This: Most Used Free Shutterstock Image Downloader Without Watermark
4. Using the Crop Tool Effectively

Mastering the crop tool in Keynote can elevate your presentations. Here are some effective tips to make the most out of it:
- Focus on Composition: When cropping, think about rule of thirds. Position your subject along the lines or at the intersections to create a more dynamic image.
- Maintain Aspect Ratio: If the image needs to fit a specific size, hold down the Shift key while dragging the corners. This keeps the aspect ratio intact.
- Experiment with Shapes: Besides standard cropping, consider using shapes. You can crop images into circles or other shapes by selecting the Mask with Shape option.
- Preview Before Finalizing: Always check your cropped image against the presentation’s background. Make sure it complements other content well.
- Use Undo: If something doesn’t look right, don’t hesitate to hit Command + Z. You can easily undo your last action!
By applying these tips, you can ensure that your images not only fit well in your slides but also enhance the overall aesthetic and message of your presentation.
Also Read This: how to rotate images on pages
5. Additional Editing Options for Images
Editing images in Keynote goes beyond just cropping. Once you’ve cropped your image, you can enhance it further using a variety of additional editing features. Here are some options you might want to explore:
- Adjusting Color: You can tweak the color settings to make your images pop. Keynote allows you to modify brightness, contrast, and saturation. Simply select the image, click on the “Format” button, and navigate to the “Image” tab to find these options.
- Adding Borders: Want to give your images a polished look? Adding a border can do just that. You can choose the color and thickness of the border for a customized appearance. This can be found under the “Style” tab in the Format sidebar.
- Applying Styles: Keynote provides pre-set styles that can add a professional touch to your images. You can find these styles under the “Image” tab. Simply click on a style to apply it instantly.
- Using Reflection and Shadows: For a more dynamic look, consider adding shadows or reflections. This feature can help your images stand out on the slide. Just head to the “Format” sidebar and explore the “Shadow” and “Reflection” options.
- Masking: If you want to get creative, use the masking option to shape your images into different forms. This feature allows you to create unique visual presentations that capture attention.
These additional editing options help you create stunning visuals that can elevate your Keynote presentations. Don't hesitate to experiment with these features to see what works best for your content!
Also Read This: Understanding the Unique Experience of YouTube Shorts Compared to Other Platforms
6. Saving and Exporting Your Cropped Image
Once you're satisfied with your cropped image in Keynote, it’s time to save and export it. This step is crucial, especially if you want to use the image outside of your Keynote presentation. Here’s how you can easily do it:
- Saving Your Presentation: First, always remember to save your Keynote presentation. Click on “File” in the menu bar and select “Save” or simply use the shortcut Command + S. This ensures that all your edits, including cropping, are preserved.
- Exporting as an Image: To export your cropped image, go to “File” > “Export To” > “Images.” You can choose to export the entire presentation or just the selected slide. If you're only interested in the cropped image, make sure you've selected the slide that contains it.
- Selecting Image Format: Keynote allows you to export your images in several formats, including PNG, JPEG, and TIFF. Choose the format that best suits your needs—PNG is great for high-quality images with transparency, while JPEG is usually smaller in size.
- Choosing Resolution: When exporting, you can also choose the resolution of the image. Higher resolutions are ideal for printing, while lower resolutions might be better for web use. Make sure to select the right option based on your intended use.
By following these steps, you can effortlessly save and export your cropped images, ensuring they’re ready for use in any project or presentation!
How to Crop Images in Keynote
Keynote is a powerful presentation software by Apple that allows users to create stunning presentations effortlessly. One of the essential features it offers is the ability to crop images, enabling you to focus on specific areas and enhance visual appeal. Here’s a step-by-step guide on how to crop images in Keynote.
Steps to Crop Images
Open Your Presentation: Launch Keynote and open the presentation where you want to crop an image.
Select the Image: Click on the image you wish to crop. A selection border will appear around it.
Access the Format Panel: Go to the right-hand side of the screen and click on the Format button.
Choose the Crop Tool: In the format panel, select the Image tab, then click on Crop.
Crop the Image: Drag the corners or sides of the cropping rectangle to adjust the crop. You can also reposition the image within the frame.
Apply the Crop: Once satisfied, click on Done in the format panel to apply the changes.
Tips for Best Practices
- Maintain Aspect Ratio: Hold down the Shift key while dragging to maintain the original aspect ratio.
- Use High-Resolution Images: Start with high-quality images to ensure clarity after cropping.
- Experiment: Don't hesitate to try different cropping styles for various visual effects.
In conclusion, cropping images in Keynote is a straightforward yet powerful tool that can significantly enhance your presentations. By following these steps and tips, you'll create visually appealing slides that effectively communicate your message.
 admin
admin