In today's professional landscape, your online presence is just as crucial as your in-person interactions. With LinkedIn being the go-to platform for networking, showcasing your professional achievements, and finding job opportunities, it's vital to make it easily accessible to your contacts. Adding your LinkedIn profile link to your email signature in Outlook is a simple yet effective way to enhance your visibility and provide a direct connection to your professional persona. Let's dive into how this small change can make a big difference!
Benefits of Adding LinkedIn to Your Email Signature
Integrating your LinkedIn profile into your email signature opens up a world of opportunities. Here are some compelling reasons to consider:
- Enhances Professional Image: Including your LinkedIn link presents you as tech-savvy and proactive in managing your professional relationships.
- Easy Networking: Recipients can quickly access your LinkedIn profile, making it easier for them to connect with you, view your recommendations, and understand your professional background.
- Increased Visibility: Each email you send becomes a potential networking opportunity. More people will view your profile, increasing the chances of being discovered for job opportunities or collaborations.
- Showcases Your Skills: Your LinkedIn profile can highlight your skills, endorsements, and accomplishments, offering a detailed overview that an email might not convey.
- Promotes Content Sharing: If you regularly share articles, insights, or updates on LinkedIn, having your link readily available encourages recipients to engage with your content.
In summary, adding your LinkedIn to your email signature not only promotes your profile but also reflects your commitment to professional growth and networking. It's a small yet impactful step that can lead to significant opportunities!
3. Step-by-Step Guide to Adding LinkedIn to Your Outlook Signature
Adding your LinkedIn profile to your Outlook email signature is a great way to enhance your professional presence. Here’s a straightforward guide to get you started:
- Open Outlook: Launch your Outlook application on your computer. If you're using Outlook Web, just log into your account.
- Access Signature Settings:
- For the desktop app, go to File > Options > Mail > Signatures.
- For Outlook Web, click on the gear icon in the top right corner, then select View all Outlook settings > Mail > Compose and reply.
- Create New Signature: Click on New to create a new signature. Name it something like “Professional Signature” for easy identification.
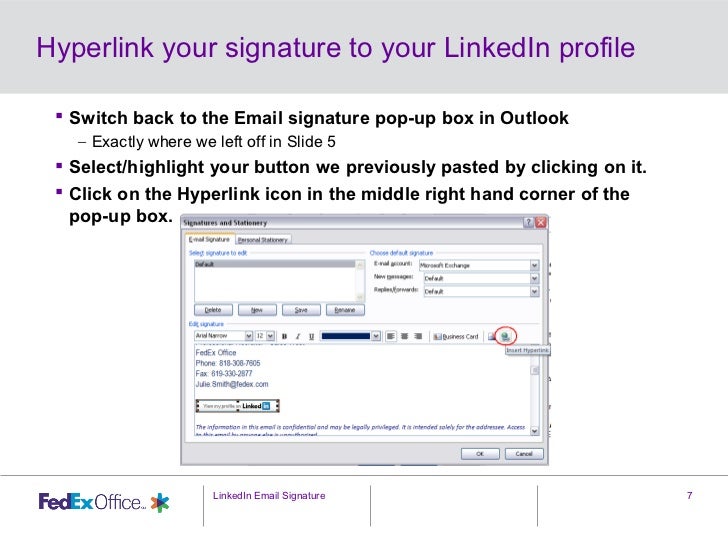
- Insert Your LinkedIn Link: In the signature editor, type in your LinkedIn URL (e.g., https://www.linkedin.com/in/yourprofile). You can highlight the text and use the link icon to hyperlink it.
- Format Your Signature: Add any additional information like your name, job title, and contact details. You can also use formatting options like bold or italics to make it visually appealing.
- Set Default Signature: If you want this signature to be your default for new emails or replies/forwards, select it from the dropdown menus.
- Save Changes: Click OK to save your signature settings, and you’re all set!
4. Customizing Your LinkedIn Link
Your LinkedIn link doesn’t have to be just a plain URL. Customizing it can make it more professional and visually appealing. Here are some tips on how to do that:
- Shorten Your URL: Use a URL shortener like Bitly or TinyURL to create a concise link that’s easy to share.
- Custom Text: Instead of displaying the full URL, hyperlink text like “Connect with me on LinkedIn” or “My LinkedIn Profile” in your signature. This approach looks cleaner.
- Use Icons: Adding a LinkedIn logo can make your signature stand out. You can find free icons on sites like Flaticon or IconFinder. Just upload the icon and hyperlink it to your profile.
- Test the Link: Always click on the link after customizing it to ensure it directs to your LinkedIn profile correctly.
By customizing your LinkedIn link, you not only enhance your signature’s professionalism but also encourage recipients to connect with you effortlessly.
5. Testing Your Email Signature
Once you’ve crafted the perfect email signature for your Outlook, it’s time to ensure it works as intended. Testing is crucial because it helps you catch any errors and guarantees that your LinkedIn link functions properly. Here’s how to do it:
- Send Yourself a Test Email: The simplest way to check your signature is to send a test email to yourself. This lets you see how it appears on both desktop and mobile versions.
- Check the LinkedIn Link: Make sure to click on the LinkedIn link in your signature. It should direct you to your profile without any issues.
- Review Formatting: Check for any formatting problems such as misaligned text, incorrect fonts, or broken images. Use different email clients if possible to see how it looks across platforms.
- Ask for Feedback: Consider sending the signature to a friend or colleague for a second opinion. Fresh eyes can catch mistakes you might overlook.
Remember, a polished signature reflects your professionalism! Taking these steps ensures your LinkedIn link is prominent and easy to access, enhancing your networking opportunities.
6. Conclusion
Adding LinkedIn to your email signature in Outlook is a fantastic way to enhance your professional image and make networking easier. By following the steps outlined, you can seamlessly incorporate your LinkedIn profile into your signature. Remember, a well-designed email signature not only conveys your contact information but also showcases your brand and invites connections.
In conclusion:
- It’s Easy: With just a few clicks, you can add your LinkedIn link.
- It’s Professional: A good signature boosts your credibility.
- It’s Effective: It opens doors to potential opportunities and connections.
So, why wait? Go ahead and make that change today. Happy networking!
 admin
admin