Adding images to your Adobe Illustrator projects can truly breathe life into your designs. Whether you're enhancing a logo, crafting a poster, or completing any visual project, images play a crucial role. But if you're new to Illustrator, you might be wondering how to seamlessly integrate them into your artwork. In this blog post, we’ll guide you through the essentials of importing images in Illustrator so you can elevate your creative game. Let’s dive right in!
Preparing Your Image for Import

Before you bring an image into Adobe Illustrator, there are a few things you should consider to ensure a smooth import process. Proper preparation can significantly improve the quality and usability of the image within your design. Here’s what you should do:
- Choose the Right Format: Illustrator supports various image formats, but the most common ones are JPEG, PNG, and TIFF. Make sure your image is in one of these formats before importing.
- Check Resolution: A high resolution (300 DPI) is ideal for print designs, while a lower resolution (72 DPI) works for digital displays. Ensure that your image's resolution matches the intended use to avoid pixelation.
- File Size Matters: Large image files can slow down Illustrator and make your project cumbersome. If your image is too large, consider resizing it or compressing it before importing.
- Image Color Profile: For color consistency, make sure your image is set to RGB for digital designs or CMYK for print projects. This ensures your colors appear as intended.
- Organize Your Files: Keep your images organized in folders so you can quickly locate them when importing. A clutter-free workspace can enhance your productivity.
Following these preparation steps will make adding images to your Adobe Illustrator projects straightforward and enjoyable. Next, we'll explore how to import your perfectly prepped images into Illustrator!
Also Read This: Mastering Gameplay Video Recording on YouTube TV
Steps to Import an Image into Adobe Illustrator

Importing an image into Adobe Illustrator is a straightforward process, and it can be done in a few simple steps. Let's go through them together!
- Open Adobe Illustrator - First things first, fire up Illustrator. You can either create a new document or open an existing one where you want to import your image.
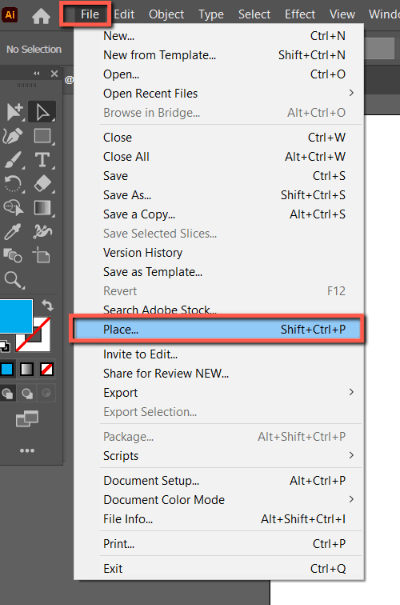
- Go to the 'File' Menu - Once you have your document open, head over to the top left corner and click on 'File'. This will pull up a dropdown menu.
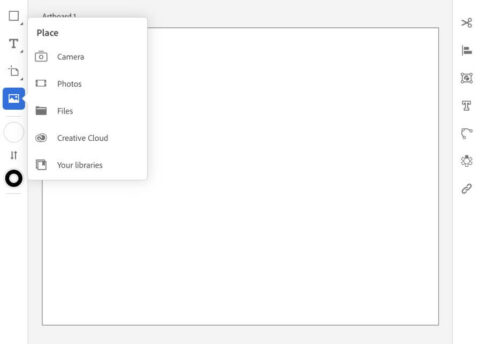
- Select 'Place' - In this dropdown menu, look for the option that says 'Place...' and click on it. This is the magical option that allows you to bring in images from your computer.
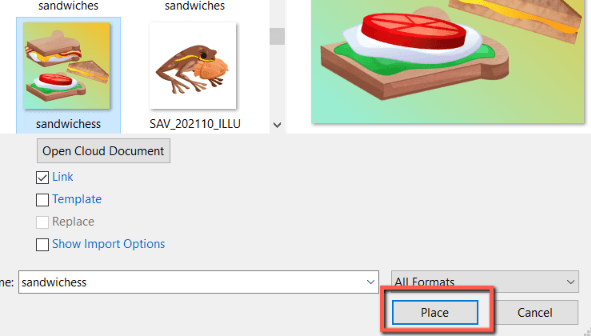
- Choose Your Image - A file dialog box will pop up. Browse through your files and select the image you want to import. Once you've found it, click on 'Place'. Remember, Illustrator supports various formats like JPEG, PNG, and GIF.
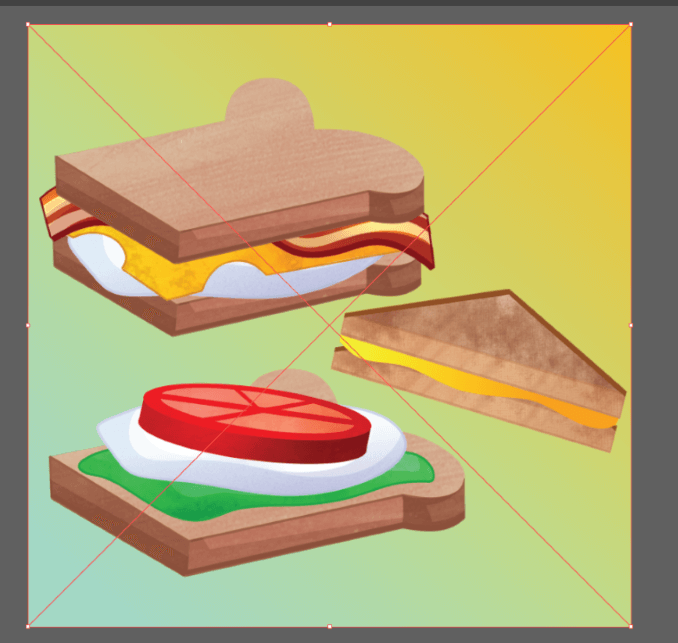
- Click to Place - After selecting your image, you can either click anywhere on your artboard to place it at its original size, or you can click and drag to specify the size right away.
And voilà! You’ve successfully imported an image into Adobe Illustrator. It’s that easy! Now, let’s talk about what to do next: how to resize and position that imported image.
Also Read This: How to Effectively Index Your Assets in Adobe Stock
Resizing and Positioning the Imported Image

Alright, so you've imported your image into Adobe Illustrator, and now it’s time to fine-tune its size and position. This step is crucial for making sure your image fits perfectly within your design.
Here’s how you can resize and position your imported image:
- Select the Image - Click on the image with the Selection Tool (the black arrow). You'll know it's selected when you see a bounding box around it.
- Resize the Image:
- Drag Corners: Hover over a corner handle, then click and drag to resize. Hold down the Shift key while dragging to keep the aspect ratio intact.
- Transform Menu: Go to 'Window' > 'Transform' to manually input width and height values for precise resizing.
- Position the Image:
- To move the image, simply click and drag it to your desired location on the artboard.
- For precision, use the arrow keys on your keyboard for fine-tuning the position.
And there you have it! With just a few clicks and drags, your image is now resized and perfectly positioned in your design. Happy designing!
Also Read This: How Much iStock Pays Contributors
Working with Image Effects and Adjustments

Once you've successfully added your image to Adobe Illustrator, the fun really begins! Applying effects and making adjustments can turn a simple image into a striking piece of art. So, let's dive into what you can do to enhance your images.
First, you might want to explore the Effects menu located at the top of your screen. This menu offers a plethora of creative options, such as:
- Warp Effects: These allow you to twist, bulge, or manipulate the shape of your image. For example, applying the "Arc" effect can give your image a unique perspective.
- 3D Effects: Turn your flat image into a 3D object, giving it depth and dimension. The "Extrude & Bevel" effect can create some eye-catching results.
- Stylize: This includes various styles like drop shadows and glows, adding a professional finish to your design.
Now, let’s not forget about adjustments! You can use adjustments to modify color, contrast, and brightness. Here are some helpful steps:
- Select your image.
- Go to Object > Image Trace and then click on Make. This converts your image to a vector, enabling you to manipulate it further.
- To adjust colors, navigate to the Color Balance settings and tweak the sliders until you achieve the desired look.
It’s all about experimenting with different effects and seeing how they change your image. So don’t hesitate; try them out!
Also Read This: How to Effectively Search for Stock Images on Adobe
Saving Your Document with Images
After putting in all that hard work into your project, the last thing you want is to lose it. Saving your document correctly ensures that everything, including images and effects, is stored properly. Here are some options for saving your work in Adobe Illustrator.
First, you’ll want to save your project as an Adobe Illustrator file. To do this, follow these steps:
- Go to the File menu at the top left corner.
- Select Save As.
- When prompted, choose a location on your computer to save the file and give it a name.
- Ensure the file type is set to Adobe Illustrator (*.AI) for maximum compatibility with future edits.
However, if you need to share your project with others, consider saving it in other formats as well:
| Format | Best For |
|---|---|
| Sharing documents while preserving vectors and layouts. | |
| JPEG | Images suitable for web use but not ideal for further edits. |
| PNG | Images with transparent backgrounds. |
Remember to save often and consider using different file types depending on your needs. This way, you can keep a master copy but still easily share your work with others. Happy designing!
Also Read This: How to Determine the Source of an Image
Common Issues When Adding Images and Troubleshooting
When you're deep into your creative process in Adobe Illustrator, adding images can sometimes throw a wrench in your plans. Let's explore some common issues you might encounter and how to troubleshoot them, ensuring a smooth workflow!
- File Format Issues: Illustrator supports a variety of file formats including JPEG, PNG, and GIF. If you try to import an unsupported format, it simply won’t work! Double-check your file type before uploading. It’s also wise to convert your image to a suitable format using software like Photoshop.
- Image Resolution Problems: High-resolution images can slow down your project and make Illustrator lag. Ideally, use images that are 72 DPI for web design and 300 DPI for print. If your images are too high in resolution, consider resizing them before import.
- Missing Links: If you’ve linked an image to your Illustrator document and then moved or renamed the original file, Illustrator won’t be able to find it. Keep your files organized in a single folder, or remember to update the link through the 'Links' panel.
- Image Not Displaying: Sometimes, the image just won’t appear after import. This could be due to being placed on a different layer or an issue with your view settings. Ensure you're on the correct layer and check the 'Layers' panel to see if your image is visible.
By being aware of these common issues, you can troubleshoot effectively and get back to focusing on your creative vision!
Conclusion and Best Practices
Adding images to Adobe Illustrator can enhance your design tremendously, but it’s important to do it right! Following best practices not only makes your life easier but also ensures that your final product is polished and professional.
Here are some best practices to keep in mind:
- Understand File Types: Know which file types work best for your projects. For high-quality graphics, use vector formats like SVG for scalability.
- Manage File Sizes: Always consider the resolution and file size of the images you’re importing. This can prevent slowdowns and ensure a smoother experience.
- Layer Organization: Keep your layers organized. Group images logically to make navigation easier, especially in complex projects.
- Save Regularly: Don’t forget to save your work regularly! This precaution can save you from losing hours of effort due to unexpected crashes or mistakes.
By implementing these practices, you’ll not only avoid potential pitfalls but also elevate your design game in Illustrator. Happy designing!
 admin
admin


