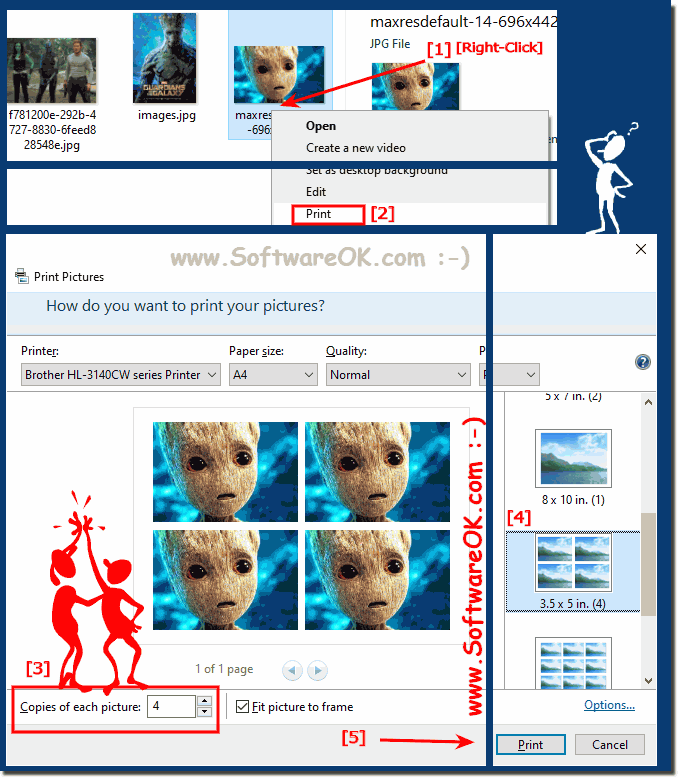
Printing multiple images on one page can be a fantastic way to save paper, create a collage for memories, or even prepare engaging materials for work or school projects. Whether you want to print photos from a recent vacation, screenshots, or digital artwork, understanding how to do this efficiently can simplify your printing tasks. In this guide, we'll explore some tips and tricks to make this process as seamless as possible. So let's dive in!
Choosing the Right Images

Before you start printing, it's crucial to select the right images that will best fit your intended page layout. Here are some tips to guide you in making your selections:
- Quality Matters: Choose high-resolution images to ensure that they look crisp and clear once printed. Blurry or pixelated images can detract from the overall quality of your print.
- Consider Orientation: Think about how you want to arrange your images. Portrait and landscape orientations can dramatically affect the layout, so ensure you have a balanced mix that suits your page size.
- Complementary Themes: If you're creating a collage, it helps to choose images that share a common theme, color palette, or mood. This creates a more cohesive look and feel.
- Size and Aspect Ratio: Be mindful of each image’s size. This can influence how many pictures will fit on a page. Make sure they have compatible aspect ratios for a tidy arrangement.
- Editing Needs: Sometimes, you might need to crop or edit images before printing. Consider how much time you want to invest in editing each picture.
Keep these tips in mind, and you'll be well on your way to selecting images that not only look great alone but also work wonderfully together on one page!
Also Read This: Get to Know How Many Images Shutterstock Has
Preparing Images for Printing

Before you dive into the fun part of printing, it's essential to make sure your images are ready to shine on paper. Proper preparation can make a world of difference in achieving that professional look you might be after. Follow these steps to get your images prepped and primed:
- Select the Right Resolution: Aim for a resolution of at least 300 DPI (dots per inch) for crisp prints. Images with lower resolutions may become blurry or pixelated once printed.
- Crop or Resize: Consider the dimensions of your paper. You might want to crop images to focus on key elements or resize them to fit your layout. Editing software like Photoshop or GIMP can come in handy!
- Adjust Image Quality: Use tools to enhance the clarity, brightness, or contrast of your photos. A little tweaking can turn a good image into a great one!
- File Format Matters: Save your images in formats that retain quality, such as JPEG or PNG. Avoid using formats that compress data too much, leading to loss in quality.
- Check Colors: Keep in mind that colors on your screen may appear differently when printed. If color accuracy is crucial, consider calibrating your monitor or doing a test print.
With these preparations in place, your images will be well-equipped for a stunning print outcome, making sure that what you see on your screen matches what you get on paper!
Also Read This: how much can you earn from adobe stock
Using Software to Arrange Images
Once your images are prepared, it's time to use some software to arrange them creatively on a single page. Various applications can help you accomplish this, so let’s dive into some popular options and tips to give your prints that polished look.
- Photo Printing Software: Programs like Adobe Lightroom and Canva offer user-friendly interfaces for collaging images and providing customizable templates.
- Word Processors: Surprisingly, software like Microsoft Word or Google Docs can be handy, allowing you to insert images, resize them, and arrange them to fit the page as you desire.
- Graphic Design Software: If you're feeling adventurous, use Photoshop or GIMP where you can manipulate layers to arrange your images freely.
- Online Collage Makers: Websites like Fotor and Pic Collage let you upload your images and automatically arrange them into beautiful layouts.
When arranging your images, keep in mind considerations like:
| Tip | Description |
|---|---|
| Balance: | Ensure images are evenly spaced and not crowded. This makes for a visually pleasing layout. |
| Alignment: | Align edges and centers for a professional finish. Most software provides alignment tools. |
| Margins: | Leave enough space around the edges of the page to avoid cutting off any parts of the images when printed. |
By taking advantage of the right software, you'll end up with a beautifully arranged collection of your favorite images ready to impress!
Also Read This: Follow This Fast and Easy Way on How to Upload Video on 9GAG
5. Setting Print Options
When it comes to printing multiple images on one page, setting the right print options is crucial for achieving the best results. Not only does it help in organizing your images effectively, but it also ensures you utilize the space on your paper efficiently. Let’s break down the essential options you might want to consider:
- Page Layout: Choose between portrait and landscape orientations based on the images and how you want them displayed.
- Print Scaling: While most print settings allow you to choose how much of the image will fit on the page, select an option like “Fit to Page” or “Multiple Pages per Sheet” to adjust the size of your images.
- Margins: Adjust the margins depending on whether you want your images to touch the edges of the paper. Reducing margins can create a more seamless look.
- Quality Settings: If you’re looking for better clarity, opt for a higher quality print setting. Keep in mind, this may use more ink.
- Print Preview: Always make use of the print preview option! It gives you a snapshot of how your images will look when printed, allowing for any last-minute adjustments.
Once you’ve set your options, it’s a good idea to run a test print on plain paper before using your desired sheets. This way, you can ensure everything looks just as you expected.
Also Read This: Unlocking International Opportunities on Adobe Stock: Expanding Your Reach Beyond Borders
6. Printing on Different Types of Paper
Choosing the right type of paper can significantly affect the quality of your prints, especially when you’re printing multiple images. Here are some popular paper types and what they’re best suited for:
| Paper Type | Best For | Features |
|---|---|---|
| Glossy Photo Paper | High-quality photo prints | Vibrant colors and sharp details |
| Matte Photo Paper | Gallery images or prints that require no glare | Texture adds a professional touch, but colors may appear softer |
| Cardstock | Postcards, cards, or thicker prints | Durable and great for projects needing some extra stiffness |
| Textured Fine Art Paper | High-end prints and artwork reproductions | Rich texture enhances depth and dimension |
Before you print, consider your project’s purpose and pick the paper that will highlight your images the best. Always check your printer’s specifications for the maximum thickness it can handle to avoid any jams or issues. With the right paper and print settings, you’ll be able to create stunning multi-image layouts that are perfect for sharing or displaying!
Also Read This: Using Adobe Stock in Your InDesign Document
Troubleshooting Common Issues
When you set out to print multiple images on one page, it can be exciting, but sometimes things don’t go as planned. Here’s a handy guide to help you troubleshoot some common issues you might encounter during this process.
1. Images Not Printing as Expected: Sometimes images appear distorted or cut off. Check your printer settings and ensure that the scale is set to 100%. Also, make sure the images are positioned correctly within the printing software you're using.
2. Printer Not Recognizing Images: If your printer is refusing to recognize the images, double-check the file formats. Most printers prefer JPEG or PNG. If your images are in other formats like TIFF or BMP, convert them before printing.
- Tip: Use an online converter or photo editing software to change the format easily.
3. Quality Issues: If your printed images look pixelated or blurry, it could be due to low-resolution source images. Always try to use high-resolution images for the best prints. Aim for at least 300 DPI (dots per inch) for clear prints, especially if they’re going to be enlarged.
4. Page Not Aligning Properly: If images are not centered or are misaligned, revisit the margins and layout settings in your printing application. Setting proper margins can significantly improve the way your images are aligned on the page.
By understanding these common issues and their fixes, you'll greet your printing session with much less frustration and more excitement for your finished product!
Conclusion
Printing multiple images on one page can be a fantastic way to share memories, create collages, or showcase your photography work. With just a few clicks, you can compile your favorite images into one sheet, making printing efficient and economical.
To wrap it up, remember these key points:
- Choose the right software: Whether it's built-in features in your operating system or dedicated apps, having the right tool makes a massive difference.
- Pay attention to size: Make sure your images are of good quality and properly adjusted to fit on the page without distortion.
- Set up your printer correctly: Check your printer settings for format, quality, and alignment.
- Don’t forget to troubleshoot: If things don’t go as planned, use our troubleshooting tips to get back on track.
So, gather your favorite images, follow these guidelines, and get ready to print a stunning collection that you'll be proud to display! Happy printing!
 admin
admin


