If you're looking to leverage your professional network efficiently, exporting your LinkedIn contacts to Excel can be a game changer. Whether you're building a marketing list, analyzing connections for networking opportunities, or managing relationships more effectively, transferring your contacts to a familiar format like Excel makes it simpler and more organized. In this guide, we'll explore the reasons for doing this and how you can easily export your LinkedIn contacts to Excel in a few straightforward steps.
Why Export LinkedIn Contacts?

So, why should you consider exporting your LinkedIn contacts? Let’s break it down into a few key benefits that illustrate the importance of this action:
- Organized Networking: Keeping your contacts in Excel allows you to categorize and label them effectively. You can create groups based on industries, locations, or how you know them, making it easier to focus your outreach efforts.
- Streamlined Communication: By having your contacts in Excel, you can sort through them easily when it's time to send personalized messages, invitations, or updates. This can be especially useful for maintaining relationships and encouraging referrals.
- Data Analysis: Excel provides powerful tools for data analysis. You can quickly use features like filtering and pivot tables to uncover trends and insights from your contacts that can guide your networking strategies.
- Backup for Your Connections: While LinkedIn is a great platform for networking, it’s a good idea to have a backup of your contacts. Exporting them ensures you have access to your valuable connections even if there are changes to your LinkedIn account.
- Marketing and Outreach: If you’re building a business or running campaigns, having direct access to your network in Excel can facilitate targeted marketing. You can easily segment your contacts and plan outreach based on specific criteria.
In summary, exporting your LinkedIn contacts to Excel not only enhances your networking capabilities but also helps you manage and analyze your professional relationships more effectively. It's a simple step toward maximizing the potential of your professional network.
3. Prerequisites for Exporting Contacts

Before diving into the nitty-gritty of exporting your LinkedIn contacts, let’s make sure you have everything you need. It’s kind of like preparing for a big dinner—if you don’t have the ingredients, the meal isn’t going to happen, right?
Here’s what you need to check off your list:
- LinkedIn Account: Of course, you need an active LinkedIn account. Make sure you're logged in so you can easily access your contacts.
- Active Internet Connection: A stable, uninterrupted internet connection is crucial. A disconnected session could lead to incomplete downloads or data loss.
- Access Rights: Ensure that your LinkedIn account is in good standing. Profiles with restrictions may not have the permission to export contacts.
- Excel or Compatible Software: You’ll need Microsoft Excel or another spreadsheet program, like Google Sheets, to open the exported file.
- Time: Although the process is relatively straightforward, you should set aside some time to gather your contacts, especially if you have a large network.
Once you’ve confirmed you have the prerequisites in place, you’ll be ready to move on to the next step. Trust me—being prepared makes the process a lot smoother!
4. Step 1: Accessing Your LinkedIn Account

Alright, let's jump into the first step! Accessing your LinkedIn account might seem like a no-brainer, but let’s go over it to ensure everyone is on the same page. Follow these simple instructions:
- Open Your Preferred Browser: Launch the web browser you typically use. Whether it’s Chrome, Firefox, or Safari, just pick one and get started!
- Go to LinkedIn: Type www.linkedin.com into the address bar and hit enter. Like a good GPS, this will take you directly to the LinkedIn homepage.
- Log In: Enter your email and password in the designated fields. If you’ve forgotten your password, no need to panic! Click on ‘Forgot Password?’ to reset it.
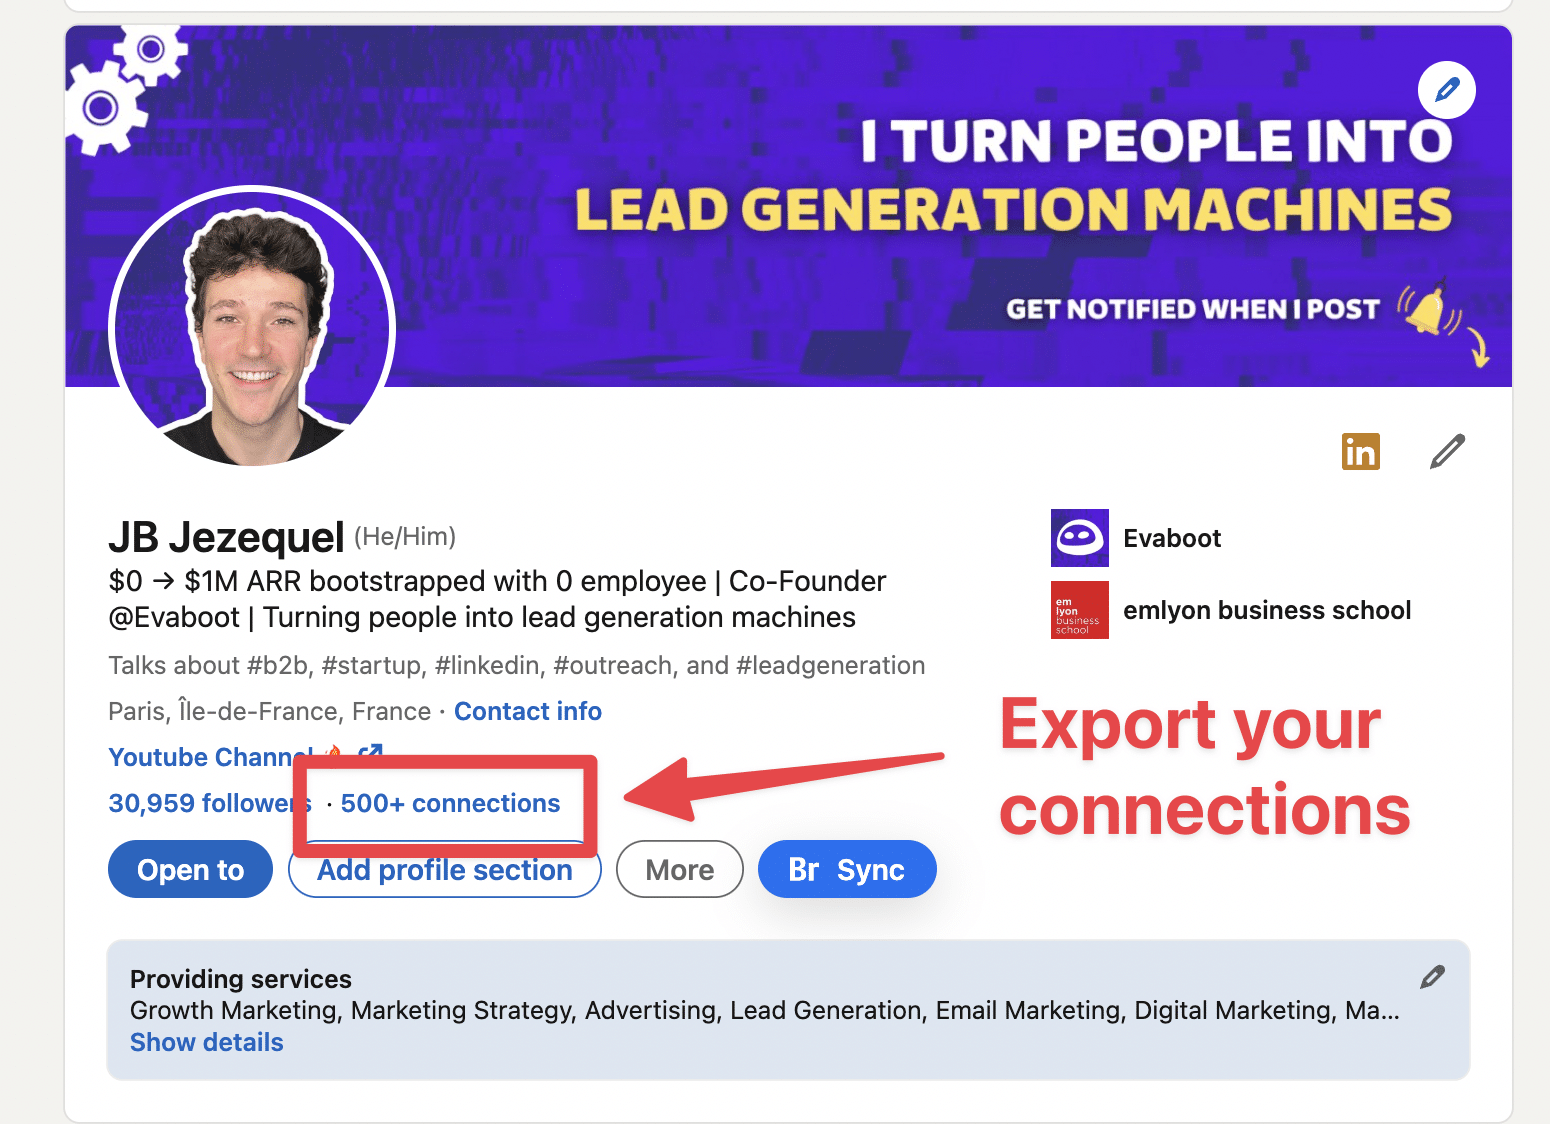
- Navigate to Your Profile: Once logged in, click on your profile picture or the ‘Me’ icon at the top right corner to access your profile.
Now that you're logged in, you’re officially one step closer to exporting your LinkedIn contacts. Easy, right? Just hang tight; the best is yet to come!
Step 2: Navigating to the Data Privacy Settings

Alright, let’s dig into this! The next step in exporting your LinkedIn contacts to Excel is to navigate to the Data Privacy settings. This is where the magic happens, and it’s surprisingly easy to do. Just follow these simple steps:
- First, log in to your LinkedIn account. You can do this through your desktop browser or the LinkedIn app. However, it’s often easier to manage these settings on a computer.
- Once logged in, look for the Me icon at the top of your LinkedIn homepage. It’s usually represented by your profile picture or an avatar.
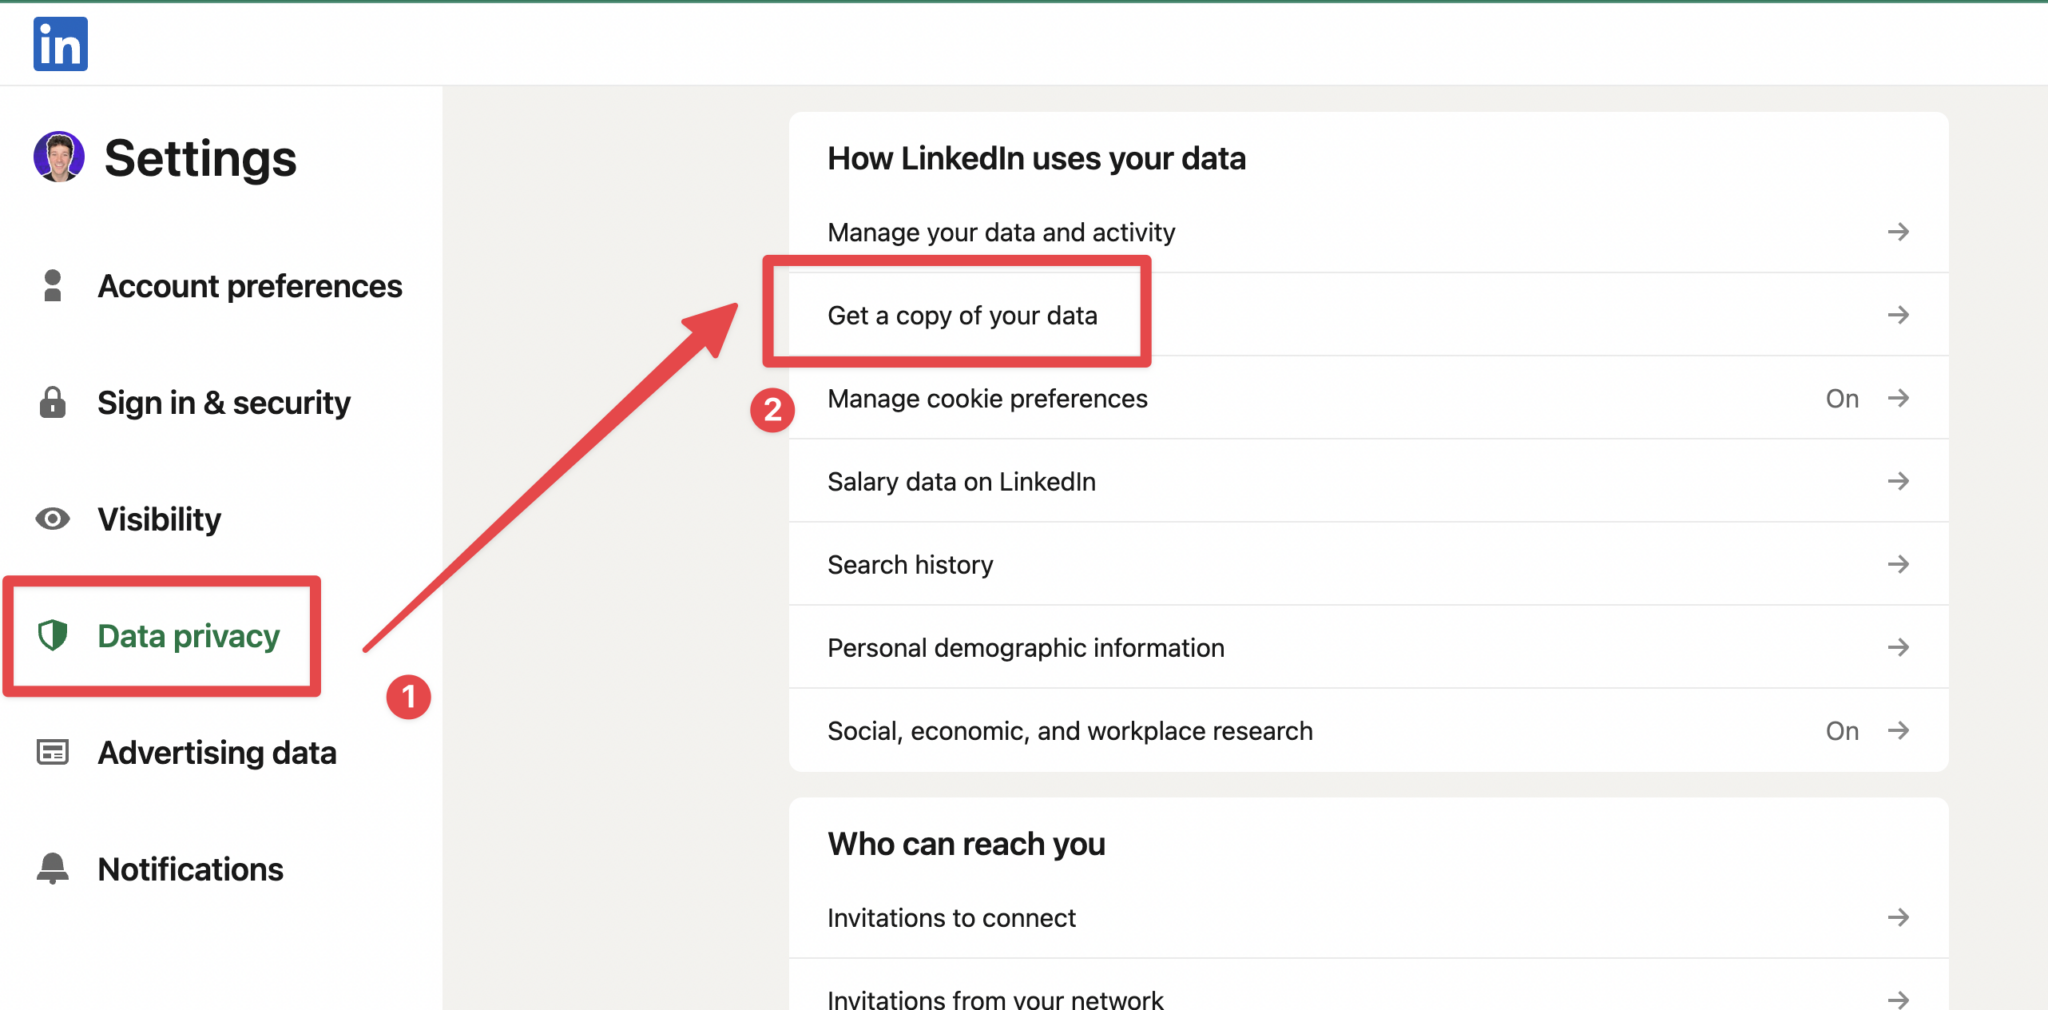
- Click on the Me icon and then select Settings & Privacy from the dropdown menu. This will take you to a page filled with various settings related to your account.
- On the left sidebar, you will see several categories. Click on Data privacy. This is where you can manage your data preferences and privacy settings.
Once you’re in the Data privacy section, you’ll find various options related to your data and privacy. This is important because, to export your contacts, you need access to your data archive. So, make sure you familiarize yourself with this area, as it’s where you’re going to be spending some time!
Step 3: Requesting Your Data Archive
Now that you’ve successfully navigated to the Data Privacy settings, it’s time to request your data archive. This may sound a bit technical, but I assure you it’s straightforward and user-friendly! Here’s how to do it:
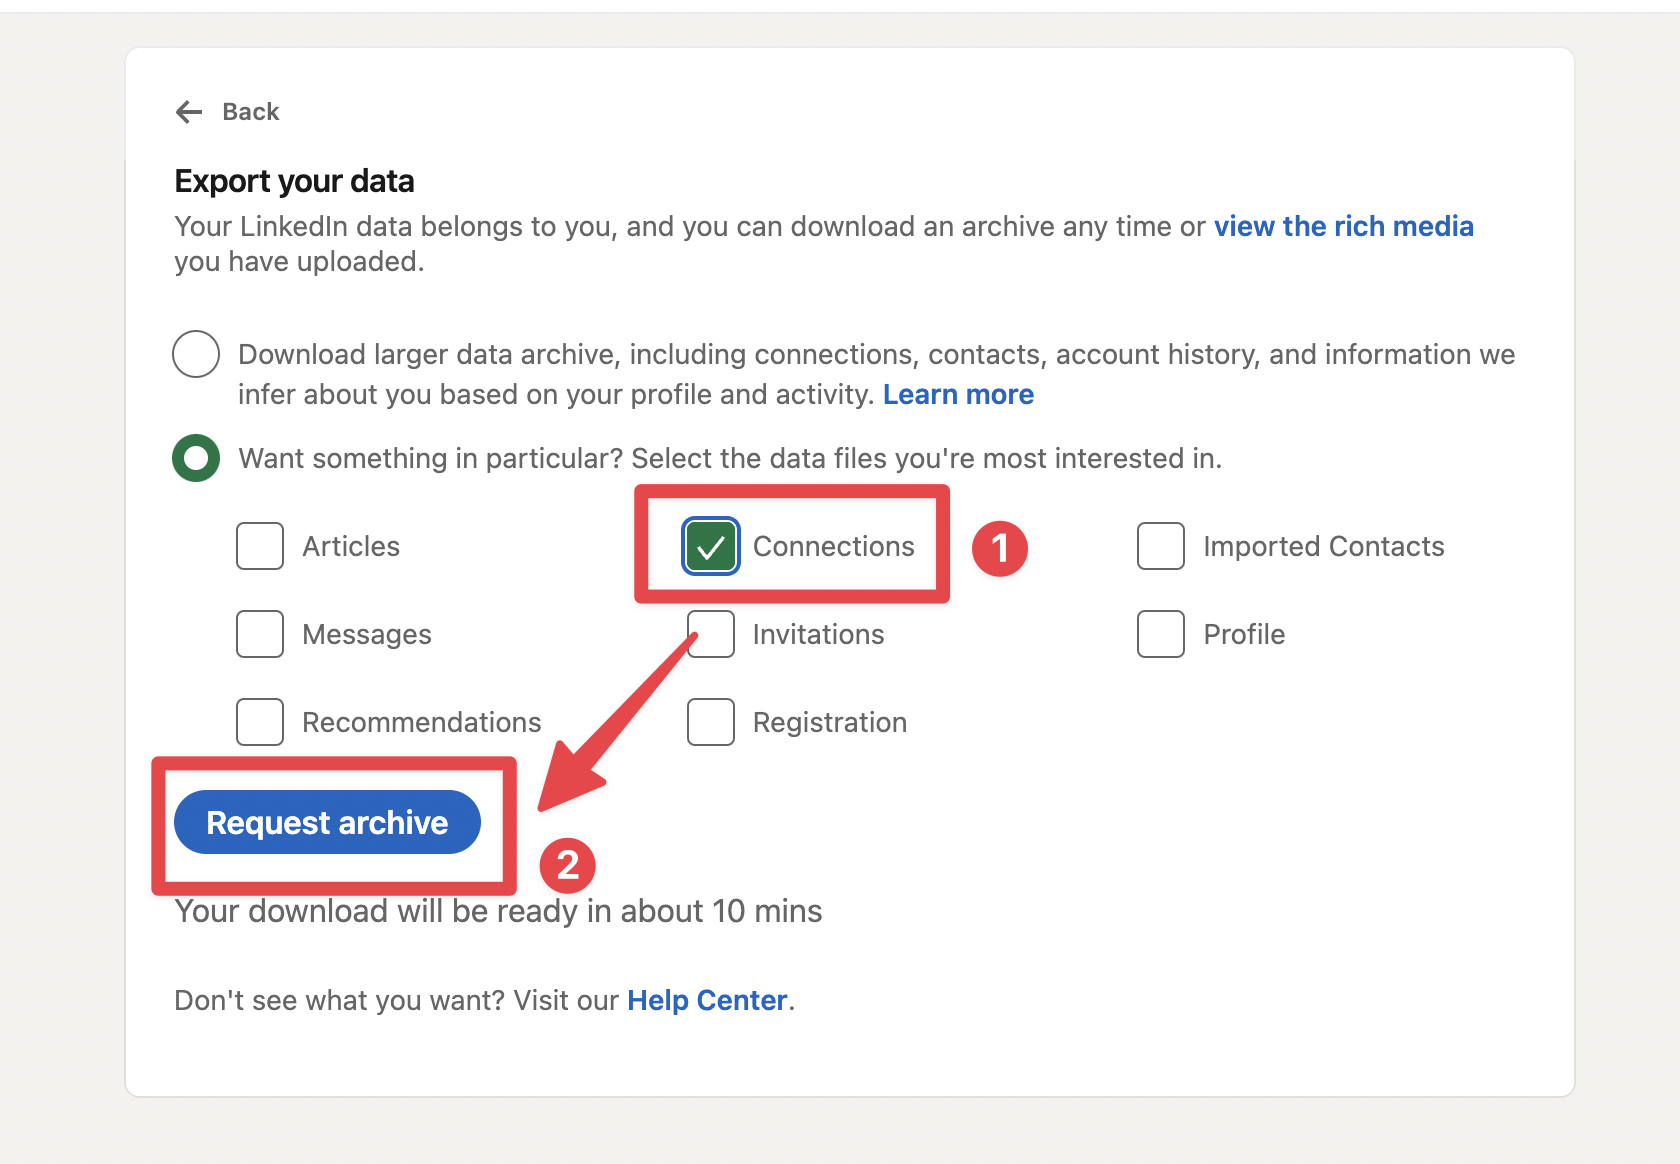
- In the Data privacy section, scroll down until you find the option labeled Get a copy of your data.
- Click on this option, and you’ll see a couple of choices for the data you can request. For exporting your contacts, select Connections only. This will ensure you get the necessary data without any extra clutter.
- After choosing your option, click the Request archive button. LinkedIn may prompt you to enter your password again for security reasons—this is totally normal.
- You’ll then see a confirmation that your request has been submitted. Hang tight! LinkedIn will take some time to prepare your data.
Keep an eye on your email inbox! Once your data is ready, you’ll receive an email with a link to download your data archive. This is the moment we’ve been waiting for, so check back periodically!
Step 4: Downloading the Data Archive
Now that you’ve requested your data from LinkedIn, it’s time to actually download that data archive. This step is crucial because it contains all your contacts and other relevant information—like profile activities and connections. So, let’s get into how you can snag this archive!
Here's a simple step-by-step:
- Check Your Email: After you’ve made the request, LinkedIn will send you an email when your data is ready. This usually takes around 24 hours, but sometimes it might be quicker, or a little longer. Be patient!
- Open the Email: Once you receive it, the email will include a link that you need to click on. This will direct you back to LinkedIn.
- Sign In: If you’re not already signed in, you’ll need to log into your LinkedIn account. Keep that password handy!
- Download the Archive: The page will direct you to download your data in a convenient ZIP file format. Click the download link and watch your browser do its magic.
And just like that, you’ve got your data on your computer! Remember where you saved that file, as you’ll be diving into it in the next step.
Step 5: Extracting Contacts from the Downloaded File
You’ve done the hard part by downloading your LinkedIn data. Now, let’s see how to get to the juicy stuff—your contacts! The downloaded ZIP file contains various folders, but don’t sweat it; we’re here to guide you through extracting your contacts.
Here’s how to do it:
- Locate the ZIP File: Find the ZIP file you just downloaded. It’s usually located in your Downloads folder unless you specified a different location.
- Extract the Contents: Right-click on the ZIP file and select “Extract All” to unzip it. This creates a new folder with all the contents inside.
- Find the Contacts File: Look for a file named Connections.csv inside the unzipped folder. This is your treasure map, containing all your LinkedIn contacts!
- Open the CSV File: Double-click the Connections.csv file, and it should open in Excel or similar spreadsheet software. Voilà! Your contacts are now displayed in a neat format.
And there you have it! From the downloaded data archive to extracting your contacts, you’re now one step closer to organizing your LinkedIn connections. Feel free to massage that data in Excel as you see fit—sort, filter, or analyze your network!
Step 6: Importing Contacts to Excel
Alright, you’ve done the heavy lifting by exporting your LinkedIn contacts! Now comes the fun part—importing them into Excel. This step helps you organize your connections in a user-friendly format that facilitates better management and outreach.
To kick things off, follow these simple steps:
- Open Excel: Launch Excel on your computer. If you don’t have it installed, various free alternatives like Google Sheets can also help you with this task.
- Select the Import Option: In Excel, go to the “Data” tab located at the top menu. Here, you’ll find an option to get data from various sources.
- Choose Your Data Source: Pick the option “From Text/CSV” or “From Workbook,” depending on what you've saved your LinkedIn contacts as. If you have a CSV file, that’s typically the best choice.
- Locate Your File: A file browser will pop up. Navigate to the folder where you saved your LinkedIn contacts file. Select it and click “Import.”
- Follow the Import Wizard: Excel has a helpful wizard that will guide you through the process. You can choose to modify how the data appears, such as deciding which columns to display.
- Adjust Formatting: Once imported, take a moment to format your Excel sheet. You might want your headers bolded or columns resized for better visibility.
And voilà, there you have it! Your LinkedIn contacts are now neatly organized in Excel, ready for you to take action. Whether you’re planning email outreach, networking, or simply keeping track, this organized view makes life so much easier!
Conclusion
Exporting your LinkedIn contacts to Excel is not just a task; it's an investment in your networking strategy. By having all your connections in a single, accessible format, you open up a world of opportunities.
Throughout this process, you've gained not only practical skills but also a clearer view of your professional relationships. Here are a few key takeaways:
- Organization: Keeping your contacts in Excel helps you manage who you know and who you want to connect with.
- Easy Tracking: You can easily track interactions, follow-ups, and set reminders for outreach.
- Customizable: Excel allows you to sort, filter, and analyze your contacts however you wish.
In a nutshell, regularly updating and maintaining your contacts can contribute significantly to your professional growth and success. So, what’s the next move? Delve into your newly created Excel sheet and start strategizing your networking moves! The more you network, the more opportunities you'll create for yourself. Happy networking!
 admin
admin


