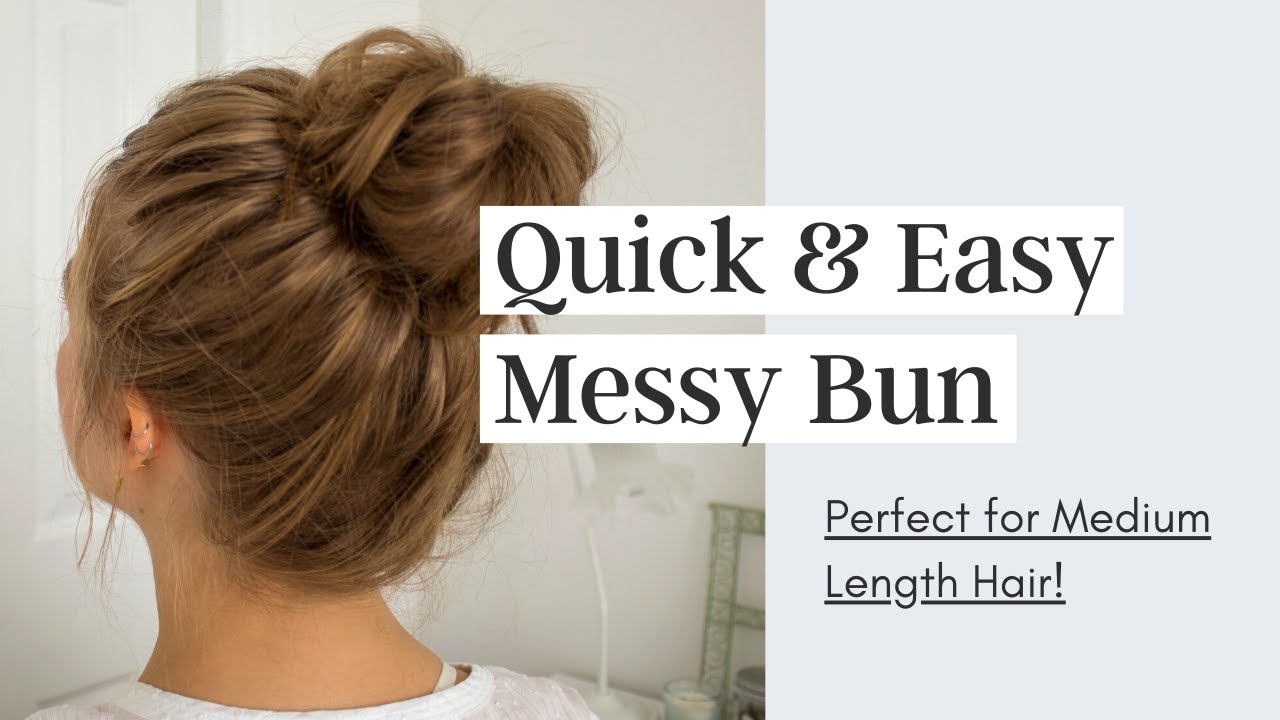
Ah, the messy hair bun! It's the perfect hairstyle that strikes a balance between effortless and chic. Whether you’re rushing out the door for work or heading out for a casual brunch with friends, a messy bun can elevate your look without demanding too much time or effort. This style embodies a relaxed vibe, making it suitable for any occasion, and it’s especially great for those days when your hair has a mind of its own.
The beauty of the messy bun lies in its versatility. From sleek and sophisticated to bigger and more chaotic, you can customize it to fit your personal style. In this guide, we’ll walk you through the steps to create your own stylish messy hair bun, complete with the must-have tools and products to make the process smooth and enjoyable. So let’s dive in!
Essential Tools and Products You'll Need

Creating that perfect messy hair bun doesn’t require a ton of complicated tools, but having the right essentials can make a world of difference. Below, you’ll find a list of tools and products that will set you up for success:
- Hair Ties: Opt for elastic hair ties that won't damage your hair. You might also consider scrunchies for a softer hold.
- Bobby Pins: These are a must-have for securing stray hairs and ensuring your bun stays in place.
- Hairbrush or Comb: A brush or wide-toothed comb will help you detangle and gather your hair smoothly.
- Texturizing Spray: This product helps add grip to your hair, making it easier to style into a messy bun.
- Hairspray: A light hairspray can help control flyaways without making your hair stiff.
- Hair Clip: Great for holding sections of hair out of the way while you work on your bun.
By gathering these essentials, you’ll be well-equipped to create the perfect messy hair bun that not only looks stylish but also feels comfortable throughout the day. Let’s get started on the process!
Step-by-Step Guide to Making a Messy Hair Bun

Creating a stylish messy hair bun is not only simple but also a fun way to style your hair, especially when you're short on time. Let’s break it down step-by-step!
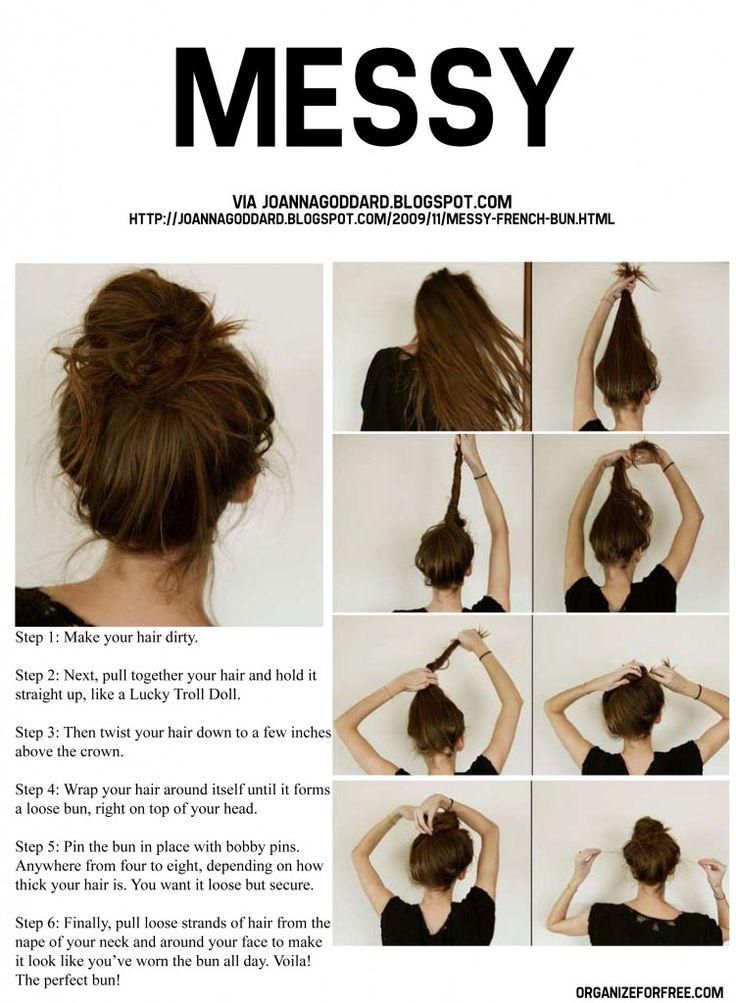
- Prep Your Hair: Start with slightly dirty hair, as this provides better grip for the bun. If your hair is clean, use a bit of texturizing spray or dry shampoo to create some volume.
- Gather Your Hair: Using your fingers, gather your hair into a high ponytail. You don’t need to worry about making it perfectly smooth—embrace the bumps!
- Twist and Wrap: Twist the ponytail and wrap it around the base to form a bun. The looser you make this wrap, the messier and more effortless it will look.
- Secure the Bun: Use hair ties, bobby pins, or hairpins to secure the bun in place. Tighten it if necessary, but keep that messy vibe!
- Mess it Up! Pull out a few strands of hair around your face and gently tug on the bun to make it a bit looser. This adds that effortless charm.
- Finish with Hairspray: Lightly spray with flexible hold hairspray to keep everything in place while maintaining the soft, messy look.
And there you have it! A casual yet chic messy hair bun that’s perfect for any occasion.
Tips for Achieving the Perfect Messy Look
Getting that perfect messy hair bun is as much about technique as it is about attitude. Here are some handy tips to keep in mind:
- Mind the Texture: Textured hair works best for a messy bun. Consider braiding your hair the night before or sleeping with loose waves to add volume.
- Use the Right Tools: Opt for a soft hair tie and bobby pins that won’t leave harsh marks. Consider using a scrunchie for a retro vibe.
- Don’t Overthink It: The key to a messy bun is its unstructured nature. The more you fuss over it, the more polished it will look. Embrace imperfections!
- Experiment with Placement: Try different placements—higher for a more playful look or lower for a relaxed vibe. Each will give a different flair!
- Add Accessories: Consider adding cute hair clips, a headband, or even flowers. They draw attention and elevate the casual style.
These tips will help you master the art of the messy bun and keep your look effortlessly stylish!
Common Mistakes to Avoid
Creating a stylish messy hair bun might seem like a simple task, but there are a few common pitfalls that can hinder your efforts. By being aware of these mistakes, you can enhance your bun-making skills and avoid styling mishaps. Here are some common mistakes to watch out for:
- Overthinking the Process: One of the biggest mistakes is trying too hard to make the bun perfect. The beauty of a messy bun lies in its effortless look, so don’t overdo it! Embrace the imperfections.
- Using Incompatible Products: Not all hair products are suitable for creating a messy bun. Avoid using heavy gels that make your hair feel stiff; opt for light mousses or texturizing sprays instead!
- Skipping the Texture: If your hair is too clean and sleek, it might not hold the bun well. Adding a bit of texture is essential. You can achieve this by using a gentle wave or going a day or two without washing your hair.
- Ignoring Hair Accessories: Hairpins and elastic bands can make a huge difference when it comes to securing your messy bun. Forgetting to use them can leave your bun looking sloppy and in danger of falling apart.
- Making It Too Tight: While it might be tempting to pull your hair tight for security, this can lead to a rigid, uncomfortable look. A looser bun is more flattering and allows for those beautiful, soft strands to escape.
Avoiding these mistakes will help you master the art of the messy bun and keep your look effortlessly chic!
Styling Variations for Your Messy Bun
Once you've nailed the classic messy bun, the fun really begins! There are countless styling variations to experiment with, allowing you to express your personality and fit any occasion. Here’s a roundup of some stylish options to consider:
- The Low Messy Bun: Position your bun lower on your neck for a more sophisticated and casual vibe. This style works well for both office hours and relaxed outings.
- The Half-Up Messy Bun: Combine elegance with ease by pulling half of your hair back into a messy bun, leaving the rest down. This style is perfect for adding a bit of flair while keeping your hair manageable.
- Messy Bun with Bangs: Incorporating bangs can frame your face beautifully. Whether they're blunt, side-swept, or curtain bangs, they accentuate the bun and add dynamism to the hairstyle.
- Twisted Messy Bun: Add some character by twisting sections of hair before pulling them into a bun. This creates interesting texture and a chic, intricate look.
- Colorful Hair Accessories: Incorporate hair ties or decorative pins in bright colors or fun patterns to make your bun stand out. Adding a scarf or a headband can also make a fresh statement.
With these styling variations, your messy bun can be as versatile as you are! Embrace the possibility of creativity and have fun experimenting!
How to Create a Stylish Messy Hair Bun
If you’re looking for a chic yet effortless hairstyle, a messy hair bun is the perfect choice. This versatile look can be worn for casual outings, work, or formal events. Here’s a detailed guide on how to achieve a stylish messy hair bun.
What You Will Need
- Hair elastics
- Bobby pins
- Hairbrush or comb
- Texturizing spray or dry shampoo
- Hair donut (optional)
- Hairspray (optional)
Steps to Create a Messy Bun
- Prep Your Hair: Start by ensuring your hair is clean and dry. For added texture, use a texturizing spray or dry shampoo.
- Gather Your Hair: Tilt your head slightly forward and gather your hair into a loose ponytail at the crown or nape of your neck, depending on your desired bun placement.
- Form the Bun: Twist your ponytail around itself to form a bun. If you’re using a hair donut, you can slide your ponytail through the center and fluff it out before securing.
- Secure the Bun: Use bobby pins to secure the bun in place. Be sure to leave some strands loose for that messy look.
- Tweak Your Style: Gently pull on some strands at the front for a relaxed appearance. Add hairspray for extra hold if needed.
Experiment with different placements and loose strands to personalize your bun! Remember, the beauty of a messy bun is its imperfections, so don’t stress over every detail.
Conclusion and Final Thoughts
A stylish messy hair bun is not only easy to create but also enhances your overall look with minimal effort. With a bit of practice and the right techniques, you can achieve this effortlessly chic hairstyle in just a few minutes!
 admin
admin


