Hey there! If you're looking to enhance your LinkedIn game, you've probably stumbled across the idea of scheduled posts. We all know that timing is crucial when it comes to reaching your audience effectively, and scheduling can be a lifesaver. In this post, we’ll break down everything you need to know about finding and managing your scheduled posts on LinkedIn. Whether you’re a marketing pro or just starting out, this guide has got you covered!
Understanding Scheduled Posts on LinkedIn

So, what exactly are scheduled posts on LinkedIn? In simple terms, scheduled posts allow you to create content in advance and set a specific date and time for it to go live. This feature is ideal for professionals who are busy yet still want to maintain an active online presence. Here’s a closer look at why you might want to consider using scheduled posts:
- Consistency is Key: Posting regularly helps keep your audience engaged. Scheduled posts make it easier to maintain a consistent posting schedule.
- Optimal Timing: You can strategically time your posts to go live when your audience is most active, leading to increased engagement.
- Content Planning: Allows you to plan your content calendar in advance, making it easier to coordinate with other marketing efforts.
- Stress Relief: By scheduling posts in advance, you can alleviate the last-minute pressure of coming up with content on the fly.
Now, you might be wondering how to access this feature. LinkedIn allows users to schedule posts through its platform, making the process fairly straightforward. Additionally, there are third-party tools available that can manage your LinkedIn scheduling and analytics. These tools often offer more robust features like post tracking and performance metrics.
Whether you're sharing industry insights, job postings, or personal achievements, scheduled posts can help you effectively reach your goals. As you continue reading, we will explore the steps involved in finding and managing these scheduled posts, so you can make the most out of this valuable tool!
Also Read This: How to Resize an Image in Your Gmail Signature
Accessing the LinkedIn Content Creation Tools

Accessing LinkedIn's content creation tools is quite simple and intuitive, making it easy for users to craft and schedule their posts. The platform is continually evolving, but let’s walk through the current steps you need to follow:
- Log into Your Account: Start by logging into your LinkedIn account as you normally would. This is the gateway to all the features LinkedIn offers.
- Navigate to the Home Page: Once logged in, you’ll find yourself on your home feed. Here, you can see posts from your connections, groups, and companies that you follow.
- Find the Post Creation Area: At the top of your home feed, there’s a box that says “Start a post.” This is your entry point to the content creation tools.
- Click on the Post Box: Clicking on this box will open up the full content creation tool where you can type, add images, videos, or links.
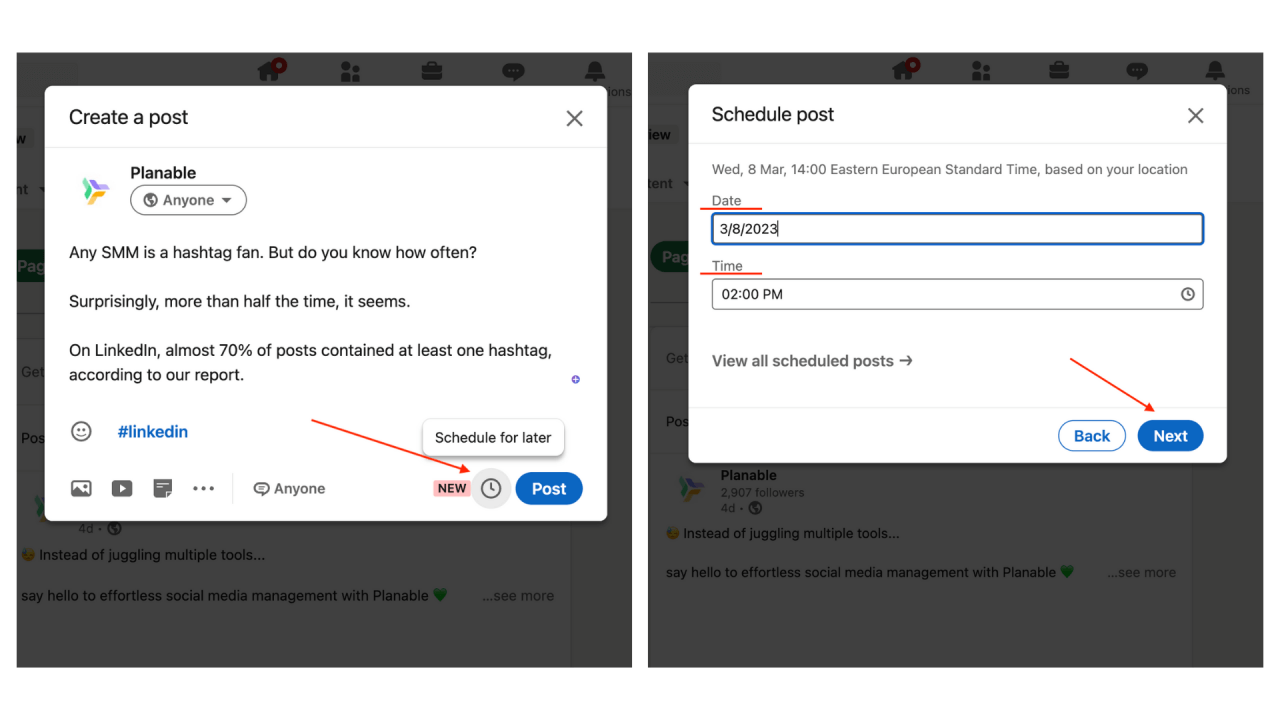
- Explore Scheduling Options: Look for the scheduling icon or option. Depending on the interface updates, it may appear as a calendar icon. This feature allows you to choose when you'd like your post to go live.
By following these steps, you’re now well on your way to creating engaging content on LinkedIn! Don't be afraid to get creative here; LinkedIn is a vibrant platform, and every post is an opportunity to connect with your audience.
Also Read This: How to Obtain Transcripts from YouTube Videos
Locating Your Scheduled Posts
Finding your scheduled posts on LinkedIn is as important as creating them. You’ll want to keep track of what’s going out and when, right? Here’s how you can easily locate your scheduled posts:
- Return to the Home Page: Just like before, start by navigating back to your home feed on LinkedIn.
- Access the Content Creation Tools: Find the same post creation box at the top of your feed, and click on it.
- Check the Drafts Section: Within the content creation tool, look for a section labeled “Drafts” or “Scheduled Posts.” This is often where LinkedIn keeps a list of what you have lined up.
- View Scheduled Posts: You should now see all your scheduled posts listed here, complete with the dates and times they’re set to publish.
- Edit or Reschedule: If you need to make any changes, simply click on the post for options to edit or reschedule it. It’s all about keeping your content fresh and relevant!
By checking this section regularly, you can maintain control over your posting schedule, ensuring that your content reaches your audience when it's most effective. Remember, a little management can go a long way!
Also Read This: Pros and Cons of Getty Images: Evaluating the Benefits and Limitations of the Stock Photography Platform
5. Editing or Rescheduling Your Content
Have you ever had that moment where you realize you could have crafted your LinkedIn post a bit better? Or maybe you just learned something exciting and want to adjust your content to reflect that? Editing or rescheduling your scheduled posts on LinkedIn is a straightforward process, and I’m here to guide you through it!
First off, let’s talk about editing. If you catch a typo or want to tweak your message, simply navigate to your scheduled posts, which can be found in your LinkedIn profile. From there, look for the option that allows you to edit the post. This is usually as easy as clicking on the post and finding the 'Edit' button. Once you make your changes, don’t forget to save them!
Now, if you’re considering rescheduling your content, that’s just as easy. Here’s how you can do it:
- Find the scheduled post you wish to reschedule.
- Click on the ‘Reschedule’ option.
- Pick a new date and time that suits you better.
- Confirm your changes, and you’re all set!
Remember, adjusting your posts can significantly enhance engagement, so don’t hesitate to tweak things as you see fit. Whether it's for clarity, timing, or relevance, editing and rescheduling are invaluable tools in your LinkedIn toolkit!
Also Read This: How to Upload a YouTube Video Longer than 15 Minutes
6. Deleting Scheduled Posts
Sometimes, despite our best efforts, we might want to pull the plug on a scheduled post. Whether it’s a change in strategy, a sudden news event, or simply realizing that the content isn’t right for the moment, knowing how to delete your posts is essential.
To delete a scheduled post, follow these simple steps:
- Go to your LinkedIn profile and find the ‘Scheduled Posts’ section.
- Locate the post you want to delete.
- Click on the post, and you’ll typically see a 'Delete' option.
- Confirm that you want to delete the post, and voilà!
It's as simple as that. Deleting a scheduled post helps you maintain a relevant and impactful presence on LinkedIn. Just remember, once you delete it, you can’t get it back, so make sure to double-check before you hit that delete button!
In the ever-evolving world of social media, keeping your content fresh and aligned with your objectives is crucial. So don’t shy away from making bold moves—sometimes a clean slate is just what you need!
Also Read This: What Does the Glove Mean on Rumble App? Let’s Uncover
7. Best Practices for Managing Scheduled Content
Managing scheduled posts on LinkedIn requires a thoughtful approach to ensure your content is effective and engaging. Here are some best practices to keep your scheduled content optimized.
- Review and Update Regularly: Always go back to your scheduled posts and review them. This allows you to check if they’re still relevant, especially in a fast-paced world where trends can change overnight.
- Engage with Your Audience: Make it a habit to check comments and messages related to your scheduled posts. Engaging with your audience shows that you value their input and encourages further interaction.
- Analyze Performance: After posting, keep track of engagement metrics. LinkedIn provides valuable insights into how each piece of content performs. Use this data to tweak your future posts.
- Coordinate with Recent Events: If something significant happens in your industry, ensure your scheduled posts align well with those conversations. Don’t hesitate to shuffle your schedule around to stay relevant.
- Diversify Your Content: Avoid posting the same type of content frequently. Mix it up with articles, images, videos, and polls to keep your audience engaged.
By implementing these best practices, you can ensure that your scheduled content not only reaches your audience but also resonates with them on multiple levels.
8. Conclusion
Managing scheduled posts on LinkedIn can feel a bit overwhelming at first, but with the right approach, it becomes second nature. By maintaining a strategic schedule, leveraging analytics, and following best practices, you can elevate your LinkedIn presence significantly.
Remember, the key to success lies in being adaptable. Whether it’s reviewing and updating your posts or engaging with your audience, flexibility will help you stay ahead of the curve and capture more attention.
So, don’t just set it and forget it—use your scheduled content as a tool to foster deeper relationships with your audience. By being proactive and involved, you'll transform your LinkedIn profile from just another page into a hub of engaging discussions and valuable insights.
Happy scheduling!
 admin
admin


