Are you looking to add a YouTube video to your website that plays automatically? You've come to the right place! Autoplaying videos can grab attention and keep visitors engaged straight away. However, there are some technical aspects to consider to do this effectively and ethically. Let’s dive into the details of how you can achieve autoplay for your YouTube videos using HTML!
Understanding the YouTube Embed Code

Before we jump into the nitty-gritty of autoplay, it’s essential to understand the YouTube embed code. This is the HTML snippet you’ll use to insert a YouTube video into your webpage. Here’s the basic structure of the
<iframe width="560" height="315" src="https://www.youtube.com/embed/VIDEO_ID" frameborder="0" allowfullscreen></iframe>Let’s break it down:
- iframe: This tag is used to embed another HTML document within your page, in this case, a YouTube video.
- src: This attribute specifies the source of the video. You replace
VIDEO_IDwith the actual ID of your YouTube video. - width and height: These attributes define the dimensions of the video player in pixels.
- allowfullscreen: This allows the video to be viewed in full-screen mode, providing an enhanced viewing experience.
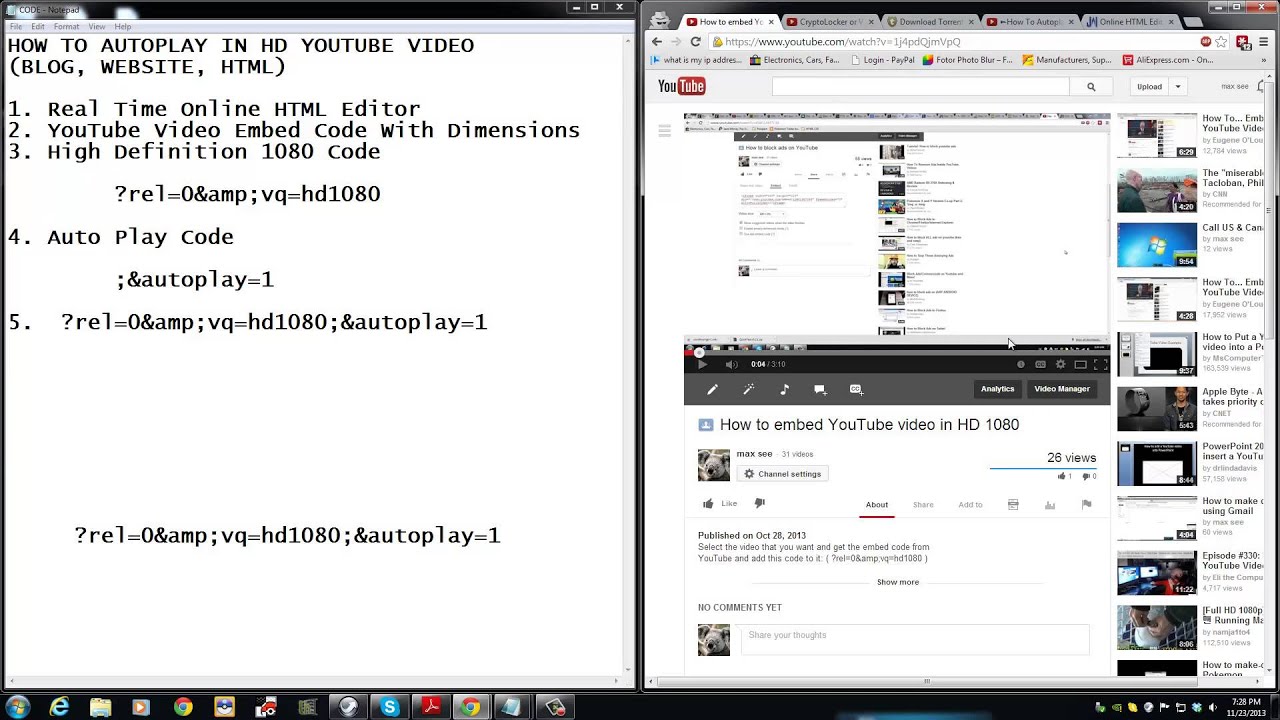
To enable autoplay, you need to modify the src URL slightly. By adding ?autoplay=1 at the end of the video URL, the video will start playing automatically when the page is loaded. Here's how your embed code would look:
<iframe width="560" height="315" src="https://www.youtube.com/embed/VIDEO_ID?autoplay=1" frameborder="0" allowfullscreen></iframe>Remember, while autoplay can be effective, it can also be annoying for users if not done thoughtfully. So always consider your audience's viewing preferences!
Steps to Enable Autoplay

Alright, let's get down to business! If you're itching to enable autoplay for your YouTube videos in HTML, the process isn't as daunting as it might seem. Just follow these straightforward steps, and you'll be good to go!
- Create Your Video Embed Code: Start by locating the video you want to embed on YouTube. Click on the 'Share' button beneath the video. A popup will appear – click on 'Embed,' and you'll see an iframe code. This is what you'll need.
- Understand the Video URL: Within the embed code, there will be a URL that looks something like this: `https://www.youtube.com/embed/VIDEO_ID`. We'll add the autoplay feature here.
- Add the Autoplay Parameter: All you need to do is add `?autoplay=1` at the end of the URL. If you already have parameters like `?start=10`, then simply add `&autoplay=1` instead. Your final code will look something like this:
<iframe width="560" height="315" src="https://www.youtube.com/embed/VIDEO_ID?autoplay=1" frameborder="0" allowfullscreen></iframe>. - Paste the Code in Your HTML: Now, it’s time to get your hands dirty! Paste the modified embed code into the HTML where you'd like the video to appear.
And voila! You've enabled autoplay for your YouTube video. Easy-peasy, right? Just keep in mind that some browsers may have restrictions on autoplaying videos with sound, so it's usually a good idea to test it out on various platforms.
Customizing the Video Player Settings
Now that you've successfully enabled autoplay, let’s talk about how you can customize your YouTube video player settings for an even better viewing experience. After all, who doesn't love a tailored touch?
- Controls: You can control whether the viewer sees playback controls. Just add `&controls=0` for no controls or `&controls=1` for standard controls. The default setting is `controls=1`.
- Start Time: Want the video to start at a specific point? You can add `&start=SECONDS` to your URL. Just replace "SECONDS" with the number of seconds you want the video to begin from.
- Looping Videos: If you need your video to loop continuously, add `&loop=1`. Don't forget to include `&playlist=VIDEO_ID` to set the video you want to loop!
- Show Annotations: To toggle annotations, you can control this by adding `&iv_load_policy=1` to show them, or `&iv_load_policy=3` to hide them.
Here’s how you might piece it all together:
| Player Parameter | Value | Function |
|---|---|---|
| autoplay | 1 | Enables autoplay |
| controls | 0 or 1 | Displays or hides player controls |
| start | SECONDS | Begins video at a specific time |
| loop | 1 | Loops video |
| iv_load_policy | 1 or 3 | Show or hide annotations |
By mixing and matching these settings, you can create just the right setup for your audience, ensuring they engage with your video content in the most enjoyable way possible.
5. Testing Your Embedded Video
Once you’ve embedded your YouTube video into your HTML, it’s essential to test it to ensure everything is working as expected. Here’s a straightforward approach to make sure your embedded video is functioning correctly:
- Open Your Web Page: Start by opening the HTML page where you’ve embedded the video in a web browser. This could be Chrome, Firefox, Safari, or any other browser of your choice.
- Check Video Display: Look for the embedded video on the page. Does it display properly? Make sure it’s not cut off and that all controls (play, pause, volume) are visible.
- Autoplay Feature: Confirm that the video starts playing automatically without requiring you to click the play button. If it doesn’t, double-check your embed code for the autoplay parameter.
- Full-Page Experience: Try to view the video in full-screen mode. It should expand to fill the screen without any issues.
- Responsive Design: Resize your browser window to ensure the video adjusts correctly to different screen sizes. It should look great on both desktop and mobile devices.
Testing is a crucial step because it not only ensures functionality but also improves user experience. If everything checks out, congratulations! You're almost ready to share your video with the world.
6. Troubleshooting Common Issues
Even with the best intentions, issues can arise when embedding a YouTube video into your HTML. Here are some common problems you might encounter, along with how to fix them:
| Issue | Possible Solutions |
|---|---|
| Video Won't Play | Make sure the autoplay parameter is set correctly in your embed code. Also, check for browser autoplay restrictions. |
| Video Displaying Incorrectly | Check your CSS styles; ensure there's no styling causing the video to appear smaller or clipped. |
| Mobile Version Not Working | Confirm that your embed code uses responsive width settings (e.g., using percentages rather than fixed pixel values). |
| Video Controls Missing | Revisit your embed parameters. Make sure you haven't set 'controls=0' inadvertently. |
If you encounter any issues not listed here, don't hesitate to consult forums or support from web development communities. Remember, every problem has a solution, and you're one step closer to displaying your content flawlessly!
How to Autoplay a YouTube Video in HTML
Autoplaying a YouTube video in HTML is a simple yet effective way to engage your website visitors. With just a few lines of code, you can embed a YouTube video that starts playing automatically when the page loads. Below are the steps to achieve this.
Step-by-Step Guide
- Get the Video URL:
Visit YouTube, find the video you want to embed, and copy its URL from the browser's address bar.
- Extract Video ID:
The video ID is the part of the URL that appears after "v=". For example, in the URL
https://www.youtube.com/watch?v=dQw4w9WgXcQ, the video ID isdQw4w9WgXcQ. - Embed the Video:
Use the following HTML code snippet to embed the video with autoplay.
<iframe width="560" height="315" src="https://www.youtube.com/embed/dQw4w9WgXcQ?autoplay=1" frameborder="0" allow="autoplay; encrypted-media" allowfullscreen></iframe>
HTML Parameters Explained
| Parameter | Description |
|---|---|
autoplay=1 | Enables the autoplay feature. |
allowfullscreen | Allows the video to be viewed in full-screen mode. |
frameborder="0" | Removes the border around the iframe. |
By following these steps, you can easily implement autoplay functionality for your chosen YouTube video, enhancing user experience and encouraging visitors to engage with your content.
Conclusion
Utilizing the autoplay feature for YouTube videos in HTML can significantly increase engagement on your website, making it a valuable addition to your content strategy.


