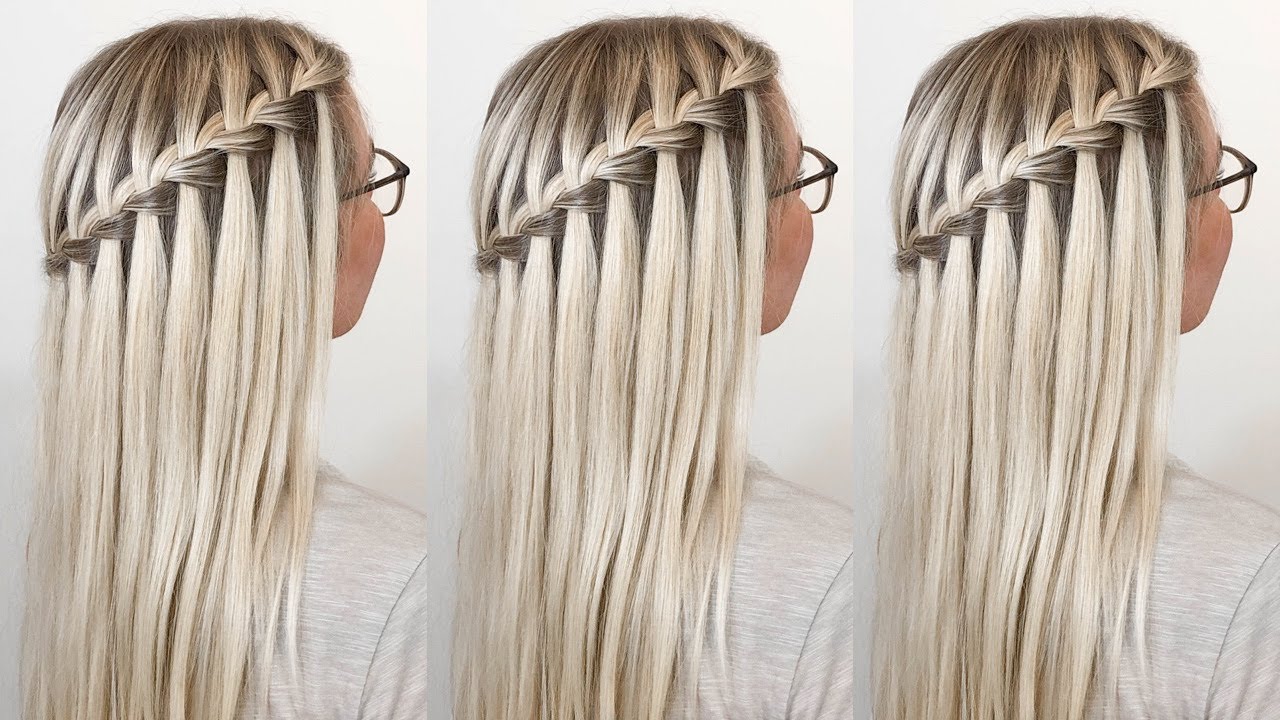
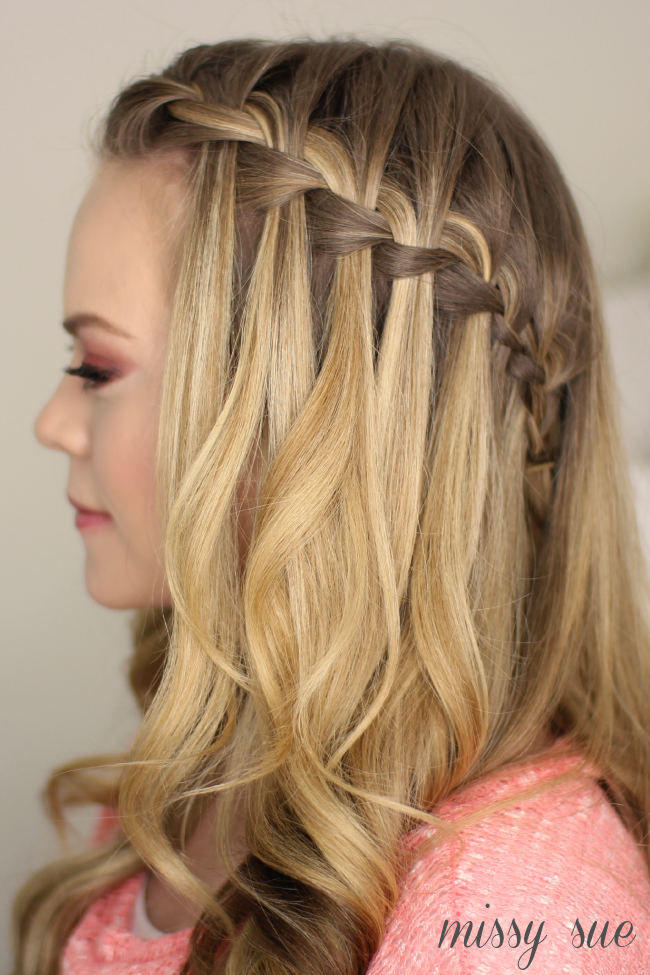
If you've ever admired intricate braids cascading down someone’s hair, you’ve likely encountered the beautiful waterfall braid. This charming hairstyle is not only a feast for the eyes but also a great way to showcase your hair’s length and texture. The waterfall braid features strands of hair that flow freely, mimicking the gentle flow of a waterfall, which makes it stand out from traditional braids. It’s perfect for any occasion—from casual outings to special events. In this post, we’ll guide you through the world of waterfall braiding, helping you create this stunning style on your own.
Essential Tools and Products Needed

Before diving into the art of waterfall braiding, it’s important to gather the right tools and products. Having everything at hand will make the process smoother, and you'll be rocking that stunning hairstyle in no time! Here’s what you’ll need:
- Hairbrush: A good quality hairbrush is essential for detangling your hair. Opt for a wide-tooth comb or a paddle brush to make the task easier.
- Hair Ties: Use clear or matching hair ties that won't stand out in the finished style.
- Bobby Pins: These little helpers will secure your braid in place, ensuring it lasts throughout the day.
- Hair Spray: A lightweight hair spray can help hold your braid in place without making it stiff. Look for a flexible option for a natural finish.
- Contouring Comb: If you're aiming for a clean, polished look, a fine-tooth comb can help you section your hair precisely.
- Hair Accessories: Optional but fun! Consider floral clips or decorative pins to enhance your waterfall braid.
With the right tools, you’ll find that creating a waterfall braid can be an enjoyable and rewarding experience. Happy braiding!
Preparing Your Hair for Braiding

Before diving into the art of creating a beautiful waterfall braid, it's essential to prepare your hair properly. Good preparation not only makes the braiding process easier but also ensures your braid looks stunning and lasts longer. Let’s go through some steps to get your hair ready:
- Start with Clean Hair: Make sure your hair is freshly washed. Clean hair is easier to manage and will hold the braid better. If your hair is particularly silky, you might want to apply a light mousse or volumizer to help with grip.
- Detangle Your Locks: After washing, gently detangle your hair using a wide-tooth comb or a soft brush. This helps prevent any knots and makes it easier to braid your hair smoothly.
- Use a Heat Protectant: If you're planning to use heat styling tools, like a curling iron or straightener, don’t forget to apply a heat protectant spray. This will keep your hair healthy and shiny.
- Consider Adding Texture: If you have fine or straight hair, adding some texture can help the waterfall braid hold better. You can either curl your hair lightly or use a texturizing spray.
- Gather Your Tools: Have some hair ties, bobby pins, and maybe some hair accessories nearby for the final touch. This way, you won’t have to scramble looking for them later.
Once your hair is clean, detangled, and prepped, you're set to go! Let’s move on to the fun part—actually creating that gorgeous waterfall braid!
Step-by-Step Guide to Waterfall Braiding

Now that your hair is prepped and ready, let’s get into the nitty-gritty of making a waterfall braid. Follow these simple steps to create a stunning look that will turn heads!
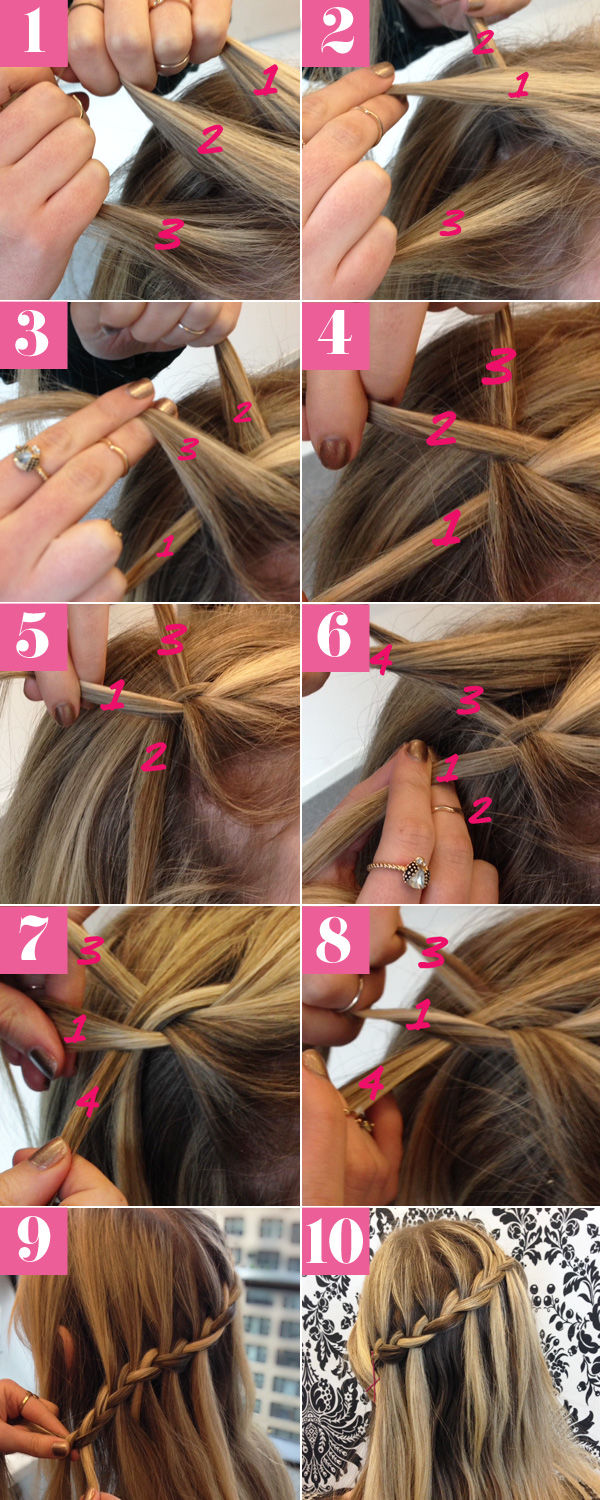
- Section Your Hair: Start by taking a section of hair from the front of your head. This section should be about 2-3 inches wide. This will form the base of your braid.
- Split the Section: Divide this section into three equal strands. This is similar to the beginning of a traditional braid.
- Braid the Strands: Begin to braid as usual—cross the right strand over the middle strand, then the left strand over the new middle strand.
- Drop and Add: Here’s where the magic happens! Instead of taking the bottom strand and crossing it over, drop it down and let it hang. Add a new section of hair from the back of your head to the remaining top strand.
- Continue the Pattern: Now, cross the top strand over the middle strand and repeat the process: drop the bottom strand, add a new section, and continue braiding.
- Secure the End: Continue this pattern until you reach the nape of your neck (or your desired length), then secure the braid with a hair tie. If you like, you can leave the rest of your hair down for a more relaxed look.
- Finish with Style: Adjust and tug on the braid gently for a fuller look. Add some decorative pins or flowers if you want to dress it up!
And voilà! You’ve created a beautiful waterfall braid. It’s a stunning style that can be worn to casual outings or more formal events. With a little practice, you’ll master this gorgeous braid in no time!
Tips for Perfecting Your Waterfall Braid
Creating a stunning waterfall braid can be quite the endeavor, but with a few expert tips, you can elevate your braiding game. Here are some key pointers to help you achieve the perfect look:
- Start with the Right Hair Texture: Make sure your hair is clean and dry. Slightly wavy hair can add texture and help the braid hold its form better.
- Use Hair Products Wisely: A light mousse or texturizing spray can add grip to slippery strands. However, avoid heavy products that might weigh your hair down.
- Sectioning is Key: Start by sectioning your hair into three equal parts. This will make the braiding process smoother and more organized. Don't rush this step!
- Keep Your Tension Even: While braiding, ensure that you maintain consistent tension. Too tight, and the braid might look stiff; too loose, and it could fall apart.
- Practice Makes Perfect: Don’t be harsh on yourself if it doesn’t look perfect on the first try. Just keep practicing, and you'll notice improvement over time!
- Accessorize Wisely: Once you've mastered your braid, consider adding some hairpins, flowers, or decorative clips. These additions can take your braid from great to stunning.
- Secure with Care: Use a clear hair tie or a small, discreet elastic to secure the end of the braid. This ensures that your hard work stays intact throughout the day.
Common Mistakes to Avoid
While attempting to create a waterfall braid, many people make a few common mistakes that can hinder their success. Let’s dive into what to watch out for:
- Rushing the Process: One of the biggest pitfalls is impatience. Take your time with each step to avoid tangles and uneven sections.
- Neglecting Hair Preparation: Skipping hair prep can be a deal-breaker. Use products that ensure your hair is manageable and easier to style.
- Ignoring Face Shape: Consider your face shape when positioning the braid. For example, a braid that’s too tight and pulled back can elongate your face, while a looser look may complement your features better.
- Using the Wrong Tools: Using the wrong type of hair tie or clip can lead to unwanted breakage or frizz. Opt for gentle and tangle-free options to protect your locks.
- Overcomplicating the Style: While it’s fun to experiment, don’t overdo it. Keep your waterfall braid elegant and simple to maintain its beauty.
- Neglecting the Finish: Finally, don’t forget to secure your braid properly at the end. A messy finish can ruin all your hard work!
7. Styling Options for Your Waterfall Braid
Once you've mastered the art of creating a waterfall braid, it’s time to consider how you can personalize it to match your style or the occasion. There are several creative ways to style your beautiful waterfall braid, and each option provides a unique flair. Here are some popular styling ideas:
- Accessorized Waterfall Braid: Add some flair to your braid with hair accessories. Think delicate flowers, decorative pins, or even a headband. These elements can transform your simple braid into something enchanting, perfect for special events or date nights.
- Messy Waterfall Braid: If you prefer a more relaxed look, consider making your waterfall braid a bit tousled. Loosening the braid slightly after you're done can give it a soft, bohemian vibe that works beautifully for casual outings or festivals.
- Half-Up Waterfall Braid: This style combines the elegance of a waterfall braid with the effortless charm of leaving some hair down. Create a waterfall braid on top of your head and let the rest of your hair flow freely for a balanced look that's both fun and sophisticated.
- Waterfall Braid Ponytail: For a sporty twist, pull your hair back into a ponytail after creating the waterfall braid. This combination is great for keeping hair manageable while still showcasing your braid.
- Waterfall Braid Bun: If you want a more polished appearance, you can wrap the remaining hair into a bun after styling your waterfall braid. This approach is ideal for formal events or a day at the office.
Feel free to mix and match these styling options to suit your personal taste and the occasion. Experimentation is key to unlocking the full potential of your waterfall braid!
8. Conclusion: Enjoy Your Gorgeous Waterfall Braid
Congratulations on learning how to create your very own waterfall braid! It’s a stunning hairstyle that effortlessly blends elegance and charm, and there’s nothing quite like the feeling of rocking a style you’ve crafted yourself. Now that you've mastered the technique, don't hesitate to experiment with different styling options we just discussed!
As you continue to practice, you’ll find that your skills improve, allowing you to create even more intricate variations. Remember, the allure of the waterfall braid lies in its versatility—whether you’re dressing it up for a wedding or keeping it casual for a day out, this hairstyle adapts beautifully to any setting.
Moreover, don’t forget to take care of your hair before styling. Healthy hair leads to greater results, so make sure to nourish and hydrate it regularly. Keep your hair shiny and strong, and your waterfall braid will always look gorgeous!
Ultimately, the most important part is to have fun with your hair. Enjoy the compliments you'll receive, and bask in the confidence that comes from wearing a hairstyle you love. So go ahead, rock that gorgeous waterfall braid and strut your stuff with pride!


